Generate Automated ros_control Plugin for 3-D Shape Tracing Manipulator
3-D shape tracing enables robotic manipulators to perform tasks that require a high level of detail and consistency, such as welding complex structures, applying coatings to irregular surfaces, or conducting non-destructive testing.
In this example, you configure a Simulink® model as a 3-D shape tracing controller, generate C++ code for the ros_control package. You then deploy the plugin on a virtual machine running Gazebo® to control a Universal Robot (UR) manipulator.
This example then shows how you can get sensor data from the Gazebo world into MATLAB®, and use the senor data to generate waypoints for 3-D shape tracing. You then publish the generated waypoints to the deployed UR manipulator controller to perform 3-D shape tracing. The steps involved in perception and waypoint generation are:
Use depth camera point cloud to get a model of the 3-D shape in the Gazebo world.
Generate 3-D poses for shape tracing in the robot task space for the model.
Calculate the UR manipulator joint configurations for those 3-D poses using inverse kinematics.
Publish the waypoints to the deployed controller so that the UR manipulator traces the 3-D shape.
Connect to ROS Device
This example uses a virtual machine (VM) with Gazebo world with a UR manipulator and the setup for 3-D shape tracing. Download the virtual machine and start it using instructions in Get Started with Gazebo and Simulated TurtleBot (ROS Toolbox)
Connect to the VM.
d = rosdevice("192.168.192.128","user","password");
runCore(d)
rosinit(d.DeviceAddress,11311)
Initializing global node /matlab_global_node_71296 with NodeURI http://192.168.192.1:56595/ and MasterURI http://192.168.192.128:11311.
rng(0)
Inspect 3-D Shape Tracing Controller Model
The model implements a joint position controller for 3-D shape tracing using a UR manipulator. The controller subscribes to the joint_space_waypoints topic where you can publish joint-space waypoints corresponding to the desired 3-D shape. At each time step, the controller ensures that the manipulator traces a smooth minimal-jerk trajectory along the 3-D shape waypoints. After the last waypoints is reached, the controller reverses direction of shape tracing along the 3-D shape all the way to the first waypoint.
The controller also provides two dynamic reconfigurable parameters.
Hold - A boolean parameter which you can enable to hold the robot in the current position.
Speed - A slider gain parameter which you can use to increase or decrease the speed of robot motion.
open_system("shapeTracingController.slx")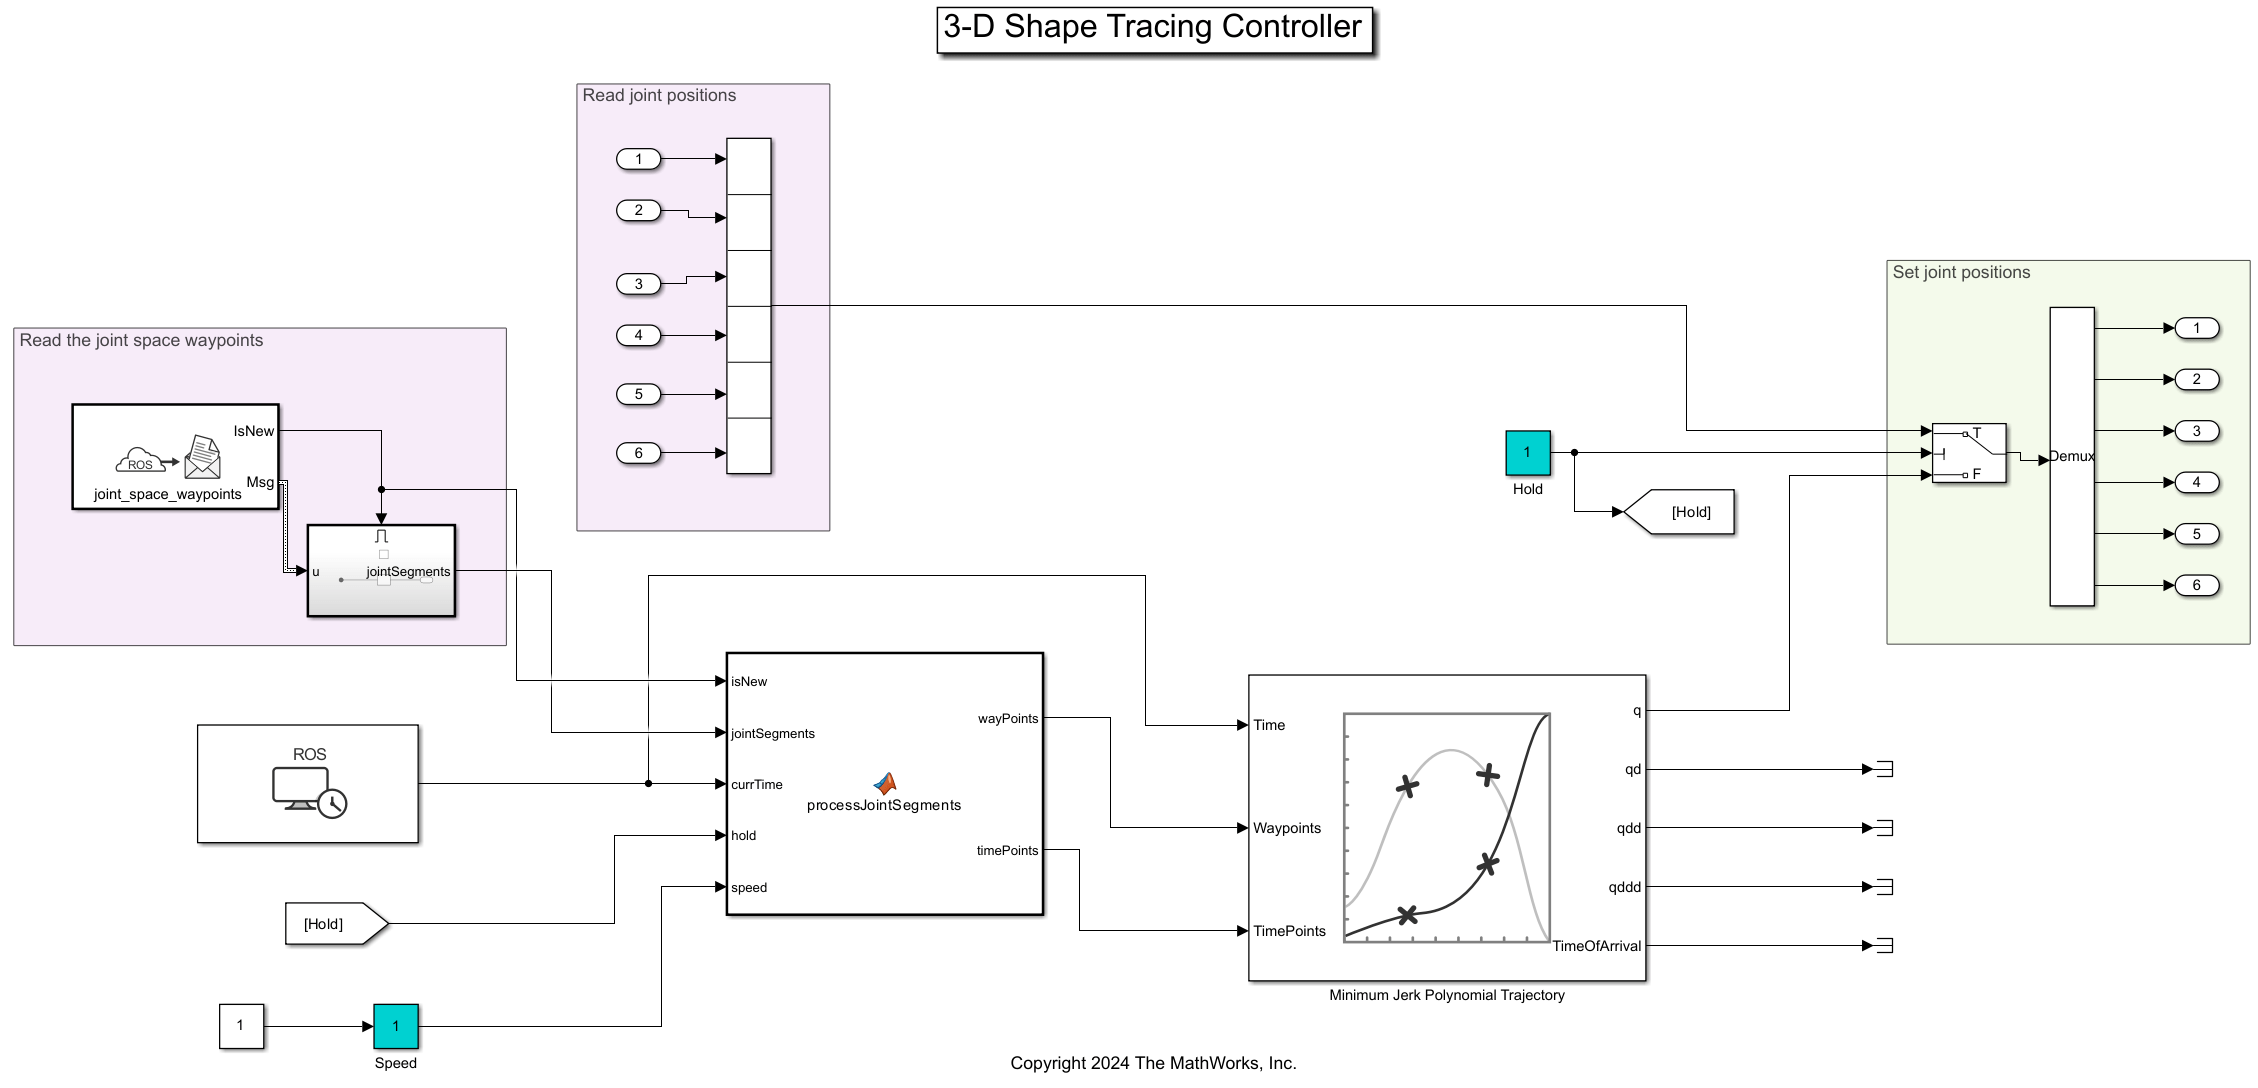
Deploy ROS Control Plugin for Shape Tracing Controller
Under ROS tab from the Prepare section, open ROS Control Settings. Verify that the input and output ports are set to PositionJointInterface with the correct joint names. You can also verify the two dynamic reconfigurable parameters are selected and the Generate ros_control controller package checkbox is enabled. Click OK.

Verify the remote device settings in the model. Ensure that they match the settings for your remote device.
To build and deploy the model, under ROS tab, from the Deploy section, click Build Model. This generates C++ code for the ROS Control plugin and deploys it to the catkin workspace on the remote device. It then builds the catkin workspace on the remote device. You can see the output of the build process in the diagnostics panel of the model.
Register Deployed ROS Control Plugin with UR Manipulator in Gazebo
The deployed ROS control plugin must be registered as a controller for the UR manipulator in Gazebo. For this example, the controller is already registered with the UR manipulator. If you change the parameters such as the controller class name or deploy to a different robot, you must manually register the controller using these steps:
In the catkin workspace where the plugin is deployed, navigate to the folder
src/shapetracingcontroller/config.Open the
controllers.yamlfile and copy the contents to the controller configuration YAML file corresponding to your robot.
Inspect Gazebo World for Shape Tracing
In the VM desktop, click UR Shape Tracing icon. This launches the gazebo world where a UR manipulator is present along with a part whose 3-D shape tracing is desired. The world also includes a depth sensor mounted on the same platform as the UR manipulator overlooking the part.
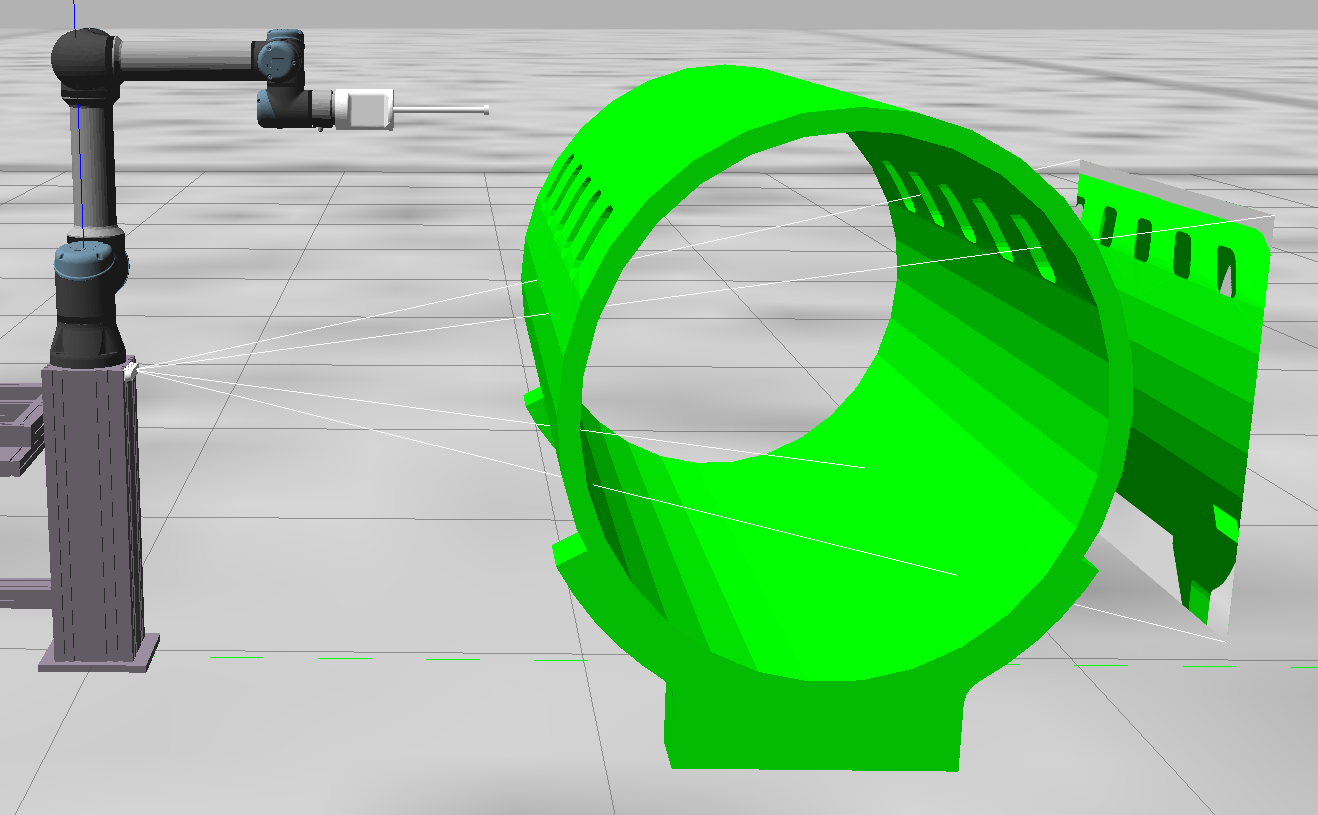
Unpause physics simulation in Gazebo.
physicsClient = rossvcclient("gazebo/unpause_physics");
physicsResp = call(physicsClient,Timeout=3);
Generate Model for Desired 3-D Shape Using Depth Sensor Point Cloud
Get the point cloud published by the depth sensor.
pcSub = rossubscriber("/camera/depth/color/points",DataFormat="struct");
pcloudXYZ = rosReadXYZ(receive(pcSub,10),PreserveStructureOnRead=true);
Transform the point cloud to the world frame. Visualize the point cloud.
camera_eul = [0 0 pi/2];
camera_translations = [0.033 0.089 0.599];
rotm = eul2rotm(camera_eul,"ZYX");
tform = rigid3d(rotm,camera_translations);
pcloud = removeInvalidPoints(pointCloud(double(pcloudXYZ)));
pcloud = pctransform(pcloud,tform);
pcshow(pcloud)
xlabel('x')
ylabel('y')
zlabel('z')
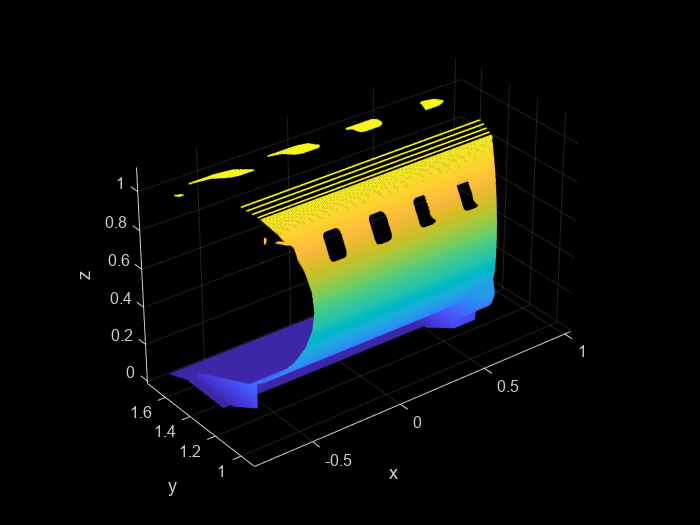
Filter out points to create a desired region for shape tracing which aligns closely with the task space of the robot using these steps:
Segment the point cloud to only include points corresponding to the cylindrical section of the part using the
pcsegdist(Computer Vision Toolbox) function.Clip the point cloud to only include points above a cutoff height. For this example, the cutoff height is 0.1m below the height of the robot.
robotHeight = 0.625;
cutOffHeight = robotHeight-0.1;
% Segment and retain points for the cylindrical section
[labels,numClusters] = pcsegdist(pcloud,0.01);
N = histcounts(labels,numClusters);
[~,maxLabelIdx] = max(N);
fuselageLabelIdxs = find(labels==maxLabelIdx);
fuselagePCloud = select(pcloud,fuselageLabelIdxs);
% Clip points below the cut off height
fuselagePCloud = pointCloud(fuselagePCloud.Location(fuselagePCloud.Location(:,3)>cutOffHeight,:));
pcshow(fuselagePCloud)
xlabel('x')
ylabel('y')
zlabel('z')
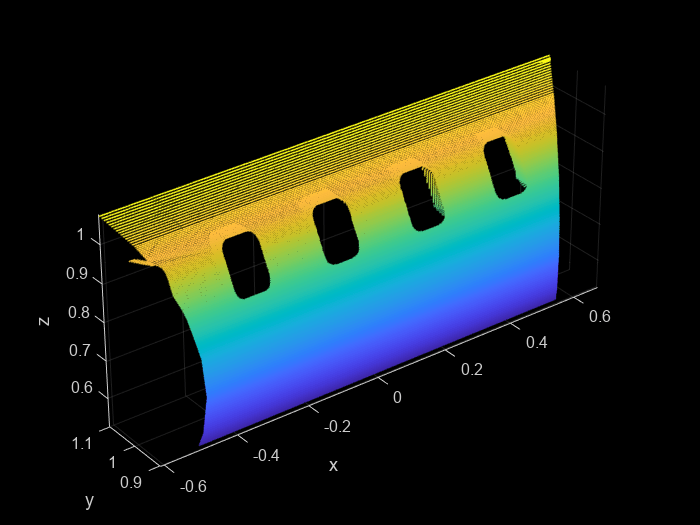
Fit a cylindrical model to the point cloud to get the 3-D model for the desired shape using the pcfitcylinder (Computer Vision Toolbox) function. Extract the points corresponding to the fitted cylinder.
[cylModel,inlierIndices,~,meanError] = pcfitcylinder(fuselagePCloud,0.005,MaxNumTrials=6000,Confidence=99.5);
pcCyl = select(fuselagePCloud,inlierIndices);
Generate Task-Space Poses for 3-D Shape Tracing Waypoints
To generate task-space poses for the waypoints, you must calculate the desired position and orientation at each waypoint.
To get the waypoint positions, downsample the point cloud associated with the fitted cylindrical shape. Use gridAverage method for downsampling so that you get evenly spaced points.
pc = pcdownsample(pcCyl,"gridAverage",0.05);
xyz = pc.Location;
For several shape tracing applications, the desired manipulator orientation is to remain perpendicular to the surface throughout the process. To get orientations perpendicular to the 3-D surface, you must calculate normal vectors at each point of the downsampled point cloud.
The downsampled point cloud contains fewer points which may not be enough for accurate calculation of normal vectors. Hence, use these steps to calculate the normal vectors at each point of the downsampled point cloud:
Calculate normals for the point cloud assocaiated with the fitted cylindrical shape using the
pcnormals(Computer Vision Toolbox) function.Filter out the normals correspoinding to the points closest in distance to those in the downsampled point cloud.
Align all normal vectors to point in the direction away from the sensor.
D = pdist2(pcCyl.Location,pc.Location);
[~,closestIndices] = min(D,[],1);
normals = pcnormals(pcCyl,200);
normals = normals(closestIndices,:);
normals = -helperFlipNormalsTowardsSensor(normals,camera_translations,xyz);
Get waypoint orientations by calulcating the pitch and yaw euler angles for the normal vector orientation. The roll angles at all waypoints will be zero because roll information cannot be calculated based on a single vector.
yaw = atan2(normals(:,2),normals(:,1));
pitch = atan2(-normals(:,3),sqrt(normals(:,1).^2 + normals(:,2).^2));
roll = zeros(size(yaw));
rpy = [yaw pitch roll];
To maintain a safety distance from the part, translate the waypoint positions 0.05m away from the part along the direction of the normal vectors.
xyz = xyz - 0.05*normals;
Move the origin of the waypoint coordinates along Z- axis to the height of the robot. This is required so that the origin of the waypoints coincides with the robot location in the world coordinates.
xyz = xyz - [0 0 robotHeight];
Next, sort the waypoints to create a path for shape tracing using the helperCreatePathFromWayPoints function. The helperCreatePathFromWayPoints function plans a basic coverage path which moves the robot in the XZ- plane in a serpentine or reciprocating motion. This ensures complete coverage of the desired 3-D surface while tracing.
[xyz,rpy,idx] = helperCreatePathFromWaypoints(xyz,rpy);
normals = normals(idx,:);
Generate Joint-Space Waypoints from Task-Space Poses Using Inverse Kinematics
Load the UR manipulator model. Add the end effector gripper link. Set the joint position limits and home position.
robot = importrobot('universalUR5e.urdf',DataFormat='column');
helperAddGripper(robot);
robot.Bodies{3}.Joint.PositionLimits = [0 pi];
robot.Bodies{4}.Joint.PositionLimits = [-pi 0];
homeConfig =  [pi/2 -pi/2 pi/2 0 pi/2 0]';
Create SE(3) homogeneous transformations from task space poses. Apply a static transformation to account for the orientation of the end-effector coordinate frame with the manipulator base-link frame. This transformation is needed as the end effector is not directly actuated.
clear temp
numPoints = length(rpy);
tfs = eul2tform(rpy,"ZYX");
tfs = pagemtimes(eul2tform([0 0 -pi/2],"ZYX"),tfs); % Static transform between robot base and end effector
temp(:,1,:) = xyz';
tfs(1:3,4,:) = temp;
tfs(4,4,:) = 1;
Visualize the robot, waypoints positions and orientation vectors.
figure
show(robot,homeConfig);
hold on

plot3(xyz(:,1),xyz(:,2),xyz(:,3),'b',LineWidth=2);
quiver3(xyz(:,1),xyz(:,2),xyz(:,3),normals(:,1),normals(:,2),normals(:,3),Color='g',LineWidth=2);
view(71,14)
axis([-1 1 -1 1 -1 1])
hold off

Calculate joint-space waypoints using the inverseKinematics object for the robot.
ik = inverseKinematics(RigidBodyTree=robot,SolverAlgorithm='BFGSGradientProjection');
initialGuess = homeConfig;
weights = [0.01 1 1 1 1 1];
eeName = 'Bellow';

jointConfigs = [];

for i = 1:numPoints
    pose = tfs(:,:,i);
    [currJConfig,solInfo] = ik(eeName,pose,weights,initialGuess);
    if solInfo.PoseErrorNorm>=0.01
            fprintf("Pose error %.2f in index %d at coordinate %.2f %.2f %.2f\n",solInfo.PoseErrorNorm,i,pose(1:3,4)');
    else
            initialGuess = currJConfig;
    end
    jointConfigs = [jointConfigs,(currJConfig)];
end
Visualize the robot motion along the waypoints.
figure
set(gcf,'Visible','on');
for i = 1:length(jointConfigs)
    show(robot, jointConfigs(:,i),'PreservePlot',false,'FastUpdate',true);
    hold on
    plot3(xyz(:,1),xyz(:,2),xyz(:,3),'b',LineWidth=2);
    quiver3(xyz(:,1),xyz(:,2),xyz(:,3),normals(:,1),normals(:,2),normals(:,3),Color='g',LineWidth=2);
    view(71,14)
    axis([-1 1 -1 1 -1 1])
    drawnow
end

Publish Joint-Space Waypoints to Deployed Controller
Start the deployed shape tracing controller. This example uses the ros_control controller manager services to start the deployed controller. Alternatively, you can use the rqt_controller_manager on the ROS device to use the controller manager UI to start the controller.
controllerName = 'sl_shapeTracingController';
allServices = rosservice("list");
startCtrlSvcName = allServices(endsWith(allServices,'/switch_controller'));
[startCtrlSvc,startCtrlMsg] = rossvcclient(startCtrlSvcName{1},Dataformat="struct",Timeout=10);
startCtrlMsg.StartControllers = {controllerName};
startCtrlMsg.Strictness = startCtrlMsg.BESTEFFORT;
startCtrlMsg.StartAsap = true;
call(startCtrlSvc,startCtrlMsg)
ans = struct with fields:
    MessageType: 'controller_manager_msgs/SwitchControllerResponse'
             Ok: 1
Use the rospublisher (ROS Toolbox) object to publish the joint-space waypoints to the topic joint_space_waypoints topic.Include both the controller and robot namespace prefixes for the topic name.
[segmentPublisher,msg] = rospublisher('/ur/sl_shapeTracingController/joint_space_waypoints','std_msgs/Float64MultiArray',DataFormat='struct');
msg.Data=reshape(jointConfigs,1,numel(jointConfigs),1);
segmentPublisher.send(msg);
From the VM desktop open a new terminal by clicking on the ROS Noetic Terminal icon. Open the dynamic configurable parameters by exececuting this command. The dynamic reconfigure window opens.
$ rosrun rqt_reconfigure rqt_reconfigure

By default, the Hold_value parameter is enabled to keep the robot in the home position. Disable the hold by unchecking the Hold_value parameter. The manipulator now starts to move along the waypoints tracing the shape of the part perfectly with the end effector being normal to the surface at all points.
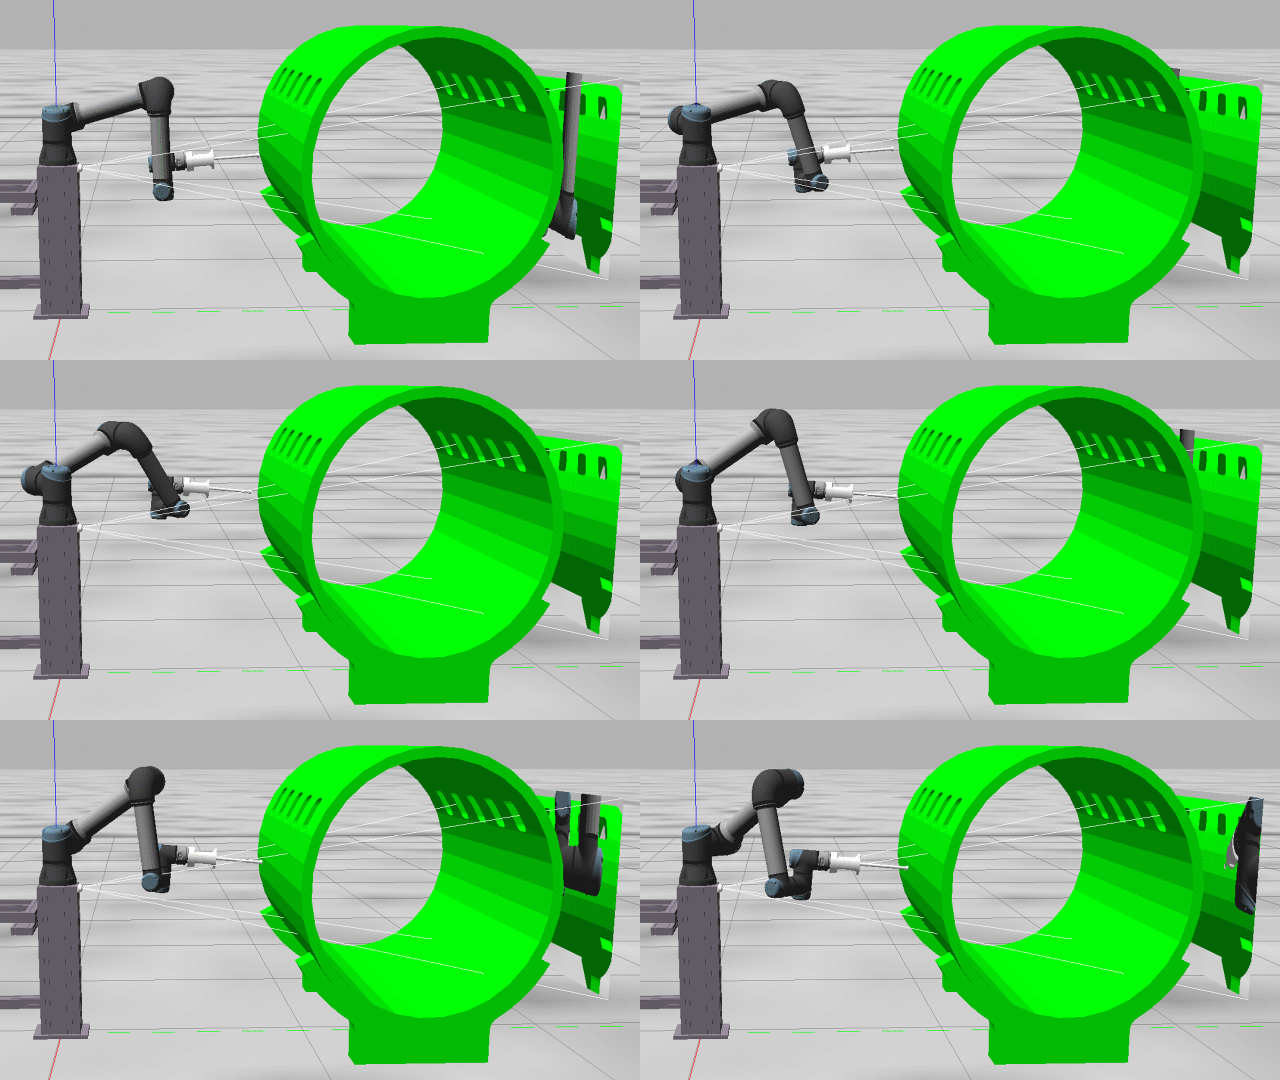
Shutdown the global MATLAB node.
rosshutdown
Shutting down global node /matlab_global_node_71296 with NodeURI http://192.168.192.1:56595/ and MasterURI http://192.168.192.128:11311.