Follow Set of Waypoints Using Parrot Minidrone
This example shows how to fly a Parrot® minidrone using Simulink® Support Package for Parrot Minidrones by configuring the path planning algorithm to follow a set of waypoints.
Note: This example requires you to additionally install the UAV Toolbox from MathWorks®.
Prerequisites
If you are new to Simulink, complete the Create a Simple Model.
To setup and run Simulink model on a Parrot minidrone, follow the example described in Spin the Motors of a Parrot Minidrone Without Flying the Drone.
Required Hardware
To run this example, you must have the following hardware:
Parrot Rolling Spider Or Parrot Mambo minidrone with a fully charged battery and propellers connected to the motors
Micro USB type-B cable
Bluetooth® Low energy (BLE) 4.0 support on the host computer
Required Products
Simulink Support Package for Parrot Minidrones
UAV Toolbox
Aerospace Blockset™
Aerospace Toolbox
Control System Toolbox™
Signal Processing Toolbox™
Simulink 3D Animation™
Model
The support package includes an example project that start the flight of Parrot minidrone and follows a pre-configured set of waypoints, for the flight's path.
Open the parrotMinidroneWaypointFollower project that uses a set of waypoint by executing this command at the MATLAB® command prompt.
openExample('parrot/FollowWaypointsParrotMinidroneFlightExample');
Note: If you are using R2023a or an earlier version of Simulink Support Package for Parrot Minidrones, then you can run the following command at the MATLAB command prompt to launch the project.
parrotMinidroneWaypointFollowerStart
To access the archived documentation page from previous release, see Follow Set of Waypoints or Follow Orbit Using Parrot Minidrone (R2023a).
Task 1: Simulate the Drone in 3D Simulator Window
1. Open the example project.
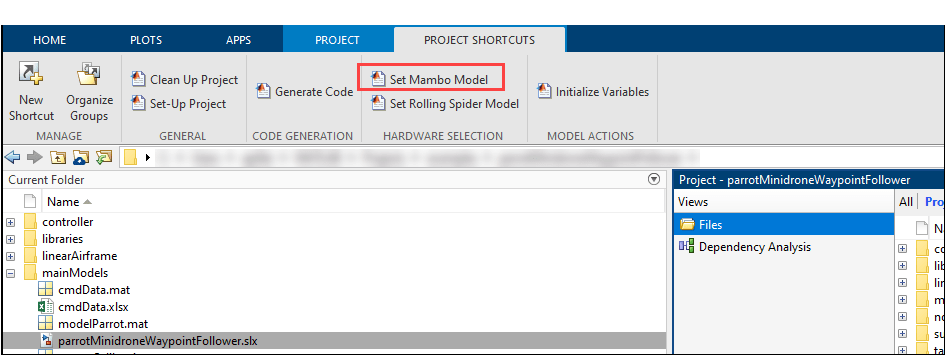
2. Once the Simulink project is open, click the Project Shortcuts tab on the MATLAB window and click the type of drone you are using. For example, if you are using Parrot Mambo, click Set Mambo Model.

3. To simulate the model, go to the Simulation tab of the Simulink model window and click Run. The lower-left corner of the model window displays status while Simulink prepares to run the model on the host computer.
Observe that the drone in the Minidrone Flight Visualization 3D Simulator takes off and starts flying along a square path twice, and then stops.
Note: The command openExample('parrot/FollowWaypointsParrotMinidroneFlightExample') creates a new project everytime you run the command. The modifications (if any) that you made in the previous project will not appear in the new project.
Task 2: Configure Waypoint Follower and Landing Logic in Path Planning Subsystem
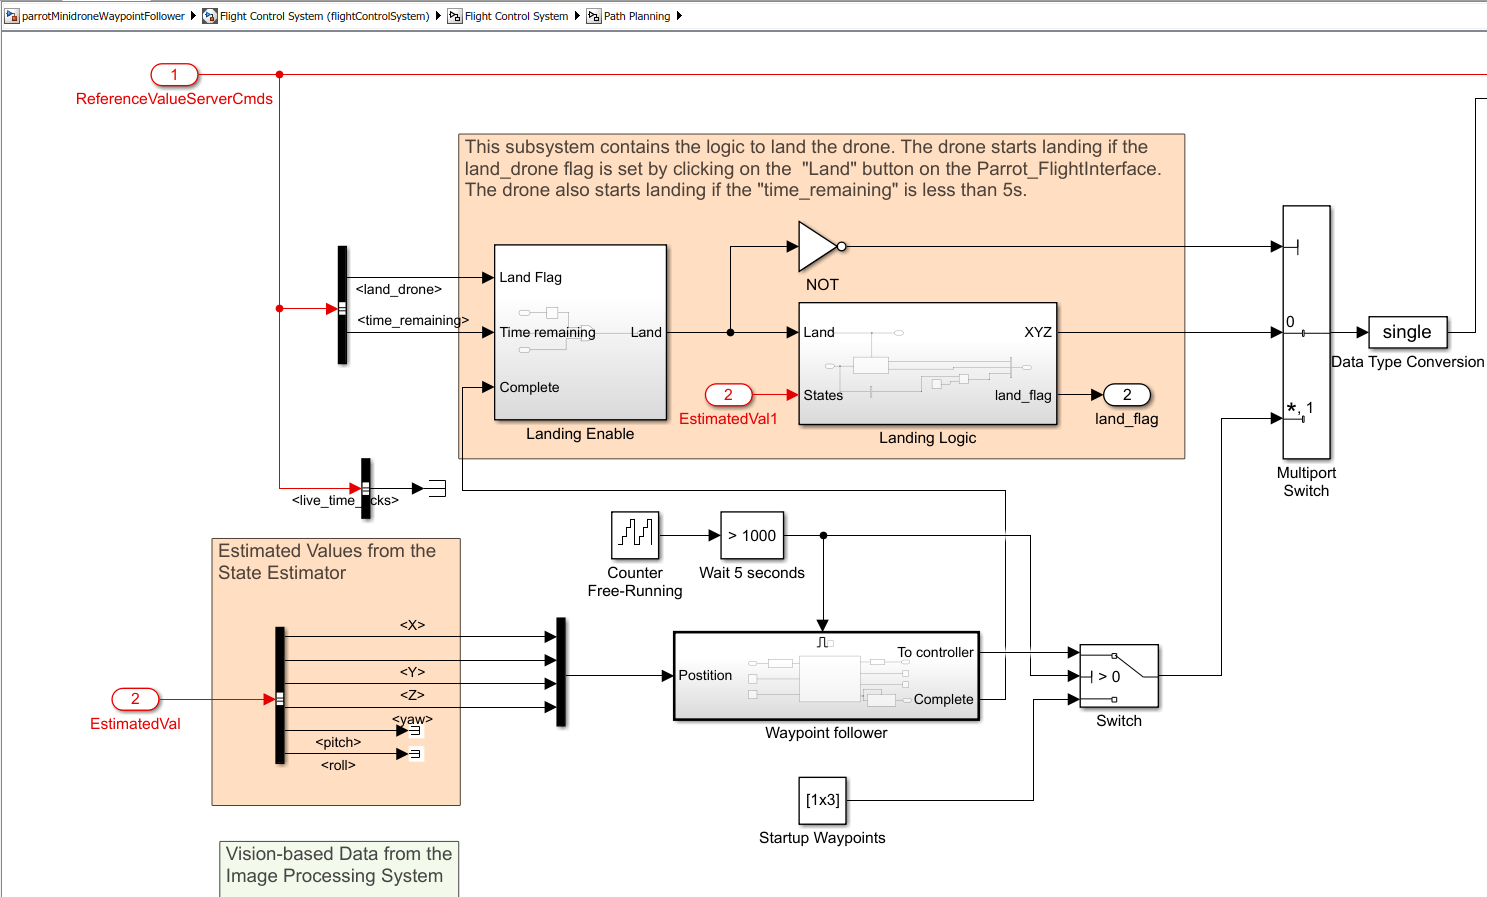
In the parrotMinidroneWaypoint Simulink model, the waypoints and landing logic are modeled inside Flight Control System > Path Planning subsystem. Double-click the Path Planning subsystem to view the logic.

There are two subsystems inside the Path Planning subsystem:
Waypoint Follower
The Waypoint Follower subsystem contains the Waypoint Follower block (from UAV Toolbox).

This subsystem is used in the parrotMinidroneWaypointFollower project for the following:
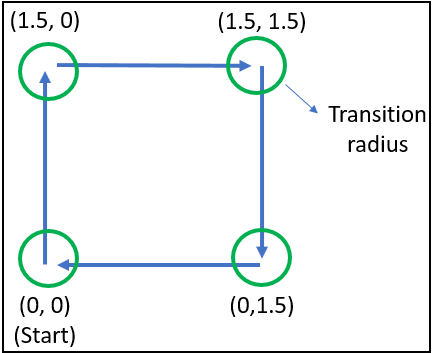
Define the set of waypoints for Parrot minidrone to follow, using [x y z] coordinates. In this project, we use nine waypoints (with the first point defining the drone's initial position among the waypoints, and the remaining points defining the complete square path that the drone navigates twice). The waypoints are defined using a Constant block connected to the Waypoints input of Waypoint Follower block, by entering the Constant value as follows:
[0 0 -1; 1.5 0 -1; 1.5 1.5 -1; 0 1.5 -1; 0 0 -1; 1.5 0 -1; 1.5 1.5 -1; 0 1.5 -1; 0 0 -1]
Here the z axis value -1 represents the height (1 meter) at which the drone navigates along the square path.

In the Waypoint Follower block, we also set the value of the Transition radius parameter as 0.3. When the drone is approaching a waypoint, this value is used as the radius around the waypoint within which the drone starts moving towards the next point. For example, if the Transition radius is set as 0.3m, and the drone is 0.3m away from the waypoint, the drone starts moving towards the next waypoint. The accuracy of reaching a specified waypoint increases with a decrease in the value of Transition radius.
Define the lookahead distance of the Parrot minidrone while it is navigating along the path. In this project, we use 0.25 meters as the lookahead distance. This value is proportional to the speed at which the drone is going to fly (if you increase the value of lookahead distance, the drone moves fast along the waypoints).
Update the status once the navigation of the drone along the square path is completed. In this project, the navigation complete status (obtained from the Status port of the Waypoint Follower block) is communicated to the Landing Logic subsystem to land the drone.
Task 3: Deploy the Waypoint Follower Model on Parrot Minidrone
1. In the Modeling tab of Simulink model window, click Model Settings to open the Configuration Parameters dialog box.
2. Go to the Hardware Implementation pane, and select the drone from the Hardware board list - either Parrot Mambo or Parrot Rolling Spider. Click Apply and then OK.
3. In the Hardware tab the Simulink model window, click Build, Deploy & Start. The lower-left corner of the model window displays status while Simulink prepares, downloads, and runs the model on the hardware.
After the model is successfully deployed, the Parrot minidrone takes off from the ground to a height of 1 meter and starts moving along the x-axis for 1.5 meters. The drone completes the square path twice (as defined using waypoints), finally initiates the landing logic, and then shuts down the motors when it reaches a height of 0.3 meters from the ground.
Other Things to Try
In the Waypoint Follower subsystem, try performing the following and observe the changes in the flight of the drone:
Change the set of waypoints that define the path followed by the drone.
Change the Look ahead distance.