Develop Robot Navigation System Using Raspberry Pi and Simulink
This example illustrates how to use the Simulink® Support Package for Raspberry Pi® Hardware to develop a robot navigation system.
Introduction
The support package enables you to build robot navigation system by interfacing sensors, motors, webcam and configuring the GPIO pins of Raspberry Pi Hardware board. These robots are capable of path following and obstacle detection by using the information received from sensors and camera feed. This example uses two IR sensors to detect whether the robot moves along the specified path and a USB or web camera to detect any obstacles in the path. You can consider black patch on a white surface as the path for the robot. In this example, the stop signal traffic signs in the path are considered as obstacles.
This example shows how to develop and deploy a robot navigation system using the Raspberry Pi hardware and Simulink.
Prerequisites
MathWorks® Raspbian image for Deep Learning which have the OpenCV library installed.
Complete the Get Started with Simulink Support Package for Raspberry Pi Hardware example.
Required Hardware
To run this example, you need the following hardware.
Raspberry Pi hardware board
IR sensors
USB camera or webcam
Motors
Motor driver hardware such as L298 driver
Batteries
Chassis with wheels to set up the above hardware and make a robot
Physically marked path for the robot to follow with obstacles or objects
Hardware Setup
Setup a robot with motor drive wheels and Raspberry Pi board mounted on it.
Use two motors to control the direction of the robot and connect them to driver hardware such as the L298 driver, as the Raspberry Pi board does not have enough current. You can power driver hardware with external power supply such as batteries. Link the two motors to two wheels of the chassis, and you can refer them as left or right depending on their connection to bot.
Connect enable pins of the driver hardware to GPIO pins of Raspberry Pi board and configure accordingly. The enable pins of the driver hardware control the start and stop actions in the left and right motors.
Connect IN1 and IN2 pins of the driver hardware corresponding to left motor to GPIO pins of Raspberry Pi board and configure them accordingly.
Connect IN3 and IN4 pins of the driver hardware corresponding to right motor to GPIO pins of Raspberry Pi board and configure them accordingly. The input pins control the motor direction.
Mount the Raspberry pi board onto the chassis with wheels robot setup.
Connect the camera and sensors to the Raspberry Pi hardware board
Connect two IR sensors to GPIO pins of Raspberry Pi hardware board.
Mount the two IR sensors near the front of the robot to receive information to detect if the robot deviates from left or right.
Connect the webcam or USB camera to Raspberry Pi hardware board and mount the camera on the front of the chassis with wheels robot setup.
Simulink Model
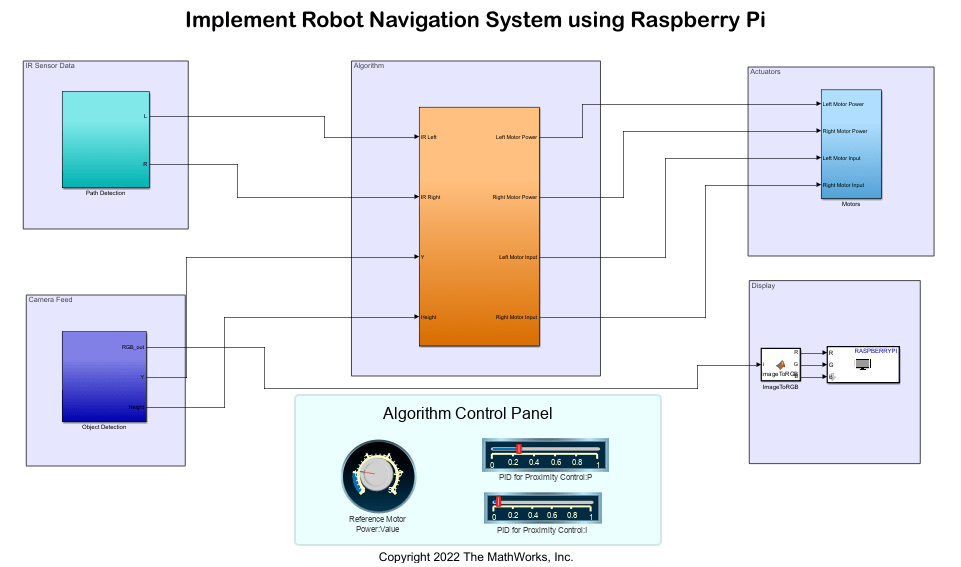
This example uses a preconfigured Simulink model from the Simulink Support Package for Raspberry Pi Hardware that enables you to develop a robot navigation system, which stops when it detects an obstacle and follows a specified path by controlling the direction of the motors and driving them in forward or left or right directions. This model have different blocks to receive left and right IR sensor data, camera feed, analyze them and to control the direction of the left and right motors.
Open the raspberrypi_robotics_navigation_obstacledetection Simulink model.

IR Sensor Data
The block represents acquisition of the IR sensor data from left and right IR sensors of the robot. This block outputs the live IR sensors data captured from left and right mounted sensors and this information is useful for path detection.

Camera Feed
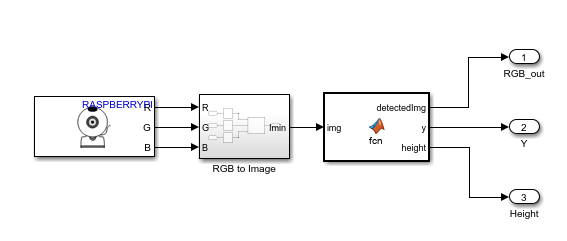
The block captures video using camera connected to Raspberry Pi Hardware board. The R, G, and B components of the video are concatenated into a single image matrix and further given as an input to the object detection algorithm block.

For more information on this object detection algorithm, refer to Get Started with Cascade Object Detector (Computer Vision Toolbox) and vision.CascadeObjectDetector (Computer Vision Toolbox). If an obstacle is detected, the image of the obstacle, the centre coordinate y and height of the bounding box are obtained and further given as an input to the Algorithm and Display subsystems of the model.
Algorithm
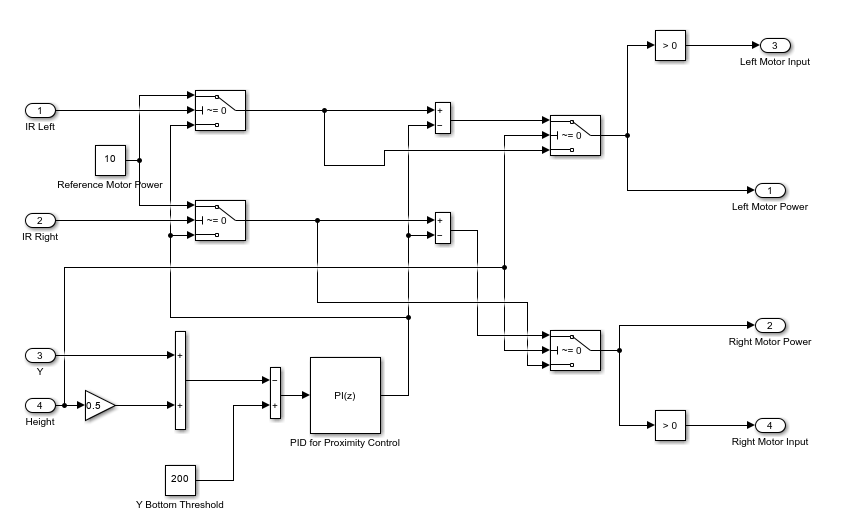
This subsystem is a representation of two factors.
1. Alignment control to the path by using the IR sensor data.
The IR sensor data decides whether the robot is following the path or deviating. If it is deviating from the path, then the subsystem instructs either to turn left or right depending on which direction the robot is deviating.
2. Proximity control to the detected obstacle by using the camera feed.
If the camera feed detects the obstacle through the object detection algorithm, the subsystem instructs the motor to stop at a proximity from the object. The bottom threshold controls the motor movement and the value on this parameter decides the maximum object distance allowed from the robot. The centre coordinate and height of the bounding box obtained from the object detection algorithm along with bottom thresholding are given as inputs to the proportional integral derivative (PID) for proximity control. The output of the PID eventually controls the amount of power delivered to the motors based on the calculated PID controller parameters, so that the speed of the robot gradually decreases as it approaches the obstacle in the specified path. The PI and bottom threshold values differ based on the setup.

Actuators
The subsystem receives input from the algorithm area where the IR sensor data and camera feed are used to control the motor power. The left and right motor inputs and power are given as input to control the direction of the motors and its proximity to the obstacle in the path. The motors either move forward or turn left or right depending on the IR sensor data information. The speed of the motors decreases smoothly and they stop at a distance from the object if an obstacle is detected from the camera feed.

Display
The image of the obstacle detected in the camera feed block is given as input to this subsystem. The SDL video display block is used to display the obstacle with bounding box from the camera feed.
Algorithm Control Panel
A customized dashboard panel is displayed in this subsystem, where you can control the reference motor power, P and I values of the PID for proximity control in an interactive way.
Deploy Simulink Model on Raspberry Pi Hardware
Follow these steps to deploy the Simulink model.
1. On the Hardware tab of the Simulink model, in the Mode section, select Run on board.
2. On the Hardware settings tab of the Simulink model, go to Hardware Implementation section and select Enable deployment for Dashboard blocks.
3. In the Deploy section of the Simulink model, click Build, Deploy & Start. The generated code is built on the Raspberry Pi hardware and runs automatically.
4. If you are using a display viewer such as VNC viewer connected to the Raspberry Pi hardware board, the default browser opens with the dash board panel for motor power control and SDL Video Display window for viewing the detected obtacle.

5. Observe the developed robot navigation system following the specified path and stopping at an obstacle by driving its motors from information acquired through the live IR sensor data and camera feed.
Other Things to Try
Follow the steps in this example and develop robot navigation system using color or ultrasonic sensors.
See Also
Get Started with Sensors for Robotics Applications Using Raspberry Pi and Simulink Online
Get Started with Motor Drives for Robotics Applications Using Raspberry Pi and Simulink
Detect Stop Signal Traffic Sign Using Raspberry Pi and Simulink
Develop Path-Following Robot Using Raspberry Pi and Simulink
Develop Obstacle Detection Robot Using ToF Sensor with Raspberry Pi