Detect Stop Signal Traffic Sign Using Raspberry Pi and Simulink
This example shows how to use the Simulink® Support Package for Raspberry Pi® Hardware to detect a stop signal traffic sign. The example uses a cascade object detector to detect a stop sign using the Viola-Jones algorithm.
Prerequisites
MathWorks® Raspbian image for Deep Learning which have the OpenCV library installed.
For more information on how to use the Simulink Support Package for Raspberry Pi, refer to Get Started with Simulink Support Package for Raspberry Pi Hardware example.
For more information on cascade object detector, see Get Started with Cascade Object Detector (Computer Vision Toolbox).
Required Hardware
To run this example, you need the following hardware.
Raspberry Pi hardware board
USB camera or webcam
Hardware Setup
Connect the webcam or USB camera to Raspberry Pi hardware board.
Train Stop Sign Detector
To set up and train a stop-sign detector, load a sample data from a MAT file. In this example, stopSignsAndCars.mat file is used for training purpose. The output from training the cascade object detector is an XML file. For more information, see Get Started with Cascade Object Detector (Computer Vision Toolbox).
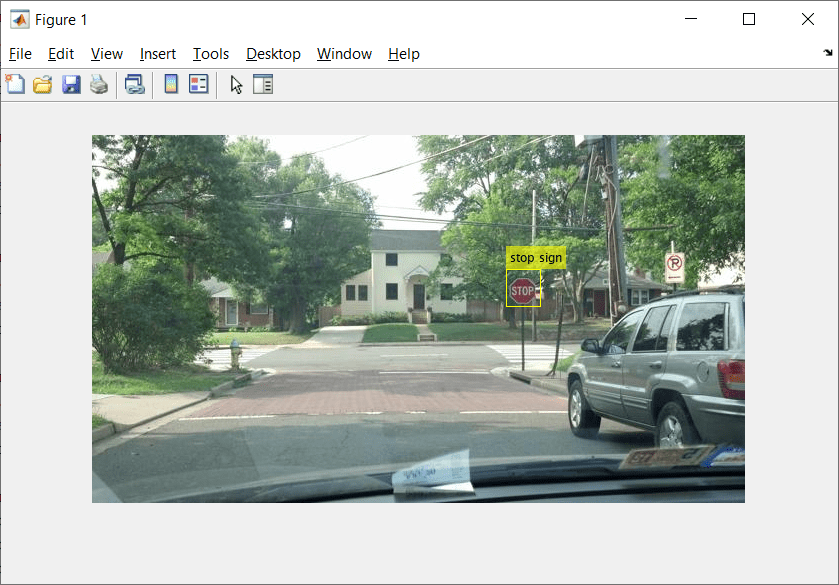
In the MATLAB® Command Window, run and execute the steps as mentioned in the Train Stop Sign Detector (Computer Vision Toolbox) section. After you complete executing the steps, a figure window opens with a bounding box drawn around the stop-sign.

Observe that the stopSignDetector.xml file is created in the current working folder of your MATLAB session.
Simulink Model
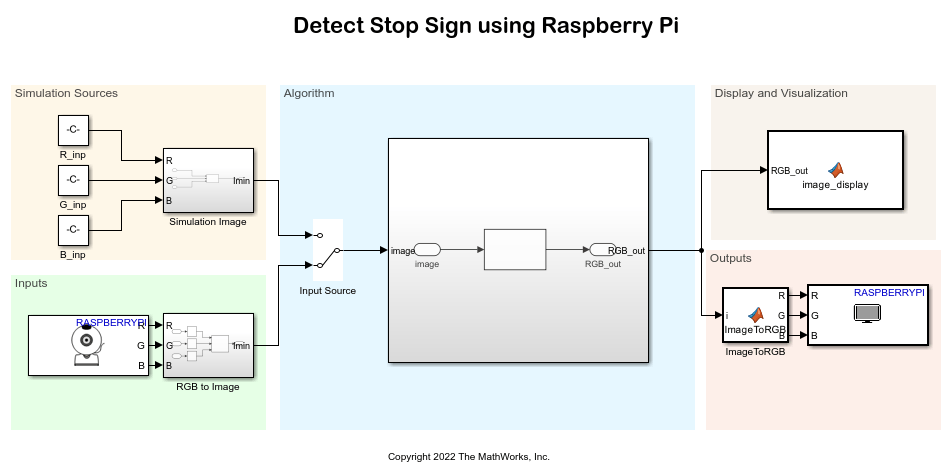
Open the raspberrypi_robotics_sign_detector Simulink model.

Simulation Sources
An image is given as an input to the Simulation sources subsystem where its R, G, and B values are combined into a single matrix and further given as an input to the Algorithm area.
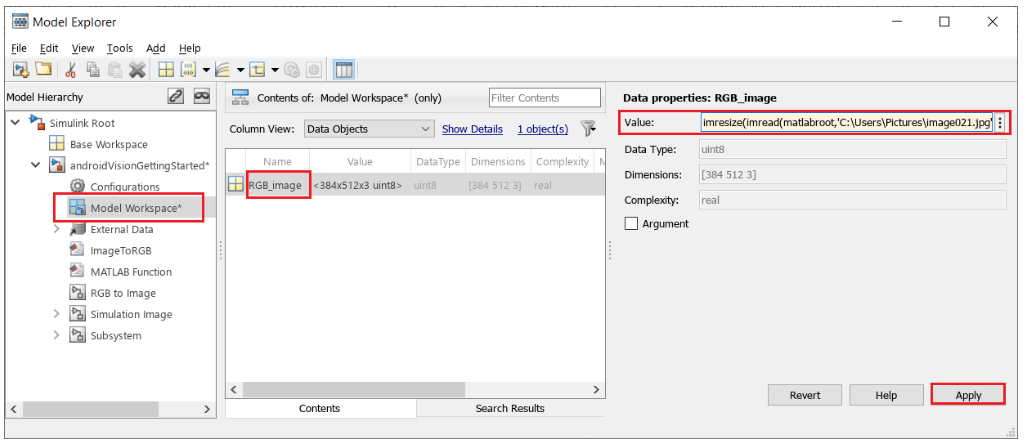
1. To change the input image in the Simulation sources subsystem, on the Modeling tab of the Simulink model, in the Design section, click Model Explorer.
2. In the Content of: Model Workspace pane, select RGB_image.
3. In the Data properties: RGB_image pane, enter the path of the simulation input image in this format: imresize(imread('Your own image path\image.jpg'), [resize value]);. For example, imresize(imread(matlabroot,'C:\Users\Pictures\image021.jpg'), [384, 512, 3]);.
4. Click Apply and close the window.

Raspberry Pi Inputs
Use the camera block to capture video using camera connected to Raspberry Pi Hardware board. This block is configured to its default parameters. The R, G, and B components of the video are concatenated into a single image matrix and further given as an input to the Algorithm area.
Algorithm

The function inside the MATLAB Function block uses the vision.CascadeObjectDetector (Computer Vision Toolbox) function to train the cascade object detector. While simulating or deploying the model, enter the path location of the stopSignDetector.xml file as an input argument to the function.
Run Simulink Model
Follow these steps to run the Simulink model.
1. In the Algorithm area, position the Manual Switch to receive output from the Simulation Sources area.
2. Open the MATLAB Function block in the Algorithm area. Enter the path location of the stopSignDetector.xml file. For example, if the stopSignDetector.xml file is present in the current working directory of MATLAB, enter
detector = vision.CascadeObjectDetector('stopSignDetector.xml');
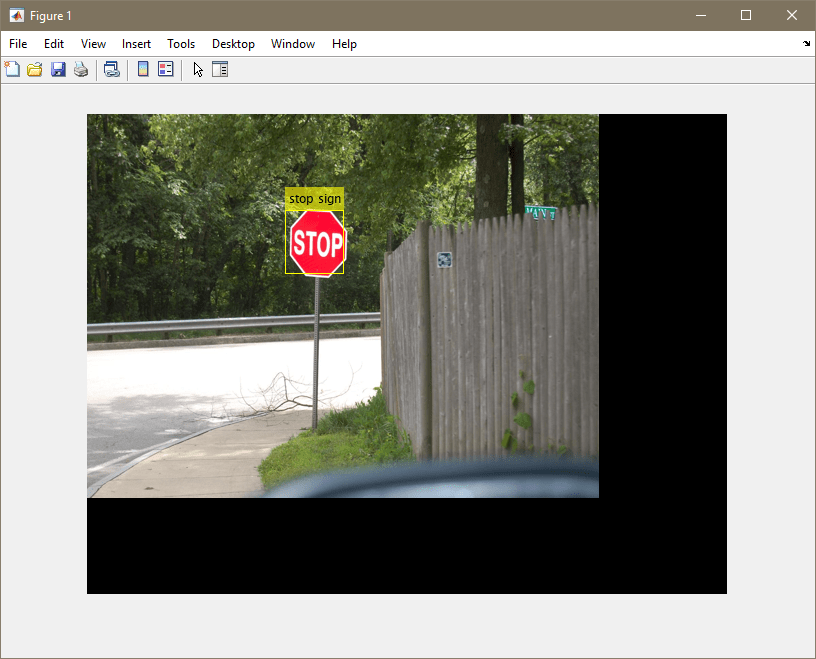
3. On the Simulation tab of the Simulink model, click Run. Observe the simulation output on the figure window.

Deploy Simulink Model
Follow these steps to deploy the Simulink model.
1. In the Algorithm area of the Simulink model, position the Manual Switch to receive output from the Raspberry Pi Input area.
2. Open the MATLAB Function block in the Algorithm area. Enter the path location of the SD card to deploy the stopSignDetector.xml file. For example, if you want to save the stopSignDetector.xml file in folder123 of the SD card on Raspberry Pi hardware board, enter
detector = vision.CascadeObjectDetector('/sdcard/folder123/stopSignDetector.xml');
3. On the Hardware tab of the Simulink model, in the Mode section, click Run on board.
4. In the Deploy section, click Build, Deploy & Start.
5. Point the camera mounted on Raspberry Pi board towards a stop sign traffic signal. Observe a bounding box around the stop sign.
See Also
Get Started with Sensors for Robotics Applications Using Raspberry Pi and Simulink Online
Get Started with Motor Drives for Robotics Applications Using Raspberry Pi and Simulink
Develop Path-Following Robot Using Raspberry Pi and Simulink
Develop Robot Navigation System Using Raspberry Pi and Simulink
Develop Obstacle Detection Robot Using ToF Sensor with Raspberry Pi