Prepare Custom Vehicle Mesh for the Unreal Editor
This example shows you how to create a vehicle mesh that is compatible with the project in the Vehicle Dynamics Blockset™ Interface for Unreal Engine® Projects support package. You can specify the mesh in the Simulation 3D Vehicle or Simulation 3D Vehicle with Ground Following block to visualize the vehicle in the Unreal® Editor when you run a simulation.
Before you start, install the Vehicle Dynamics Blockset Interface for Unreal Engine Projects support package. See Customize 3D Scenes for Vehicle Dynamics Simulations.
To create a compatible custom vehicle mesh, follow these workflow steps.
Step | Description | |
|---|---|---|
In a 3D creation environment, setup the vehicle mesh bone hierarchy and specify part names. | ||
| Step 2: Assign Materials | Optionally, assign materials to the vehicle parts. | |
| Step 3: Export Mesh and Armature | Export the vehicle mesh and armature in . | |
| Step 4: Import Mesh to Unreal Editor | Import the vehicle mesh into the Unreal Editor. | |
| Step 5: Set Block Parameters | Set up the Simulation 3D Vehicle or Simulation 3D Vehicle with Ground Following block parameters. | |
Note
To create the mesh, this example uses the 3D creation software Blender® Version 2.80.
Step 1: Setup Bone Hierarchy
Import a vehicle mesh into a 3D modeling tool, for example Blender.
Segment the vehicle mesh to control each vehicle part, including lights. To make the mesh compatible with the animation components in the Vehicle Dynamics Blockset Interface for Unreal Engine Projects support package, use this naming convention for the vehicle parts in the mesh.
Vehicle Part Name Chassis
VehicleBody
Front left wheel
Wheel_FL
Front right wheel
Wheel_FR
Rear left wheel
Wheel_RL
Rear right wheel
Wheel_RR
Steering wheel
Wheel_Steering
Left headlight
Lights_Headlight_Left
Right headlight
Lights_Headlight_Right
Front left brake caliper
BrakeCaliper_FL
Front right brake caliper
BrakeCaliper_FR
Rear left brake caliper
BrakeCaliper_RL
Rear right brake caliper
BrakeCaliper_RR
Set the vehicle body object, VehicleBody as the parent of the wheel objects and other vehicle objects.
Step 2: Assign Materials
Optionally, assign material slots to vehicle parts. In this example, the mesh uses one material for the chassis and one for the four wheels.
Create and assign material slots to the vehicle chassis. Confirm that the first vehicle slot corresponds to the vehicle body.
Create and assign material slots to the wheels.
To view the visual effects of vehicle lights, create material slots for lights in the 3D modeling tool. To make the material slot compatible with the animation components in the support package, use this naming convention for the material slots.
| Light | Name |
|---|---|
Headlight | M_Headlight |
Left indicator light | M_IndicatorlightLeft |
Right indicator light | M_IndicatorlightRight |
Brake lights | M_Brakelight |
Tail light | M_TailLight |
Reverse lights | M_Reverselight |
Step 3: Export Mesh and Armature
Export the mesh and armature in the .fbx file format. For example,
in Blender:
On the Object Types pane, select Armature and Mesh.
On the Transform pane, set:
Scale to 1.00
Apply Scalings to
All
                                        Local
Forward to
X
                                        Forward
Up to
Z
                                    Up
Select Apply Unit.
On the Geometry pane:
Set Smoothing to
FaceSelect Apply Modifiers
On the Armature pane, set:
Primary Bone Axis to
X
                                        Axis
Secondary Bone Axis to
Z
                                        Axis
Select Export FBX.
Step 4: Import Mesh to Unreal Editor
Open the Unreal Engine
AutoVrtlEnv.uprojectproject in the Unreal Editor.In the editor, click Import to import the FBX® file as a skeletal mesh. Assign the Skeleton to the
SK_PassengenerVehicle_Skeletonasset.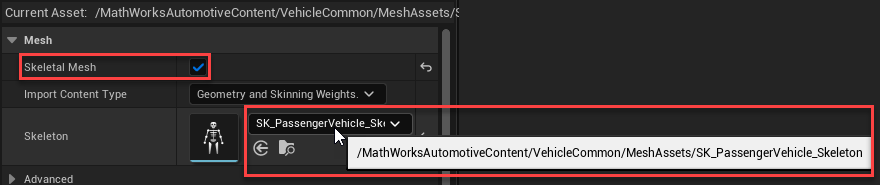
Note
If you cannot select
SK_PassengenerVehicle_Skeleton, click the gearbox. Make sure Show Engine Content and Show Plugin Content are both selected.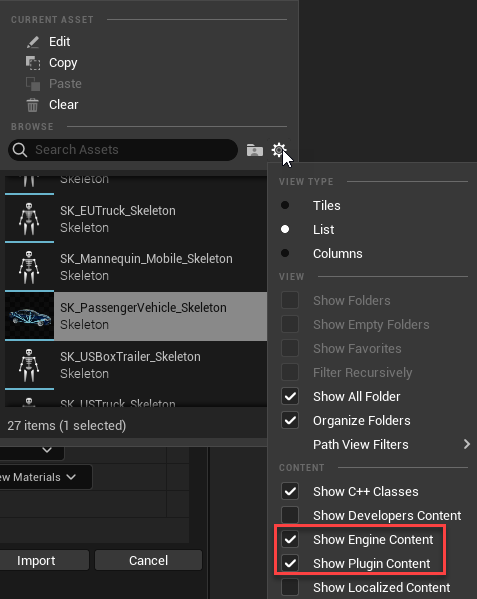
Step 5: Set Block Parameters
In your Simulink® model, set these Simulation 3D Vehicle or Simulation 3D Vehicle with Ground Following block parameters:
Type to
Custom.Path to the path in the Unreal Engine project that contains the imported mesh.
See Also
Simulation 3D Scene Configuration | Simulation 3D Vehicle with Ground Following | Simulation 3D Vehicle
Topics
- Coordinate Systems in Vehicle Dynamics Blockset
- How Unreal Engine Simulation for Vehicle Dynamics Blockset Works
- Unreal Engine Simulation Environment Requirements and Limitations