使用 YOLO v2 深度学习进行目标检测
此示例说明如何训练 you only look once (YOLO) v2 目标检测器。
深度学习是一种功能强大的机器学习方法,可用于训练稳健的目标检测器。目标检测有多种方法,包括 Faster R-CNN 和 you only look once (YOLO) v2。此示例使用 trainYOLOv2ObjectDetector 函数训练 YOLO v2 车辆检测器。有关详细信息,请参阅Getting Started with YOLO v2 (Computer Vision Toolbox)。
下载预训练的检测器
下载预训练的检测器,避免在训练上花费时间。如果要训练检测器,请将 doTraining 变量设置为 true。
doTraining = false;
if ~doTraining && ~exist("yolov2ResNet50VehicleExample_19b.mat","file")
    disp("Downloading pretrained detector (98 MB)...");
    pretrainedURL = "https://www.mathworks.com/supportfiles/vision/data/yolov2ResNet50VehicleExample_19b.mat";
    websave("yolov2ResNet50VehicleExample_19b.mat",pretrainedURL);
end
Downloading pretrained detector (98 MB)...
加载数据集
此示例使用包含 295 个图像的小型车辆数据集。其中许多图像来自加州理工学院的 Caltech Cars 1999 和 2001 数据集,由 Pietro Perona 创建并经许可使用。每个图像包含一个或两个带标签的车辆实例。小型数据集适用于探查 YOLO v2 训练过程,但在实践中,需要更多带标签的图像来训练稳健的检测器。解压缩车辆图像并加载车辆真实值数据。
unzip vehicleDatasetImages.zip
data = load("vehicleDatasetGroundTruth.mat");
vehicleDataset = data.vehicleDataset;
车辆数据存储在一个包含两列的表中。第一列包含图像文件路径,第二列包含边界框。
% Display first few rows of the data set.
vehicleDataset(1:4,:)ans=4×2 table
imageFilename vehicle
_________________________________ _________________
{'vehicleImages/image_00001.jpg'} {[220 136 35 28]}
{'vehicleImages/image_00002.jpg'} {[175 126 61 45]}
{'vehicleImages/image_00003.jpg'} {[108 120 45 33]}
{'vehicleImages/image_00004.jpg'} {[124 112 38 36]}
% Add the full path to the local vehicle data folder.
vehicleDataset.imageFilename = fullfile(pwd,vehicleDataset.imageFilename);
将数据集分成训练集、验证集和测试集。选择 60% 的数据用于训练,10% 用于验证,其余用于测试经过训练的检测器。
rng("default");
shuffledIndices = randperm(height(vehicleDataset));
idx = floor(0.6 * length(shuffledIndices) );

trainingIdx = 1:idx;
trainingDataTbl = vehicleDataset(shuffledIndices(trainingIdx),:);

validationIdx = idx+1 : idx + 1 + floor(0.1 * length(shuffledIndices) );
validationDataTbl = vehicleDataset(shuffledIndices(validationIdx),:);

testIdx = validationIdx(end)+1 : length(shuffledIndices);
testDataTbl = vehicleDataset(shuffledIndices(testIdx),:);
使用 imageDatastore 和 boxLabelDatastore 创建数据存储,以便在训练和评估期间加载图像和标签数据。
imdsTrain = imageDatastore(trainingDataTbl{:,"imageFilename"});
bldsTrain = boxLabelDatastore(trainingDataTbl(:,"vehicle"));

imdsValidation = imageDatastore(validationDataTbl{:,"imageFilename"});
bldsValidation = boxLabelDatastore(validationDataTbl(:,"vehicle"));

imdsTest = imageDatastore(testDataTbl{:,"imageFilename"});
bldsTest = boxLabelDatastore(testDataTbl(:,"vehicle"));
组合图像和边界框标签数据存储。
trainingData = combine(imdsTrain,bldsTrain);
validationData = combine(imdsValidation,bldsValidation);
testData = combine(imdsTest,bldsTest);
显示其中一个训练图像和边界框标签。
data = read(trainingData);
I = data{1};
bbox = data{2};
annotatedImage = insertShape(I,"rectangle",bbox);
annotatedImage = imresize(annotatedImage,2);
figure
imshow(annotatedImage)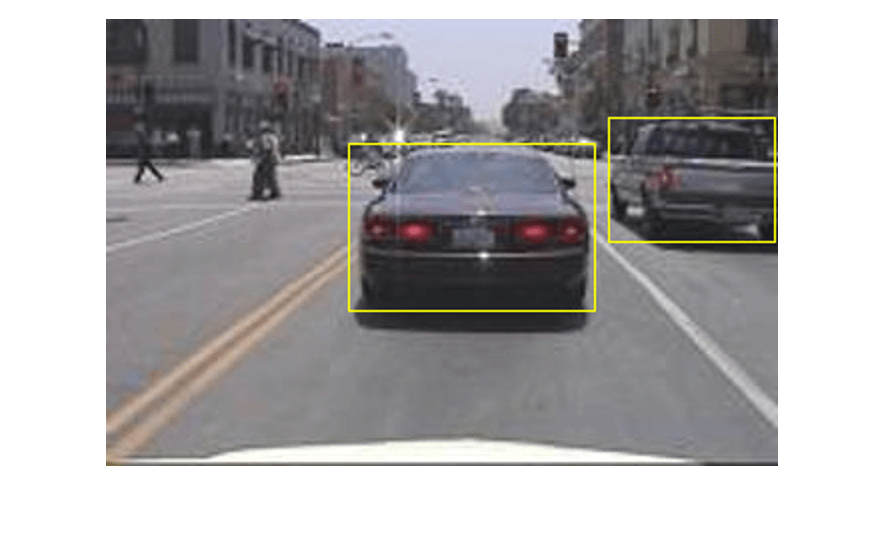
创建 YOLO v2 目标检测网络
YOLO v2 目标检测网络由两个子网络组成:一个特征提取网络后跟一个检测网络。特征提取网络通常是一个预训练的 CNN(有关详细信息,请参阅预训练的深度神经网络)。此示例使用 ResNet-50 进行特征提取。根据应用要求,也可以使用其他预训练网络,如 MobileNet v2 或 ResNet-18。与特征提取网络相比,检测子网络是小型 CNN,它由几个卷积层和特定于 YOLO v2 的层组成。
首先,指定网络输入大小和类的数量。选择网络输入大小时,请考虑网络本身所需的最低大小、训练图像的大小以及基于所选大小处理数据所产生的计算成本。如果可行,请选择接近训练图像大小且大于网络所需输入大小的网络输入大小。为了降低运行示例的计算成本,请指定网络输入大小为 [224 224 3],这是运行网络所需的最低大小。
inputSize = [224 224 3];
指定要检测的对象类的名称。
classes = "vehicle";请注意,此示例中使用的训练图像大小不同,并且大于网络输入大小 224×224。要更正此问题,请在训练前的预处理步骤中调整图像的大小。
接下来,使用 estimateAnchorBoxes (Computer Vision Toolbox) 根据训练数据中目标的大小来估计锚框。考虑到训练前会对图像大小进行调整,用来估计锚框的训练数据的大小也要调整。使用 transform 预处理训练数据,然后定义锚框数量并估计锚框。使用支持函数 preprocessData 将训练数据的大小调整为网络的输入图像大小。
trainingDataForEstimation = transform(trainingData,@(data)preprocessData(data,inputSize));
numAnchors = 7;
[anchorBoxes,meanIoU] = estimateAnchorBoxes(trainingDataForEstimation,numAnchors)
anchorBoxes = 7×2

    40    38
   156   127
    74    71
   135   121
    36    25
    56    52
    98    89
meanIoU =
0.8383
有关选择锚框的详细信息,请参阅Estimate Anchor Boxes from Training Data (Computer Vision Toolbox) (Computer Vision Toolbox™) 和Anchor Boxes for Object Detection (Computer Vision Toolbox)。
加载一个预训练的 ResNet-50 模型。
baseNet = imagePretrainedNetwork("resnet50");选择 "activation_40_relu" 作为检测网络源,以将 "activation_40_relu" 后面的层替换为检测子网络。此检测网络源层输出以 16 为因子的下采样特征图。该下采样量是空间分辨率和提取特征强度之间一个很好的折中,因为在网络更深层提取的特征能够对更强的图像特征进行编码,但以空间分辨率为代价。选择最佳特征提取层需要依靠经验分析。
detectionSource = "activation_40_relu";创建 YOLO v2 目标检测网络。
detector = yolov2ObjectDetector(baseNet,classes,anchorBoxes,DetectionNetworkSource=detectionSource);
您可以使用 analyzeNetwork 或 Deep Learning Toolbox™ 中的深度网络设计器来可视化网络。
数据增强
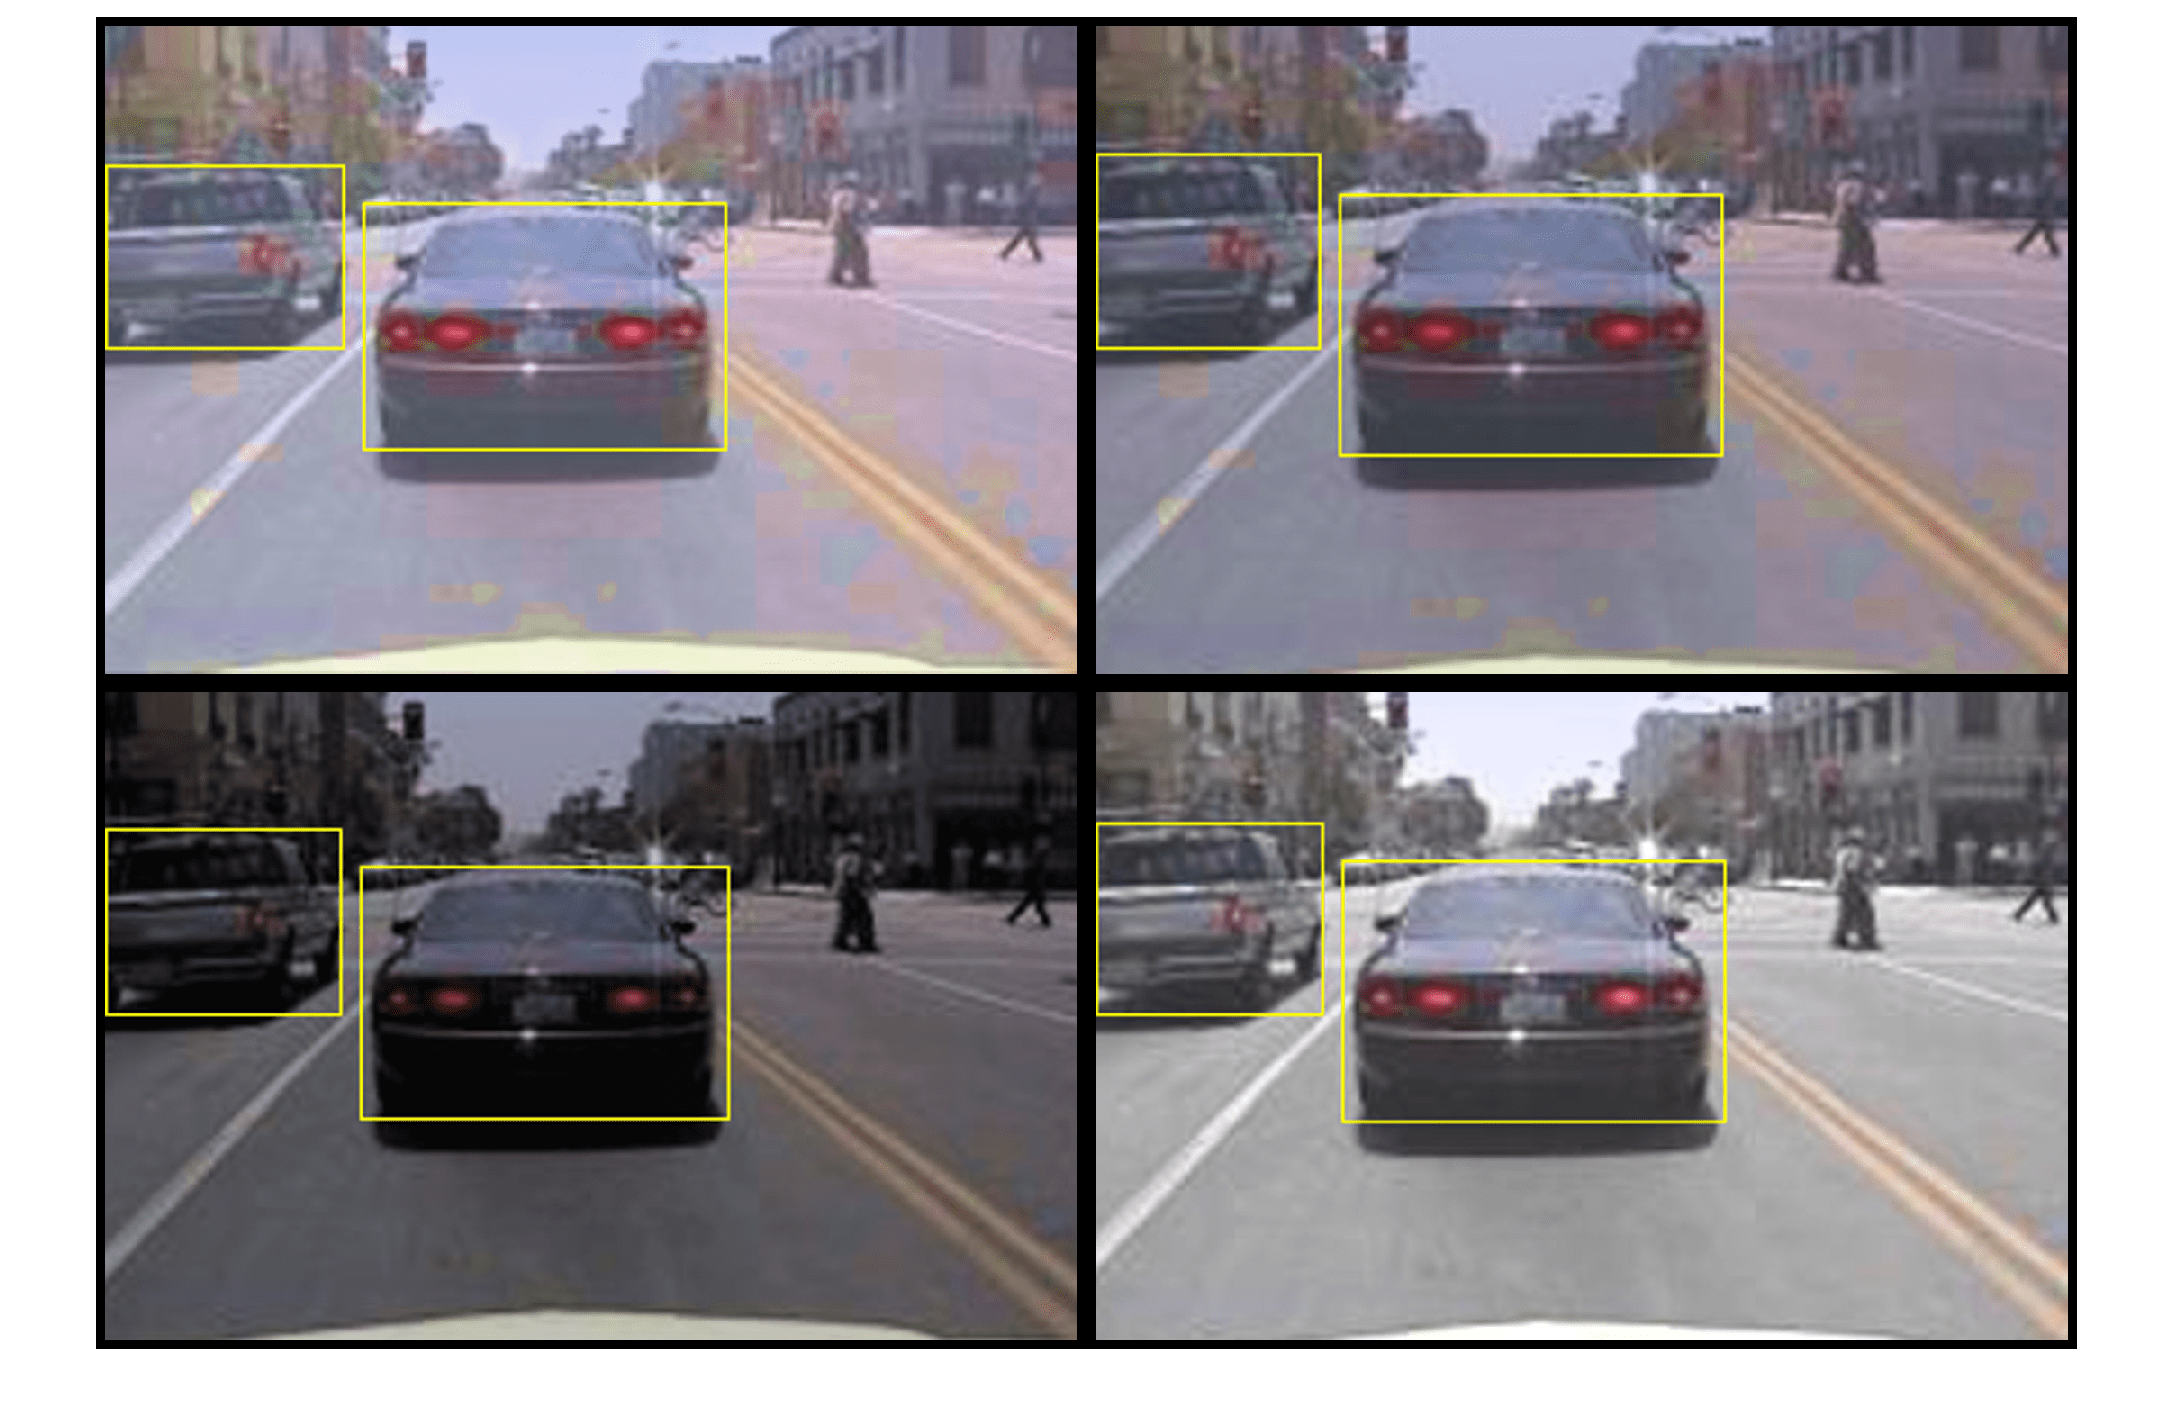
数据增强可通过在训练期间随机变换原始数据来提高网络准确度。通过使用数据增强,您可以为训练数据添加更多变化,但又不必增加带标签的训练样本的数量。
使用 transform 通过随机水平翻转图像和相关边界框标签来增强训练数据。请注意,数据增强不适用于测试数据和验证数据。理想情况下,测试数据和验证数据应代表原始数据并且保持不变,以便进行无偏置的评估。
augmentedTrainingData = transform(trainingData,@augmentData);
多次读取同一图像,并显示增强的训练数据。
augmentedData = cell(4,1);
for k = 1:4
    data = read(augmentedTrainingData);
    augmentedData{k} = insertShape(data{1},"rectangle",data{2});
    reset(augmentedTrainingData);
end
figure
montage(augmentedData,BorderSize=10)
预处理训练数据
预处理增强的训练数据和验证数据以准备进行训练。
preprocessedTrainingData = transform(augmentedTrainingData,@(data)preprocessData(data,inputSize));
preprocessedValidationData = transform(validationData,@(data)preprocessData(data,inputSize));
读取预处理的训练数据。
data = read(preprocessedTrainingData);
显示图像和边界框。
I = data{1};
bbox = data{2};
annotatedImage = insertShape(I,"rectangle",bbox);
annotatedImage = imresize(annotatedImage,2);
figure
imshow(annotatedImage)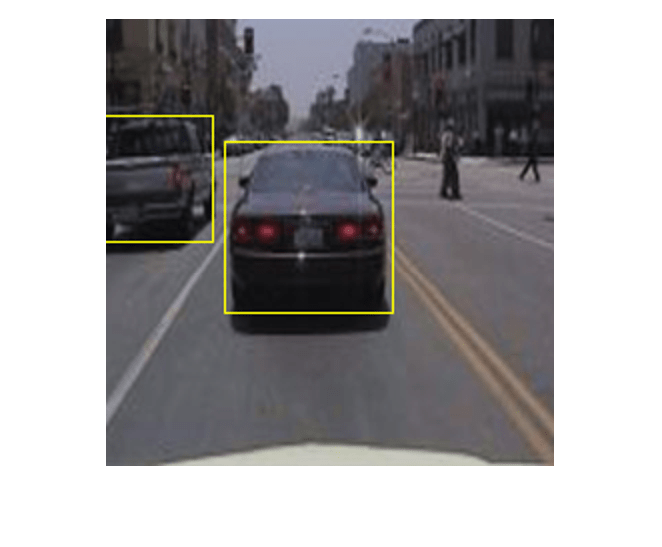
训练 YOLO v2 目标检测器
使用 trainingOptions 指定网络训练选项。将 ValidationData 设置为经过预处理的验证数据。将 CheckpointPath 设置为临时位置。这样可在训练过程中保存经过部分训练的检测器。如果由于停电或系统故障等原因导致训练中断,您可以从保存的检查点继续训练。
options = trainingOptions("adam", ...
        MiniBatchSize=16, ....
        InitialLearnRate=1e-3, ...
        MaxEpochs=10, ...
        CheckpointPath=tempdir, ...
        ValidationData=preprocessedValidationData);
如果 doTraining 为 true,则使用 trainYOLOv2ObjectDetector (Computer Vision Toolbox) 函数训练 YOLO v2 目标检测器。否则,加载预训练的网络。
 if doTraining
    % Train the YOLO v2 detector.
    [detector,info] = trainYOLOv2ObjectDetector(preprocessedTrainingData,detector,options);
else
    % Load pretrained detector for the example.
    pretrained = load("yolov2ResNet50VehicleExample_19b.mat");
    detector = pretrained.detector;
 end
使用具有 12 GB 内存的 NVIDIA™ Titan X GPU 训练此网络大约需要 7 分钟。具体训练时间因您使用的硬件而异。如果您的 GPU 内存较少,则可能内存不足。如果出现这种情况,请使用 trainingOptions 函数降低 MiniBatchSize。
为了快速测试,对一张测试图像运行检测器。确保将图像的大小调整为与训练图像相同。
I = imread("highway.png");
I = imresize(I,inputSize(1:2));
[bboxes,scores] = detect(detector,I);
显示结果。
I = insertObjectAnnotation(I,"rectangle",bboxes,scores);
figure
imshow(I)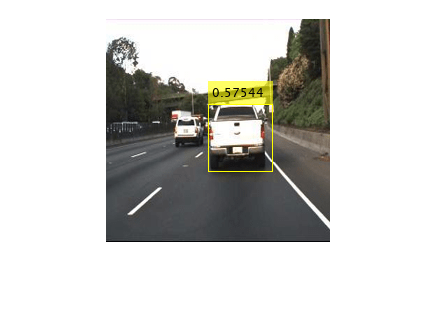
使用测试集评估检测器
基于大量图像评估经过训练的目标检测器以测量其性能。Computer Vision Toolbox™ 提供目标检测器评估函数 (evaluateObjectDetection (Computer Vision Toolbox)),用于测量常见度量,如平均精确率和对数平均泄漏检率。对于此示例,使用平均精确率度量来评估性能。平均准确率提供单一数字,该数字综合反映了检测器进行正确分类的能力(精确率)和检测器找到所有相关对象的能力(召回率)。
将应用于训练数据的同一预处理变换应用于测试数据。请注意,数据增强不适用于测试数据。测试数据应代表原始数据并且保持不变,以便进行无偏置的评估。
preprocessedTestData = transform(testData,@(data)preprocessData(data,inputSize));
对所有测试图像运行检测器。将检测阈值设置为较低的值以检测到尽可能多的对象。这有助于您在整个召回值范围内评估检测器的精度。
detectionThreshold = 0.01;
detectionResults = detect(detector,preprocessedTestData,Threshold=detectionThreshold);
基于测试数据集评估目标检测器。
metrics = evaluateObjectDetection(detectionResults,preprocessedTestData);
计算平均精确率 (AP) 度量和精确率/召回率 (PR) 曲线。精确率/召回率曲线强调检测器在不同召回水平下的精确程度。理想情况下,所有召回水平的精确率均为 1。使用更多数据有助于提高平均精确率,但可能需要更多训练时间。
AP = averagePrecision(metrics,ClassName="vehicle");
[precision, recall] = precisionRecall(metrics,ClassName="vehicle");
绘制 PR 曲线并显示 AP。
figure
plot(recall{:},precision{:})
xlabel("Recall")
ylabel("Precision")
grid on
title("Average Precision = "+AP)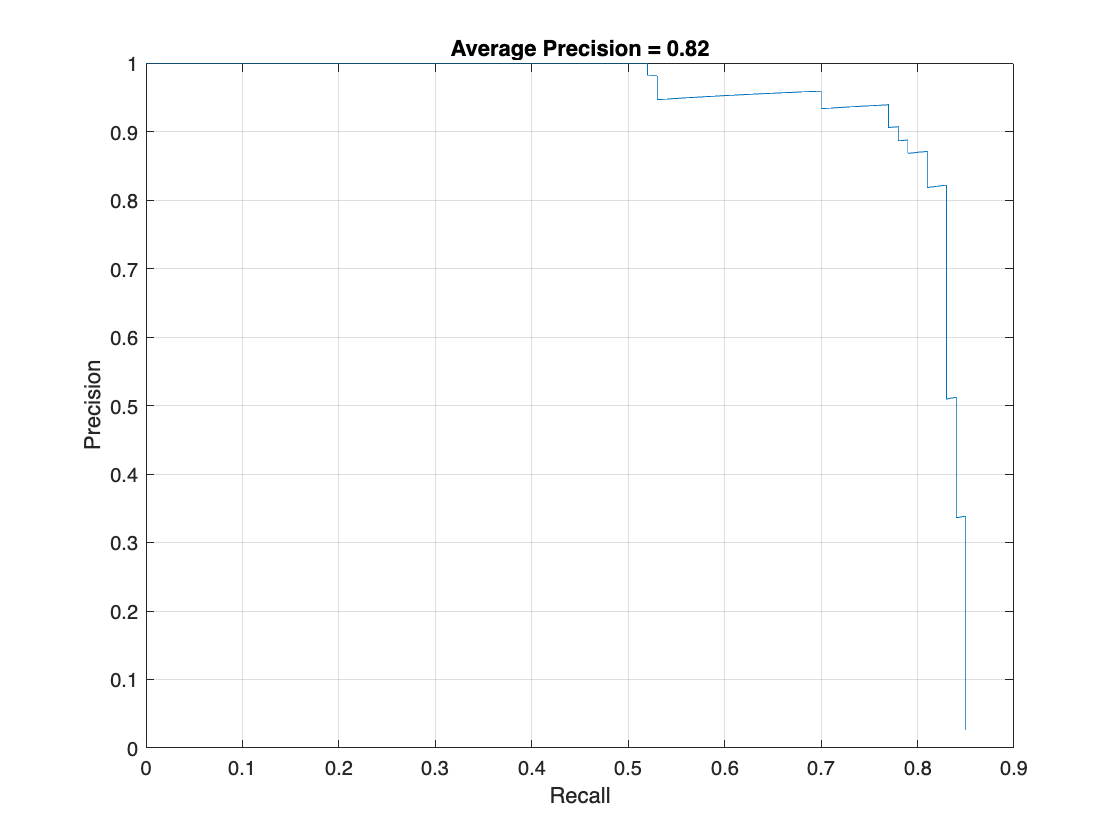
代码生成
一旦检测器经过训练和评估,您就可以使用 GPU Coder™ 为 yolov2ObjectDetector 生成代码。有关详细信息,请参阅Code Generation for Object Detection by Using YOLO v2 (GPU Coder) 示例。
支持函数
function B = augmentData(A)
% Apply random horizontal flipping, and random X/Y scaling. Boxes that get
% scaled outside the bounds are clipped if the overlap is above 0.25. Also,
% jitter image color.

B = cell(size(A));

I = A{1};
sz = size(I);
if numel(sz)==3 && sz(3) == 3
    I = jitterColorHSV(I ,...
        Contrast=0.2, ...
        Hue=0, ...
        Saturation=0.1, ...
        Brightness=0.2);
end

% Randomly flip and scale image.
tform = randomAffine2d(XReflection=true,Scale=[1 1.1]);
rout = affineOutputView(sz,tform,BoundsStyle="CenterOutput");
B{1} = imwarp(I,tform,OutputView=rout);

% Sanitize boxes, if needed. This helper function is attached as a
% supporting file. Open the example in MATLAB to access this function.
A{2} = helperSanitizeBoxes(A{2});

% Apply same transform to boxes.
[B{2},indices] = bboxwarp(A{2},tform,rout,OverlapThreshold=0.25);
B{3} = A{3}(indices);

% Return original data only when all boxes are removed by warping.
if isempty(indices)
    B = A;
end
end

function data = preprocessData(data,targetSize)
% Resize image and bounding boxes to the targetSize.
sz = size(data{1},[1 2]);
scale = targetSize(1:2)./sz;
data{1} = imresize(data{1},targetSize(1:2));

% Sanitize boxes, if needed. This helper function is attached as a
% supporting file. Open the example in MATLAB to access this function.
data{2} = helperSanitizeBoxes(data{2});

% Resize boxes to new image size.
data{2} = bboxresize(data{2},scale);
end
参考资料
[1] Redmon, Joseph, and Ali Farhadi.“YOLO9000:Better, Faster, Stronger.”In 2017 IEEE Conference on Computer Vision and Pattern Recognition (CVPR), 6517–25.Honolulu, HI:IEEE, 2017. https://doi.org/10.1109/CVPR.2017.690.