Highway Lane Following with RoadRunner Scene
This example shows how to configure and simulate a highway lane following application using a scene created in RoadRunner 3D scene editing tool. This example closely follows the Highway Lane Following example.
Introduction
A highway lane following system steers a vehicle to travel within a marked lane. It also maintains a set velocity or safe distance to a preceding vehicle in the same lane. The system typically includes vision processing, sensor fusion, decision logic, and controls components. To ensure functional safety and interoperability, this system requires testing on a variety of road conditions. For example, testing on a scene that has varying shadows, lane marking types, and road materials can make it easier to identify edge cases.
RoadRunner is an interactive editor that enables you to design 3D scenes for simulating and testing automated driving systems. You can use RoadRunner to create roads, lane markings, road signs, vegetation, and scenes with varied complexities in a 3D environment.
The Highway Lane Following example that this example is based on shows how to simulate scenarios for curved and straight road scenes. This example demonstrates how to simulate scenarios with a scene created in RoadRunner. The scene contains variations in shadows, lane marking types, and road materials designed to test the impact of the vision processing on system functionality. In this example, you will:
Review scene: Explore the scene and road segments that were created in RoadRunner.
Integrate scene into driving scenario: Export the road network from the RoadRunner scene to an ASAM OpenDRIVE® file, and then import this file into a driving scenario. Then, add a vehicle to the scenario and simulate the scenario.
Integrate scene into Unreal Engine scenario: Export the RoadRunner scene to a Filmbox (.fbx) file and connect a Simulink® model to this scene. The imported driving scenario specifies vehicle poses. Add sensors to the vehicle and the simulate the scenario.
Integrate scene into lane following application: Using the techniques described in the previous sections, you integrate the RoadRunner scene into a scenario for highway lane following. Then, you add additional target vehicles to the scenario and simulate the system in a scenario that transitions from no shadows to shadows.
Explore additional scenarios: Simulate additional scenarios for lane marking and road type variations. Apply these techniques to your own design.
You can use the modeling patterns and techniques used in this example to import your own scenes and test your algorithms.
This example requires a Windows® 64 bit platform to enable system-level simulation.
if ~ispc
    error(['This example is supported only on Microsoft', char(174),...
          ' Windows', char(174), '.']);
end
To ensure reproducibility of the simulation results, set the random seed.
rng(0);
Review Scene
This example includes a scene (RRHighway.rrscene) that was designed in RoadRunner. View the scene by starting RoadRunner application interactively by using the roadrunnerSetup function. When the function opens a dialog box, specify the RoadRunner Project Folder and RoadRunner Installation Folder locations.
rrApp = roadrunnerSetup;
The rrApp RoadRunner object enables you to interact with RoadRunner from the MATLAB workspace.
Copy the RRHighway.rrscene scene to the RoadRunner project. To learn more about the RoadRunner environment, see RoadRunner Project and Scene System (RoadRunner).
copyfile("RRHighway.rrscene",fullfile(rrApp.status.Project.Filename,"Scenes"),"f")
Open the RRHighway.rrscene scene.
openScene(rrApp,"RRHighway.rrscene");
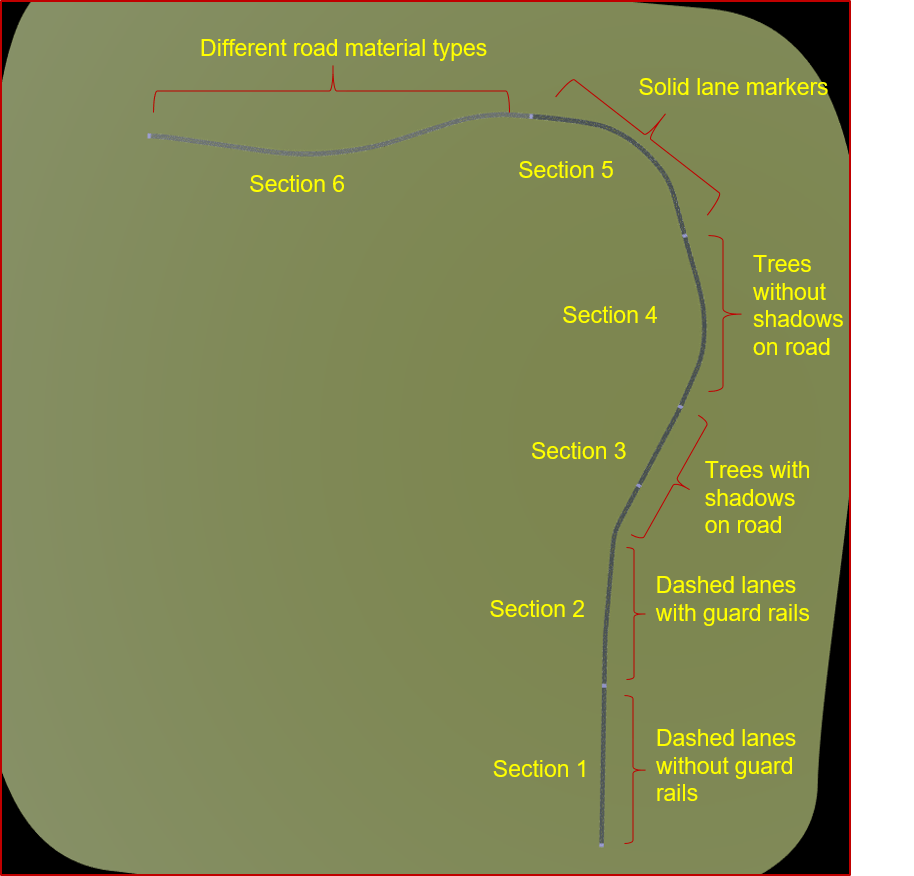
This scene is designed to pose challenges to the lane following system. This image shows that the road network is divided into six sections. Each section incrementally adds variations to the scene as follows:
Section 1 contains dashed lanes without guard rails.
Section 2 contains dashed lanes with guard rails.
Section 3 adds trees that do cast shadows on the lane markings.
Section 4 contains trees that do not cast shadows on lane markings.
Section 5 contains solid lane markings instead of dashed lane markings.
Section 6 road material with lighter texture in comparison with other sections of the road.

For example, the following image shows the transition between Section-3 (with trees that do not cast shadows on the lane markings) and Section-4 (with trees that do cast shadows on lane markings).

The following image shows the transition between Section-4 (with dashed lane markings) and Section-5 (with solid lane markings).

The following image shows the transition between Section-5 (with darker road material) and Section-6 (with lighter road material).

Integrate Scene into Driving Scenario
A common motivation for importing scenes into a driving scenario is to enable the addition of vehicles and trajectories, either interactively or programmatically. You can integrate a road network from a RoadRunner scene into a driving scenario by using these steps:
Export Scene to ASAM OpenDRIVE File.
Import ASAM OpenDRIVE file into driving scenario.
Add vehicle and trajectory to driving scenario.
Simulate driving scenario.
Export Scene to ASAM OpenDRIVE File
RoadRunner enables you to export scenes to various file formats, including ASAM OpenDRIVE format. For more information on ASAM OpenDRIVE export workflow, see Export to ASAM OpenDRIVE (RoadRunner).
exportScene(rrApp,fullfile(pwd,"RRHighway.xodr"),"OpenDRIVE");
Import ASAM OpenDRIVE File into Driving Scenario
You can import ASAM OpenDRIVE files into cuboid driving scenarios. For more information, see Import ASAM OpenDRIVE Roads into Driving Scenario.
Create a driving scenario and import the ASAM OpenDRIVE road network. For the purposes of this example, turn off the warnings from the OpenDRIVE importer.
scenario = drivingScenario;
Turn off warning from OpenDRIVE importer for example purpose
warning('off','driving:scenario:OpenDRIVEWarnings');
roadNetwork(scenario,"OpenDrive","RRHighway.xodr");
Add Vehicle and Trajectory to Driving Scenario
You can add vehicles to a scenario either programmatically or interactively. This example shows the programmatic workflow. To add vehicles interactively, use the Driving Scenario Designer app.
Add a vehicle to the road network using a set of predefined waypoints. These waypoints are attached as a supporting file, manualwaypoints.mat.
v = vehicle(scenario,"ClassID", 1);
load("manualWaypoints.mat","waypoints");
speed = 20; % m/s
trajectory(v, waypoints, speed);
Simulate Driving Scenario
Plot the driving scenario in world coordinates. Also plot the scenario from the vehicle perspective by using a chase plot.
hFigScenario = figure;
p1 = uipanel("Position",[0 0 0.5 1]);
h1 = axes("Parent",p1);
plot(scenario,"Waypoints","On","Parent",h1);
p2 = uipanel("Position",[0.5 0 0.5 1]);
h2 = axes("Parent",p2);
chasePlot(v,"Parent",h2);

Set the visibility of the figure to off.
set(hFigScenario, 'Visible', 'Off');
You can optionally continue to explore, simulate, and edit the scenario in Driving Scenario Designer drivingScenarioDesigner(scenario).
Integrate Scene into Unreal Engine Scenario
A common motivation for importing scenes into Unreal Engine is to enable simulation systems with camera, radar, and lidar sensor models. You can integrate a RoadRunner scene with an Unreal Engine driving scenario simulation using these steps:
Export RoadRunner scene to FBX file.
Configure test bench model.
Simulate test bench model.
Export RoadRunner Scene to FBX file
Export RoadRunner scene to an FBX file using the exportScene
options = unrealExportOptions(FilmboxOptions=filmboxExportOptions(EmbedTextures=true));
exportScene(rrApp,fullfile(pwd,"RRHighway.fbx"),"Unreal",options);
This example uses the exported FBX file to configure the test bench and imports the scene into Unreal Engine.
Configure Test Bench Model
To load the exported file into Unreal Engine at the start of simulation, set the Scene source parameter of the Simulation 3D Scene Configuration block to RoadRunner.
Open the test bench model for the scenario.
open_system("RRHighwayTestBench");

Opening this model runs the helperSLRRHighwaySetup script. This script configures the Simulation 3D Scene Configuration block in the RRHighwayTestBench model.
This model contains blocks that enable simulating a driving scenario with Unreal Engine.
Scenario Reader reads the driving scenario from the base workspace and outputs the ego vehicle pose.
Simulation 3D Scene Configuration enables connection to the
RRHighwayscene.Simulation 3D Vehicle with Ground Following controls the pose of a vehicle in the scene
Vehicle To World converts actor poses from the coordinates of the input ego vehicle to the world coordinates of the scenario.
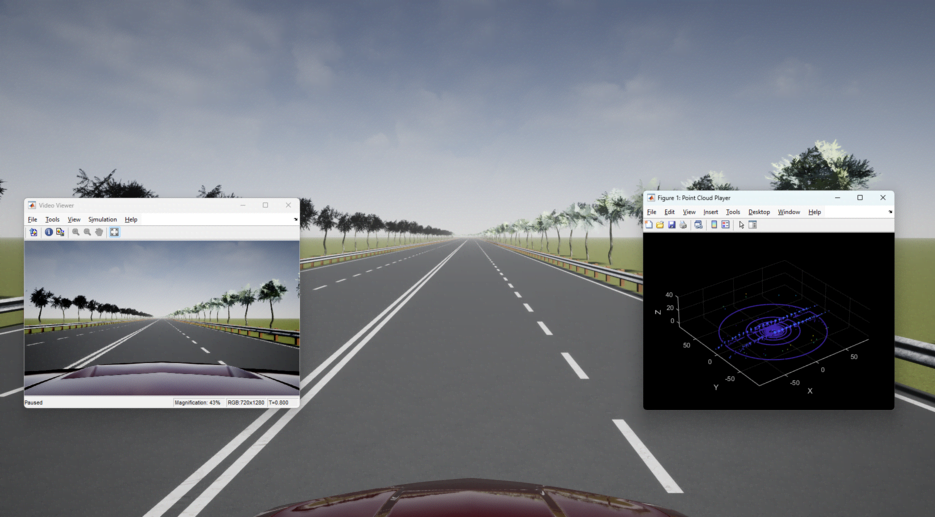
Simulation 3D Camera synthesizes camera images.
Simulation 3D Probabilistic Radar synthesizes radar detections.
Simulation 3D Lidar synthesizes lidar point cloud data.
The model also contains blocks to visualize the camera and lidar sensors. You can use the Bird's-Eye Scope to visualize radar and vision detections from a bird's-eye view. To learn how to configure this scope, see Visualize Sensor Data from Unreal Engine Simulation Environment.
Simulate Test Bench Model
Simulate the model. The vehicle follows the trajectory defined in the driving scenario.
sim("RRHighwayTestBench");

Integrate Scene into Lane Following Application
You can reuse the techniques described in the previous sections to simulate and assess a closed-loop system such as the highway lane following application. This section reuses models, helper functions, and techniques described in the Highway Lane Following example.
To explore the test bench model, load the highway lane following project and change the present working directory to example working directory.
openProject("HighwayLaneFollowing");cd ..;
Open and configure the system level test bench model.
open_system("HighwayLaneFollowingTestBench");
scenarioFcnName = "scenario_RRHighway_01_NoShadowToShadow";
helperSLHighwayLaneFollowingSetup("scenarioFcnName", scenarioFcnName);

Integrate Scene into Driving Scenario
The first argument to the helperSLHighwayLaneFollowingSetup is the name of a function that creates a driving scenario that is compatible with the HighwayLaneFollowingTestBench. The scenario_RRHighway_01_NoShadowToShadow function creates this driving scenario. It imports the RRHighway.xodr file and adds vehicles around the road segment that transitions from no shadow to shadow. You can explore this function to learn more about programmatic techniques for creating scenarios. It leverages several helper functions that you can use to simplify adding vehicle and their trajectories to the imported road network. Explore the scenario_RRHighway_01_NoShadowToShadow to know more about the helper functions and their usage.
The helperSLHighwayLaneFollowingSetup function creates a variable scenario in the base workspace. Plot this scenario and notice the region of the scene that will be simulated.
hFigScenario = figure;
p1 = uipanel("Position",[0 0 0.5 1]);
h1 = axes("Parent",p1);
plot(scenario,"Waypoints","On","Parent",h1);
p2 = uipanel("Position",[0.5 0 0.5 1]);
h2 = axes("Parent",p2);
chasePlot(scenario.Actors(1),"Parent",h2)

Set the visibility of the figure to off.
set(hFigScenario, "Visible", "Off");
Integrate Scene into Unreal Engine Scenario
The HighwayLaneFollowingTestBench model contains algorithm components for vision detection, forward vehicle sensor fusion, and controls. The Simulation 3D Scenario subsystem integrates the model with the driving scenario and the corresponding scene in Unreal Engine.
Open the Simulation 3D Scenario subsystem.
open_system("HighwayLaneFollowingTestBench/Simulation 3D Scenario")

Notice that this subsystem reuses the modeling techniques and blocks described previously in this example.
The primary differences are:
The ego vehicle is under closed-loop control.
Target vehicles are added to the scenario.
The lane following example does not use a lidar sensor.
Simulate the model to see the ego vehicle behavior for the scenario.
sim("HighwayLaneFollowingTestBench");
The system is able to detect and follow lanes in the conditions where shadows are present. For more details on how to analyze the simulation results, refer to the Highway Lane Following example.

Close the figure.
close(hFigScenario);
Explore Additional Scenarios
This example provides additional scenarios that you can use to test the system behavior.
scenario_RRHighway_02_DashedToSolidMarkingsfunction configures the test scenario such that the ego vehicle navigates from Section 4 to Section 5 of the scene. This enables testing the lane following application for the transition from dashed lane markings to solid lane markings.scenario_RRHighway_03_DarkToLightRoadMaterialfunction configures the test scenario such that the ego vehicle navigates from Section 5 to Section 6 of the scene. This enables testing the lane following application for the transition from darker textured road material to lighter textured road material.
You can configure the model and workspace with these scenarios by using the helperSLHighwayLaneFollowingSetup function. For example, this code configures the test bench to simulate a scenario in the region where the road material changes.
helperSLHighwayLaneFollowingSetup("scenarioFcnName",...
    "scenario_RRHighway_03_DarkToLightRoadMaterial");
Enable the warnings from OpenDRIVE importer.
warning('on','driving:scenario:OpenDRIVEWarnings');
You can apply these techniques to integrate RoadRunner scenes into driving scenarios for simulation and testing of your systems.
See Also
Blocks
- Simulation 3D Scene Configuration | Simulation 3D Probabilistic Radar | Simulation 3D Camera | Simulation 3D Probabilistic Radar | Scenario Reader | Simulation 3D Vehicle with Ground Following