Import Data into Diagnostic Feature Designer
Diagnostic Feature Designer is an interactive tool for processing ensemble
measurement data and extracting features that indicate the condition, such as
healthy or faulty, of the machines that produced the
data. The data can come from measurements on systems using sensors such as accelerometers,
pressure gauges, thermometers, altimeters, voltmeters, and tachometers. The main unit for
organizing and managing multifaceted data sets in the app is the data ensemble. An
ensemble is a collection of data sets, created by measuring or
simulating a system under varying conditions. Each row within the ensemble is a
member. Each member of the ensemble contains the same
variables, such as Vibration or
Tacho.
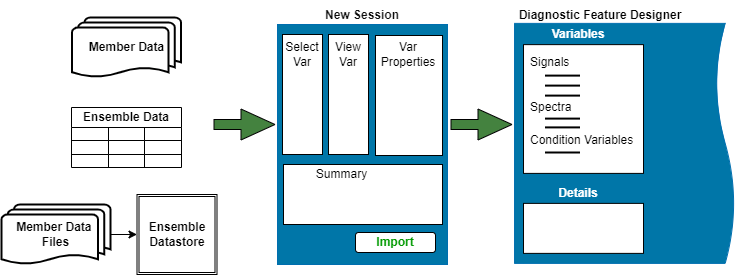
The first step in using Diagnostic Feature Designer is to import source data into the app from your MATLAB® workspace. You can import data from tables, timetables, cell arrays, or matrices. You can also import an ensemble datastore that contains information that allows the app to interact with external data files. Your files can contain actual or simulated time-domain measurement data, spectral models or tables, variable names, condition and operational variables, and features you generated previously. Diagnostic Feature Designer combines all your member data into a single ensemble data set. In this data set, each variable is a collective signal or model that contains all the individual member values.
Before importing your data, it must already be clean, with preprocessing such as outlier and missing-value removal. For more information, see Data Preprocessing for Condition Monitoring and Predictive Maintenance.
During the import process, you select which variables you want to import, specify the variable types, and perform other operations to create the ensemble that you want to work with. When you click import, the app applies your specifications and creates an ensemble that contains your selected data. The following figure illustrates the overall import flow.
After you import your data once, you do not need to import it again for subsequent sessions. Save your session to store both the initial data ensemble and any derived variables and features you compute prior to saving. You can also export your data set to the MATLAB workspace, and save your data as a file that you can import in a subsequent session.
If you have a large number of ensemble members, consider creating a representative subset of members when you first start exploring the data and potential features in the app. Because the app is interactive, importing a large number of members can result in slower performance. Instead, you can develop and rank features interactively with the smaller data set, and then generate code that repeats the computations on the original data set.
For more information on data sources, ensembles, and variable types in predictive maintenance, see Data Ensembles for Condition Monitoring and Predictive Maintenance.
Source Data Requirements
For signals, the app accepts individual member table arrays, timetable arrays, cell arrays, or numeric
matrices, each member containing the same independent variables, data variables, and
condition variables. For spectral data, the app accepts individual member
table arrays or idfrd objects. This table describes the data requirements for variables within
ensemble members.
| Input Item | Content | Notes |
|---|---|---|
| Signal data | Timetables, tables, cell arrays, or numeric arrays | For time-based data, timetables are recommended. |
| Signal independent variables (IVs) | Double, duration, or
datetime | For each signal variable, all member IVs must be of the same type, whether your signal is based on time or on another IV such as consumption or duty cycles. If your member data is stored in a matrix, you must have only one IV that applies to the full set of signals that you are importing. If your data was uniformly sampled in time and you do not have recorded timestamps, you can construct a uniform timeline during the import process. |
| Spectral data | Numeric (double) table or idfrd object | Each You cannot import spectra from matrices. |
| Condition variables (CVs) | Scalar — Numeric, string, cell, or categorical | You can import condition variables along with your data in tables, timetables, or cell arrays, but not in matrices. |
| Features | Scalar — Numeric, string, or cell | You can import features that you computed previously, either externally or within the app itself. |
| Matrices | Purely numeric array that contains columns representing a single IV and any number of signals that share that IV. Cannot accommodate spectra. Cannot generally accommodate condition variables or features. | Matrices cannot accommodate variable names. You can import condition variables and features from a matrix if your data set contains only scalars and does not contain signals. |
You can import data members individually or as an ensemble that contains all your data members. This ensemble can be any of the following:
An ensemble table containing
tablearrays, cell arrays, or matrices. Table rows represent individual members.An ensemble cell array containing tables, cell arrays, or matrices. Cell array rows represent individual members.
An ensemble datastore object such as a
fileEnsembleDatastoreorsimulationEnsembleDatastoreobject that contains the information necessary to read from files stored externally. Use an ensemble datastore object especially when you have too much data to fit into app memory. To create a representative subset of the ensemble datastore files to work with, seesubset.An ensemble matrix that contains only condition variables and features. Matrix rows represent individual members.
A labeled signal set (LSS), which is a
labeledSignalSetobject, that contains labeled data for signals, condition variables, and features. The LSS must have a label type of"attribute"and not"roi"or"point". If you are using Signal Labeler, you can export LSS items directly from that app to Diagnostic Feature Designer.
For more information about organizing your data for import, see Organize System Data for Diagnostic Feature Designer.
Typical Workflows for Data Import
The following sections describe typical workflows for different types of data import. The first workflow describes the overall import process and the subsequent workflows focus on variations that are specific to the import data format. The following table summarizes the cases for the workflows.
| Import Type | Summary |
|---|---|
| Ensemble table | Core workflow that describes the import of an ensemble table, including ensemble specification, configuration, import, and confirmation in the app |
| Individual Ensemble Members | Use of the filtering capability within the import dialog process to quickly select and import individual ensemble members that are represented by tables or timetables |
| Matrices | Use of matrix column indices for variable identification. Alternative specification of matrix as feature rather than signal. |
| Spectral Data | Import of spectral data in idfrd object or in a table with
columns that contain frequency or order values and corresponding data values |
| Signal with no IV | Import of signal with no explicit time stamps by generating virtual IV |
| Signal with multiple IVs | Specification of an alternative IV so that the signal can be analyzed in the app using either IV |
| Ensemble Datastore | Specification of an ensemble datastore that contains information on reading from external files. |
| Labeled Signal Set | Import of signal, condition variable, and feature information from a
labeledSignalSet object. The object must have a label type of
"attribute", and not "roi" or
"point". |
Core Workflow—Import Ensemble Table
This workflow illustrates the steps for importing an ensemble table into the app.
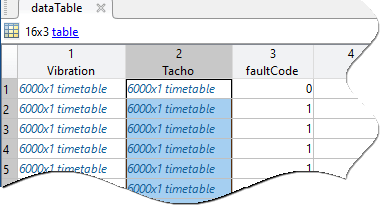
Load Ensemble Table into MATLAB Workspace
Load your ensemble table into the MATLAB workspace. You can preview the data in the workspace variable browser, as
this example shows. In this case, the data set contains two time-based signals and a
scalar condition variable named faultCode.
Open App and Start New Session
Open the app by entering diagnosticFeatureDesigner at the command
line. Then, click New Session. This action opens the import dialog box.

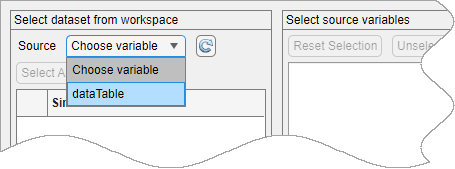
Select Ensemble Table from Source Variables
In the Select dataset from workspace pane, select your ensemble table as the Source.
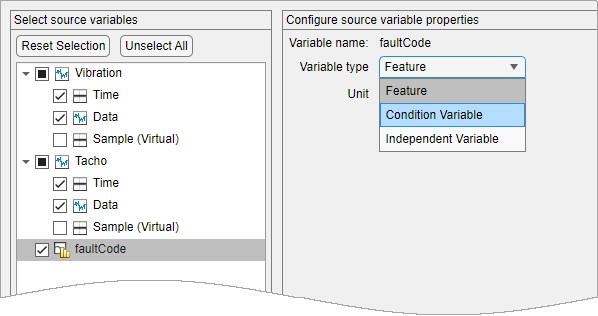
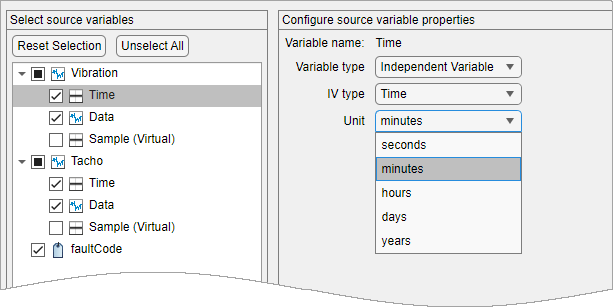
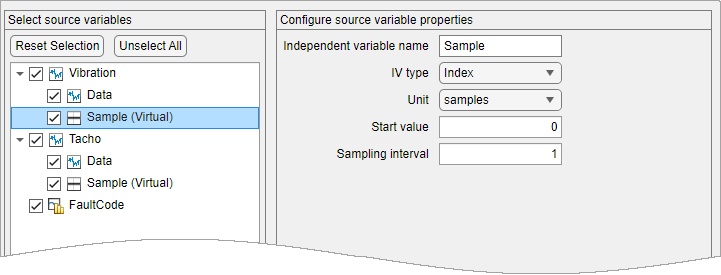
View Source Variable Components and Change Variable Type and Units
The Select source variables pane displays the variables from your
ensemble. In the following example figure, the app identifies the
Vibration and Tacho variables as time-based
signals that each contain Time and Data variables.
The third variable in the variable set for each signal, Sample
(Virtual), is not checked. Sample (Virtual) allows you to
generate an IV, especially when your source data set does not contain an explicit IV. For
more information on Sample (Virtual), see Import Signal with No Time Variable.

The icons identify the variable type that the app assumes. The icon next to
faultCode, which illustrates a histogram, represents a feature. Both
features and condition variables are scalars, and the app cannot distinguish between the
two unless the condition variable is categorical. To change a variable type, click the
variable name to open the variable properties in the Configure source variable
properties pane. Then, in Variable type, change
Feature to Condition Variable.
The icon for faultCode now illustrates a label, which
represents a condition variable.
![]()
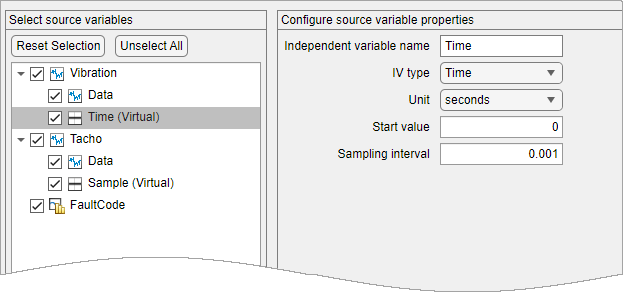
For signal and spectrum variables, you can also change the units that the app uses for
plotting and for other operations within the app. To do so, in the lower level variable
list of the signal or spectrum variable, click the name of the IV or data variable. The
Configure source variable properties pane provides a menu of
options for each property that you can modify. In the following example figure,
Configure source variable properties displays properties for the
Time variable of the Vibration signal. The figure
illustrates the selection of Minutes from the menu of
Units options.
Preview Data Variables
In addition to providing options for variable properties such as
Type, the Configure source variable
properties pane displays a preview of your import data when you click the
name of a signal or spectrum variable. The following example figure shows the preview of
the Vibration data. The preview pane in the figure displays source data
for the first ten Vibration samples of the first ensemble member, and
includes values for IV, data, and the sample index.
The preview pane displays source properties only. The preview pane does not reflect
any property modifications that you make in the pane. For example, if you change the units
of the Vibration signal from seconds to minutes, the preview pane still
displays source units of seconds. When you complete the import, the app converts the time
data to minutes for use in the app.

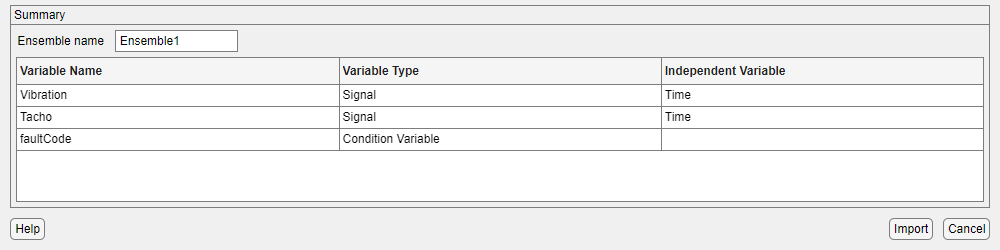
Confirm Ensemble Specification and Execute Import
Confirm the ensemble specification in the Summary pane at the bottom of the dialog box. Click Import to execute the data import.
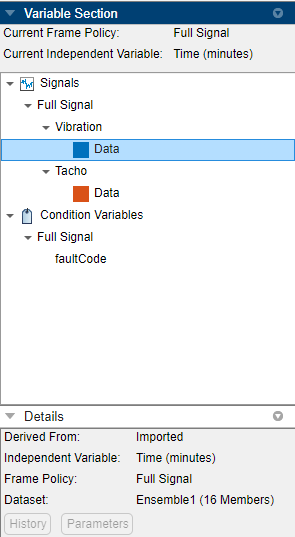
Confirm Successful Import into App
Confirm the import in the variables pane. In this example, the two signals appear in
the Signals list. The condition variable FaultCode
appears in the Condition Variables list. Beneath the variables pane
is the Details pane, which provides additional information about the
selected variable.
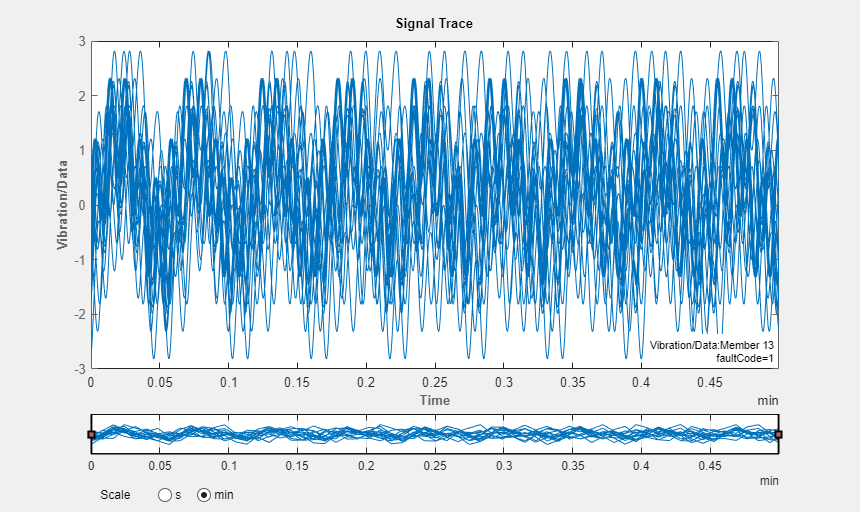
Select Vibration/Data and click Signal
Trace to plot the data and view the imported signals, as the following
example figure shows. For more information on plotting data, see
Import and Visualize Ensemble Data in Diagnostic Feature Designer.
Import Individual Members
This workflow describes the steps associated with importing ensemble members individually.
Initiate Import Process
Load the individual member variables into your MATLAB workspace, open the app, and click New Session. In
the Select dataset from workspace pane, the
Source menu displays a list of the files in your workspace. The
following example figure shows 10 member files and one additional file,
sens2, that is not an ensemble member.
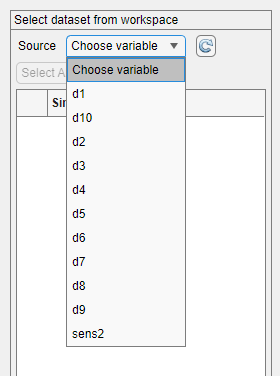
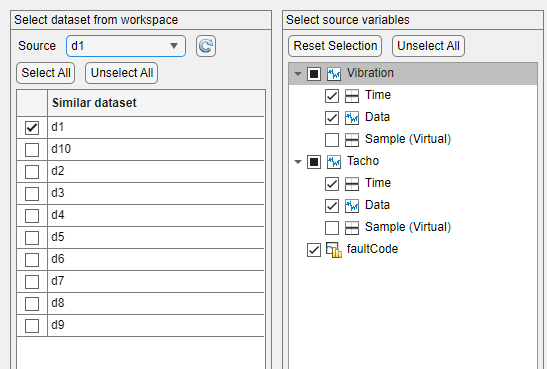
Select Ensemble Members
Select one of the variables that represents an ensemble member. In this example,
select d1. The app opens a list of all compatible workspace
variables that contain the same internal variables. You can select any combination of
these variables or click Select All to select all of them at once.
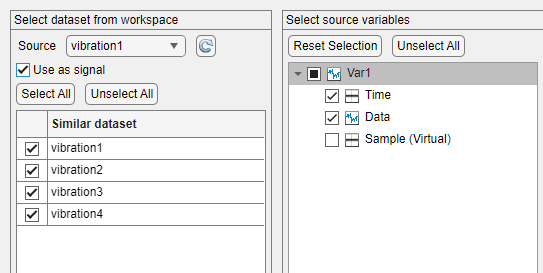
Import Individual Timetables
If your individual members are packaged as timetables with a scalar value for each time point, specify Use as signal to have the app interpret the timetable variable as a signal rather than as a feature.
Complete Import Process
Once you select your variables, the remaining import steps are the same as in Core Workflow—Import Ensemble Table. The app combines the members you import into a single ensemble.
Import Matrix Data
This workflow describes the import of signals from individual member matrices. When you import data in matrices, each signal in the ensemble must share one independent variable, such as a time variable, with all signals in the ensemble. You cannot import condition variables, features, or spectral data in matrices.
Select and Preview Matrices to Import
Load your matrices into the MATLAB workspace, and then initiate the import process by clicking New Session. In the Select dataset from workspace pane, select one of your matrices and click Select All. For matrices, this pane also displays a Use as feature option. This option applies to the special case where a matrix contains only scalar condition variables and features, and no signal data.
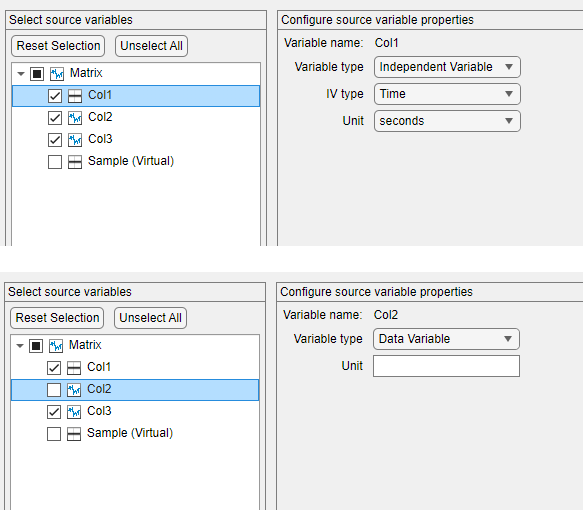
Because matrices are numeric, the app identifies each variable column by its column
index. The following example figure shows four member matrices. The first column of each
matrix contains the IV representing time, and the second and third columns contain the
data values for vibration and tacho data. To preview the contents of the ensemble, in the
Select Source variables pane, select the Matrix row.

Confirm Variable Types
The app interprets Col1 as the IV because it is monotonic,
and Col2 and Col3 as signal data
variables.
If you cannot accurately represent your signals with a single time variable, convert your matrices into tables before import.
Complete and Confirm Import
Click Import to complete the import. Confirm that the variables pane contains the signals you want, as shown in the following example figure.

The app merges the matrices into an ensemble data set that contains the four matrices.
This workflow demonstrates that you can import matrices, but only with limitations. If you want to identify your variables by name, import condition variables or features, or use independent timelines for independent signals, convert your matrices to tables or cell arrays prior to import. For an example of converting a set of matrices to an ensemble table, see Prepare Matrix Data for Diagnostic Feature Designer.
Import Spectral Data
This workflow illustrates how to import spectral data. You can import spectral data in two forms:
An
idfrdobject that contains frequency and spectrum data for a single spectrum in theFrequencyandSpectrumDataproperties, respectivelyA table that contains columns with the frequency and spectral data
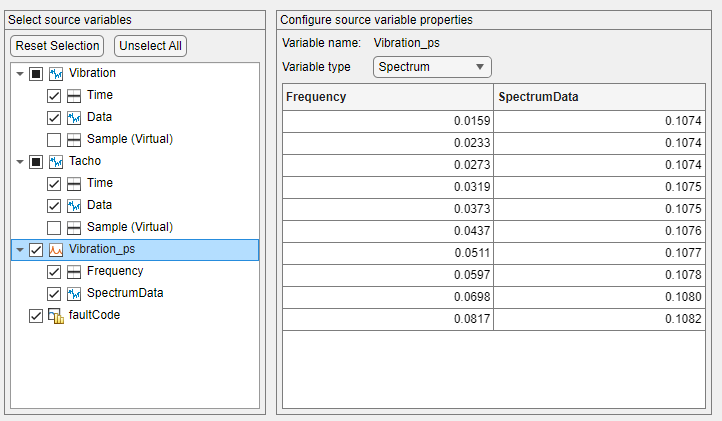
When you import an idfrd object, the app recognizes that the data
source is spectral, and defaults to the Spectrum variable type,
as the following example figure shows.
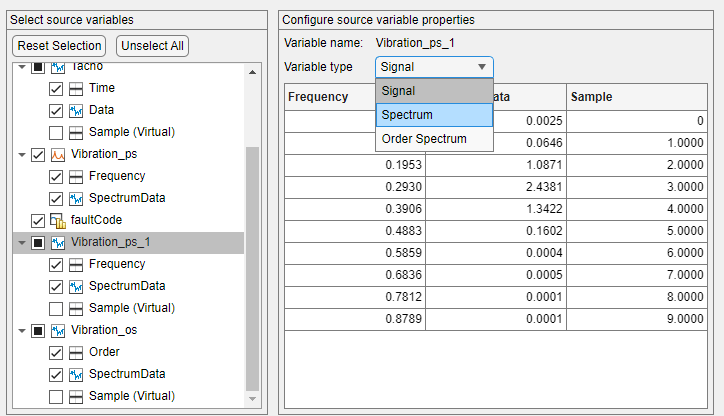
When you import spectral data in a table, the app defaults to the Signal variable type, but provides additional options for the Spectrum and Order Spectrum variable types. The following example figure illustrates the import of spectral data in a table.
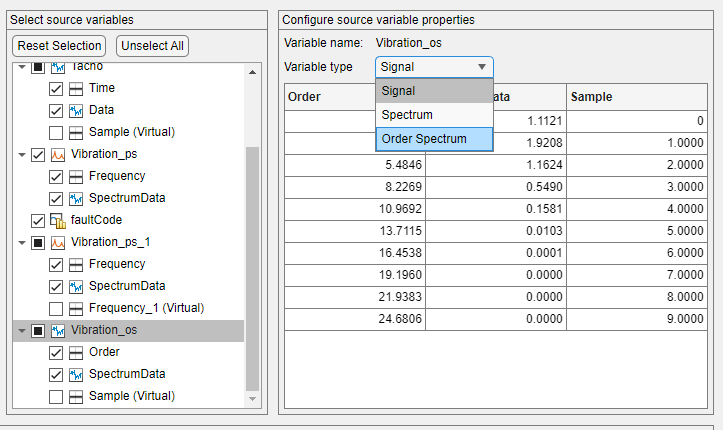
You can also import order spectra that contain order rather than frequency information. Order spectra are useful for analyzing rotating machinery. Each order is a multiple of a reference frequency, such as the primary-shaft rotational frequency. The following example figure illustrates the import of an order spectrum.
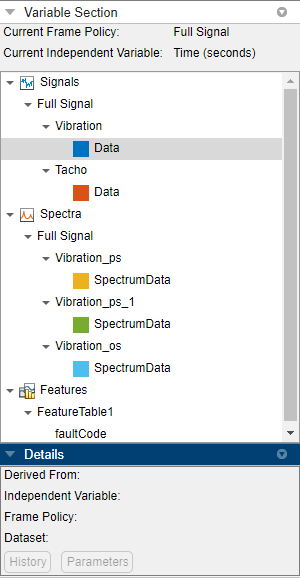
When you complete the import, the Variables pane displays the spectra, as the following example figure shows.
Import Signal with No Time Variable
This workflow illustrates how to generate a virtual IV if your data set includes signals that contain no IV. For instance, you might have a signal that was measured or generated in uniform time samples, but which does not include a vector of the actual time stamps. The app can generate a virtual timeline that contains the same sample rate.
Select Data Source and View Source Variables
Initiate the import process and select workspace variables to import. In the following
example figure, the data source is a table that contains Vibration and
Tacho variables. However, these variables contain only measurement
data and no time information. As always, the app provides a Sample
(Virtual) option. In this case, since the data has no IV, the app
automatically selects this variable.

View Virtual IV Properties
The default unit for a virtual IV is the sample index. You can modify this default
setting by selecting the Sample (Virtual) name, which opens the
source properties. The following example figure displays the default properties.
Reconstruct Signal Time Variable Using Sample Time
If you know the sample time of the signal, you can reconstruct the time variable. To
do so, change Independent variable name to the name you want,
IV type to Time,
Unit to the time units you want, and Sampling
interval to the sample time. For example, consider that you know the sample
time for both Vibration and Tacho is 0.001 seconds.
The following figure shows how to set this sample time for Vibration.
Note that these settings do not affect Tacho.
Once you have reconstructed the IVs that you want, complete the import
process. You can view your reconstructed timelines by plotting your imported signals in
the app. The following figure shows plots for Vibration, which has the
reconstructed timeline, and Tacho, which retains the default IV of
Sample.

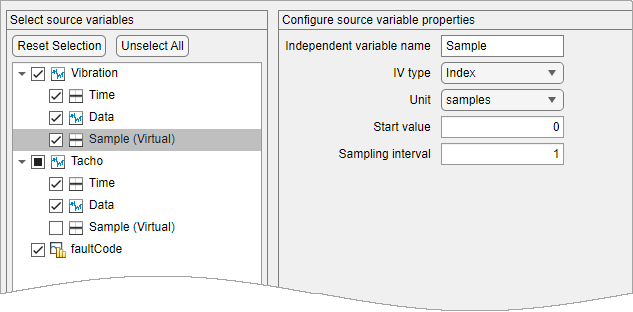
Specify Sample Index as Alternative IV
This workflow describes the steps for specifying the signal sample index as an alternative IV when you also import a time variable or some other signal IV.
Specify Sample Index as IV
Initiate the import and select the data to import. In the Select source
variables pane, select Sample (Virtual) and view
the properties. The following example figure illustrates this step. In this figure,
Vibration now has all three lower level variables selected. The
Configure source variable properties pane displays the default IV
type and unit for Sample (Virtual), which are
Index and samples, respectively.
Perform the same operation on all variables for which you want to include the sample index. Complete the import process.
Switch to Sample Index the App
The app defaults to the IV type that you imported with the data. To switch to the sample index, in Options, select Index, as the example figure illustrates.
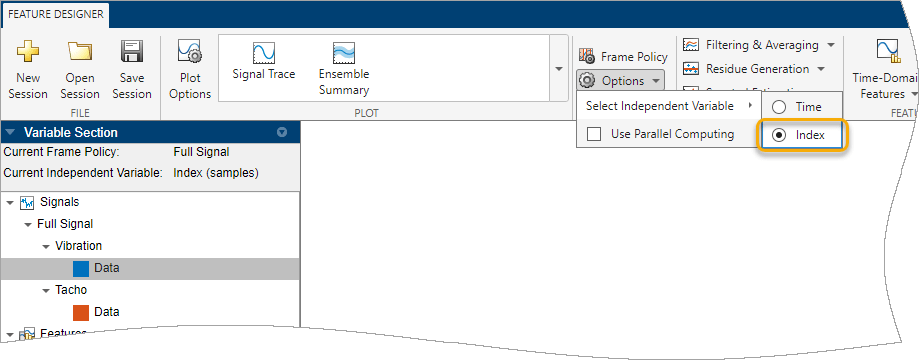
All signals that include Index as an alternative IV type now use the sample indices rather than the time values. When you plot the data, the signal trace uses the sample data, as the following example figure shows.

Import Ensemble Datastore
This workflow describes the steps for importing a fileEnsembleDatastore object or a simulationEnsembleDatastore object. Ensemble datastore objects provide
information that allows the app to interact with external files. They include specifications
for the variables you want to read, the variable types, and the source file locations. When
you import an ensemble datastore, the app stores results within the app memory. The
ReadSize property must be equal to 1 so that the
app reads one datastore member at a time. For more information about ensemble datastores,
see Data Ensembles for Condition Monitoring and Predictive Maintenance.
Select Data Source and View Source Variables
Initiate the import process. In the Select dataset from workspace
pane, select the ensemble datastore. The app uses the ensemble datastore properties for
SelectedVariables to select the variables to display. The app also
uses the DataVariables, IndependentVariables,
and ConditionVariables properties to determine which variables belong
to which of these variable types. The example figure illustrates the import of a
simulationEnsembleDatastore object ens.

In the preceding example figure, the app interprets ens as follows:
The data variables
FlowandPressureappear identical in form to timetable-based variables extracted from tables.ensincludes the standardsimulationEnsembleDatastorevariableSimulationInputin theSelectedVariablesproperty. However, the app does not support theSimulationInputdata format and displays an orange warning icon. The app also automatically clears the selection and deletesSimulationInputfromens.SelectedVariables.CombinedFlagappears as a condition variable in accordance withens.ConditionVariables.
Retain Your Results
To retain your local results at the end of the session, You can also export them as a
table to the MATLAB workspace. From the workspace, you can store the results in the file, or
integrate results selectively using ensemble datastore commands.
Import Labeled Signal Set (LSS)
This workflow describes the steps for importing an LSS, or labeledSignalSet
object, from Signal Labeler in
Signal Processing Toolbox™. You can import only LSS objects with a LabelType
property of "attribute", and not "roi" or
"point". The signals you import must be full signals and not framed
(segmented) signals.
Select Data Source and View Contents
Initiate the import process. In the Select dataset from workspace pane, select the LSS. The app retains the LSS labels and interprets the variables as signals, condition variables, and features, according to the variable roles in the LSS and their data type.

View Imported Variables and Features in Variables Pane
View the imported variables and features in the variables pane. The imported data retains the labels and the variable and feature designations.

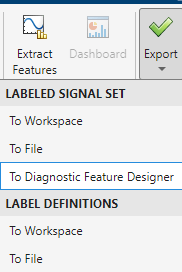
Export LSS data directly from Signal Labeler to Diagnostic Feature Designer
You can export LSS data directly from Signal Labeler to Diagnostic Feature Designer. To do so, in Signal Labeler, select the signal sets you want to import.
A New Session window opens up in Diagnostic Feature Designer. Use the guidance in the previous two sections to complete the import.
See Also
Diagnostic Feature
Designer | table | timetable | simulationEnsembleDatastore | fileEnsembleDatastore | idfrd | subset | labeledSignalSet
Topics
- Data Ensembles for Condition Monitoring and Predictive Maintenance
- Organize System Data for Diagnostic Feature Designer
- Import and Visualize Ensemble Data in Diagnostic Feature Designer
- Prepare Matrix Data for Diagnostic Feature Designer
- Data Preprocessing for Condition Monitoring and Predictive Maintenance