Design Bin Picking Scene and Sensors in Unreal Engine
This example illustrates how to simulate a bin picking system in Unreal Engine with Simulink by using Simulink 3D Animation. This example is part of a series under Intelligent Bin Picking System in Simulink.
In robotics, bin picking involves using a manipulator to retrieve items from a bin. Intelligent bin picking represents an advanced version of this process, offering greater autonomy. Parts are perceived using a camera system, and a planner generates collision-free trajectories that adapt to the scene. The whole system requires a hardware or comprehensive event-based physics simulation to be properly tested.
This example shows how to create a target component. It builds a scene to use for simulating the bin-picking system in Unreal Engine. The component is stored as a standalone model that used as a referenced model in a harness. The example further uses a test harness to validate the scene behavior.
Model Overview
Open the test harness containing the planner model and navigate to the planner subsystem to inspect its contents. To do so, it is necessary to first initialize the contents. This is also done automatically in a callback when the model is opened.
initRobotModelParams_SL3DTarget;
open_system('BinPickingScene_Harness')
open_system('BinPickingScene_Harness/Target Scene')

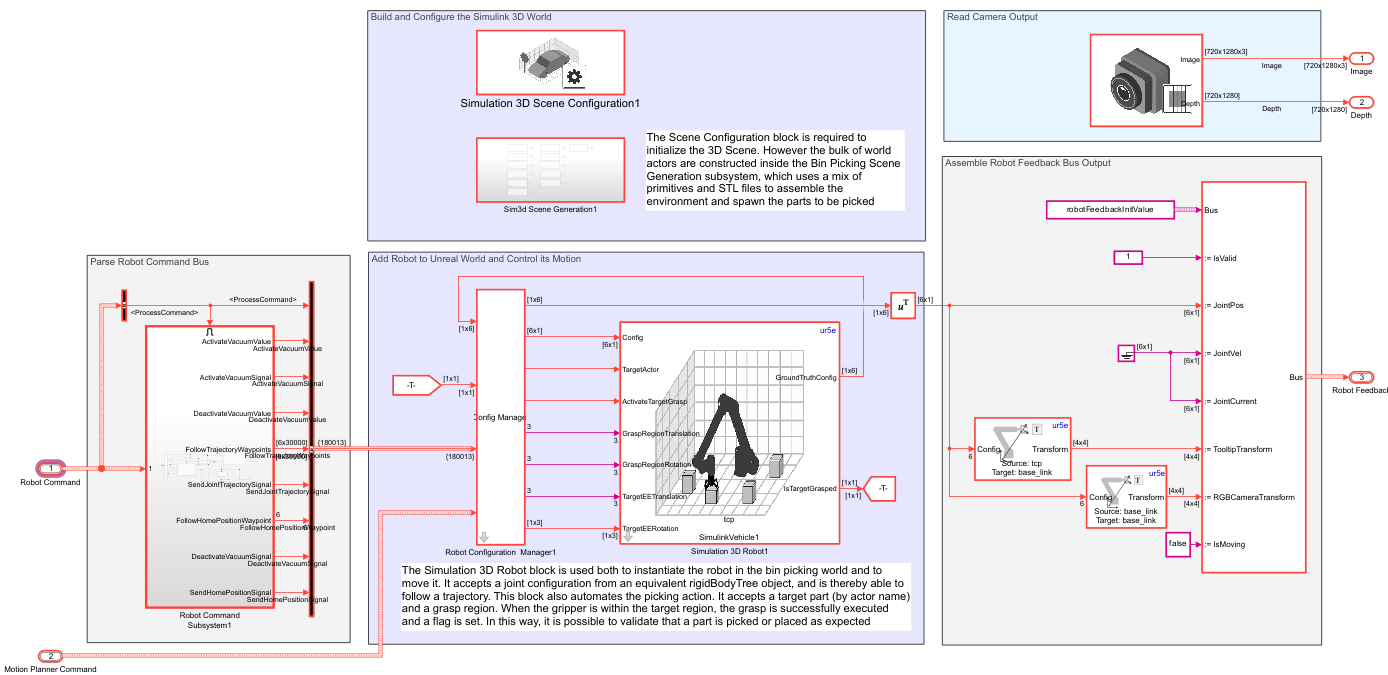
The two areas, Parse Robot Command Bus and Assemble Robot Feedback Bus Output, contain blocks dedicated to converting between the input and output ports. These are specified as standard bus interfaces and commands that are compatible with the local simulation. The remaining areas of the model show how the model is built and controlled. This has three main sections:
Build and Configure Scene with Simulink 3D Animation
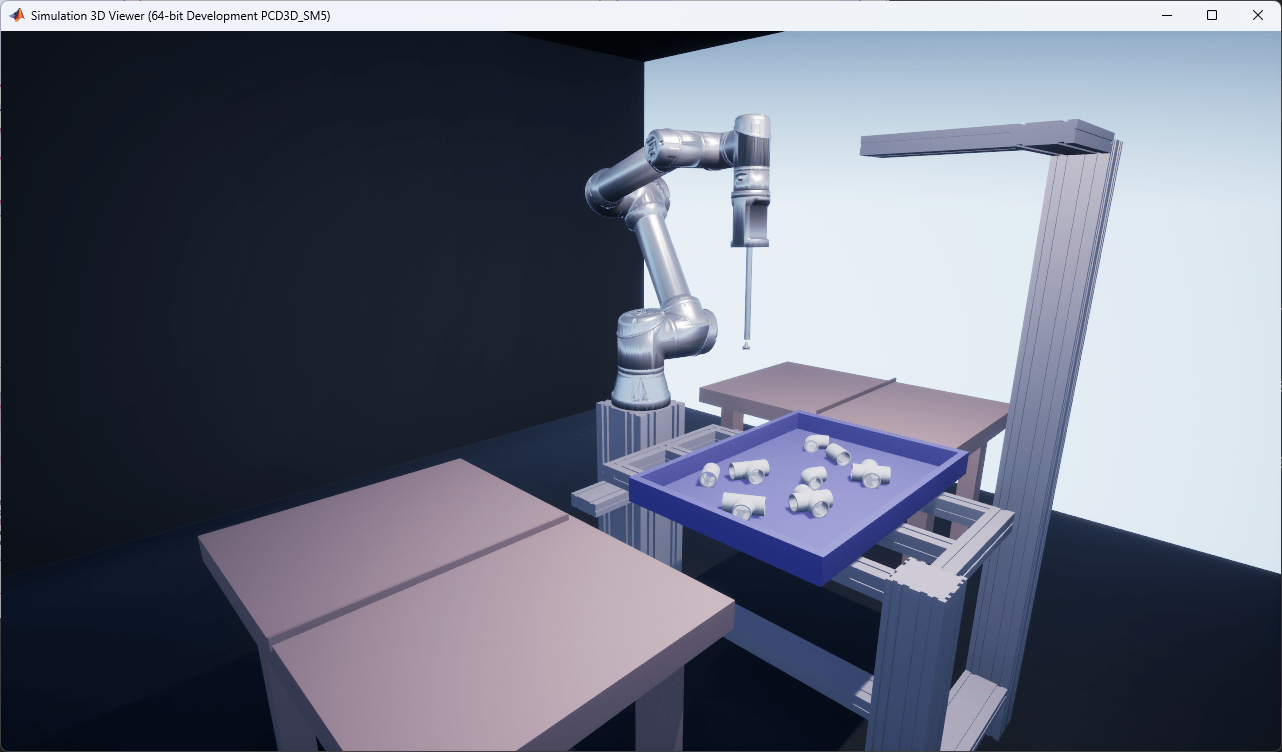
Blocks from Simulink 3D Animation are used to initialize an Unreal scene from MATLAB and populate it with the bin picking setup. A Simulation 3D Scene Configuration block is needed to initialize the basic scene, while the remaining elements (bin and parts) are populated within the Build Simulink 3D Scene subsystem. The robot is added directly from the rigidBodyTree using the Simulation 3D Robot block.
Looking inside the 3D scene subsystem, it contains a number of Simulation 3D Actor blocks. These contain initialization scripts that load primitives, lights, and the provided STL files. In particular, the block labeled Build Bin Picking Scene contains a script that loads and places the provided STL files, which define the bin, stand, and parts.
Model and Control Robot
As noted in the Build and Configure Scene with Simulink 3D Animation section, the robot is added using a Simulation 3D Robot block that takes the rigidBodyTree as an input. In this way, the robot can be added directly from a rigidBodyTree and subsequently controlled with the same block. Additionally, the Simulation 3D Robot block allows the robot to simulate pick and place actions by attaching and releasing the target part when it is within a target range. It is also possible to add the robot in Unreal using an actor block and still control it using the Simulink 3D Robot block.
To move the robot, joint configurations are passed directly to the Config inport. Additionally, several parameters are used to define the picking logic. To ensure success is measured for the right part, ground truth information is needed, you must specify the name of the actor object to be picked. This is provided by reading from the motion planner task instruction. The other input parameters to the block specify the range within which the block can be successfully picked, and the offset from the end effector. With this approach, the robot only picks and attaches the block to the end effector if the gripper reaches the target pose. For more information on this block, see Simulation 3D Robot.
Read Camera Output
The model also includes sensors that provide feedback to the model. In bin picking systems, a camera such as an Intel® RealSense™ is common as it provides raw image and depth data out so a perception algorithm can identify the pose of objects. With Unreal Engine, you can use the Simulation 3D Camera block to return camera and depth measurements. The outputs from the perception component are then formatted into the standard bus interfaces, described in the Bus Overview.
Bus Overview
The model accepts a bus of robot commands, indicating the generalized motion instructions for the robot, as well as a bus of motion planner commands, which is used to read ground truth data that helps evaluate the success of simulations. It outputs camera image RGB and depth data, as well as a robot response bus, which provides statuses and actual robot poses. Each section in Bus Overview, describe the structure of a bus. Note that you may choose to build a completely different interface, but you must ensure that you use the same buses to communicate. Also note that these buses have many fields, but only a few necessary.
Robot Command Bus
The simulated robot receives commands from a command bus. You can observe the structure of this bus by calling its initial value.
robotCommandInitValue
robotCommandInitValue = struct with fields:
       CommandToProcess: 0
         ProcessCommand: 0
        JointTrajectory: [1×1 struct]
        JointConstraint: [2×1 double]
           JointCommand: [6×1 double]
    CartesianConstraint: [4×1 double]
       CartesianCommand: [6×1 double]
         ToolConstraint: 0
            ToolCommand: 0
There are several important parameters:
The
CommandToProcessfield isunit32of typeenumCmdthat is used to determine whether the command is a known value. For example, like "go to home position" or a custom command like "follow a specific trajectory". You can see all the registered command types by printing the enumeration to the command line.
enumeration('enumCmd')Enumeration members for class 'enumCmd':
undefined
reboot_arm
emergency_stop
clear_faults
stop_action
pause_action
resume_action
precomputed_joint_trj
joint_reach
cartesian_reach
tool_reach
tool_speed
activate_vacuum
deactivate_vacuum
send_to_home
The
ProcessCommandis a logical value indicating whether to process additional data on the command.The
JointTrajectoryarray is a structure provides joint trajectories that have been planned.The
ToolCommandis a number that indicates whether there is expected action, such as grasp and release, for the end effector tool.
Take a closer look at the JointTrajectory field.
robotCommandInitValue.JointTrajectory
ans = struct with fields:
       NumPoints: 0
    MaxNumPoints: 30000
            Time: [0 0 0 0 0 0 0 0 0 0 0 0 0 0 0 0 0 0 0 0 0 0 0 0 0 0 0 0 0 0 0 0 0 0 0 0 0 0 0 0 0 0 0 0 0 0 0 0 0 0 0 0 0 0 0 0 0 0 0 0 0 0 0 0 0 0 0 0 0 0 0 0 0 0 0 0 0 0 0 0 0 0 0 0 0 0 0 0 0 0 0 0 0 0 0 0 0 0 0 0 0 0 0 0 0 0 0 … ] (1×30000 double)
        JointPos: [6×30000 double]
        JointVel: [6×30000 double]
        JointAcc: [6×30000 double]
        JointTau: [6×30000 double]
The Joint Trajectory bus is used within the robot command for cases where the robot is expected to follow a specified trajectory. It is important to pass these in a generalized form, since different robot interfaces require very different trajectory following methods. For example, many ROS interfaces rely on a standard ROS_control platform that simulates a low-level controller, while direct-to-robot interfaces like URScript accept the entire trajectory as a single input. In this application, the robot follows the specified trajectory exactly, following the assumption of a capable low-level controller.
The trajectory bus used here is detailed in the Design a Trajectory Planner for a Robotic Manipulator example, but the following properties are relevant here
The
NumPointsproperty sets the number of points actually used by the trajectory. For example, for a 5 second trajectory sampled at 1000 Hz, only the first 5000 indices will be used.The
Timeproperty indicates the sampled trajectory time. This is initialized to aMaxNumPoints-element vector of zeros, and the planned time occupies the firstNumPointselements.The
JointPos,JointVel,JointAcc, andJointTaucontain the joint configuration, velocity, acceleration, and jerk, respectively. These are initialized to N-by-MaxNumPointsmatrices of zeros, but the planned trajectory occupies the first N-by-NumPointsindices. Here N is the number of nonfixed joints in the robot. For the UR5e cobot, N is equal to 6.
Motion Planner Command Bus
The motion planner command bus is a set of instructions to the motion planner. It has a number of important properties for motion planning, detailed in Design a Trajectory Planner for a Robotic Manipulator, but within this model, only the following fields are relevant:
The
Tasksarray is a structure that details each specific task. This is where the bulk of the planning instruction is provided. Two supplementary properties describe these tasks:MaxNumTasksindicates the upper bound on the number of tasks per command, andNumTasksindicates the number of provided tasks in this command. However, in this model, these are unused, and only the first task is queried. This array is further detailed below. Within the tasks, this model primarily uses theNameproperty to verify that the correct actor is picked from the bin
Camera RGB Image and Depth Data
This model returns outputs from a depth camera, like the Intel RealSense. These are assumed to be a 720-by-1280-by-3 matrix of RGB values (for a 720-by-1280 pixel camera) and a 720-by-1280 matrix of depth data. If a camera with a different resolution is used, you must update the inports because the size is hard-coded in the parameters to assist with model compilation.
Robot Response Bus
After the robot has been simulated, some success criteria are returned to the task scheduler. Take a look at the initial value for the feedback bus to understand its contents.
robotFeedbackInitValue
robotFeedbackInitValue = struct with fields:
               IsValid: 0
              JointPos: [6×1 double]
              JointVel: [6×1 double]
              JointTau: [6×1 double]
          JointCurrent: [6×1 double]
      TooltipTransform: [4×4 double]
    RGBCameraTransform: [4×4 double]
              IsMoving: 0
There are a number of important properties.
Successis a logical indicating the overall success of the command.The
JointPos,JointVel, andJointTauindicate the current robot configuration, velocity, and torque.The
IsMovingflag returns true when the robot is still in motion. This flag is most frequently used by ROS interfaces.
The other parameters in the bus can also be used to provide feedback on the simulation status.
Validate the Simulation with Commands in a Test Harness
We can validate the bin picking scene component model using a test harness. The harness is designed to test the two main functionalities that this block must achieve:
Given a trajectory, move the robot from its current pose along that trajectory to completion.
Given a part to be picked, pick up the part.
Given an instruction to return home, move from the current pose to the home configuration along a physically feasible trajectory.
The provided harness does this using two separate subsystems that alternate execution.
Open the Bin Picking Scene Harness
Open the model
open_system("BinPickingScene_Harness");
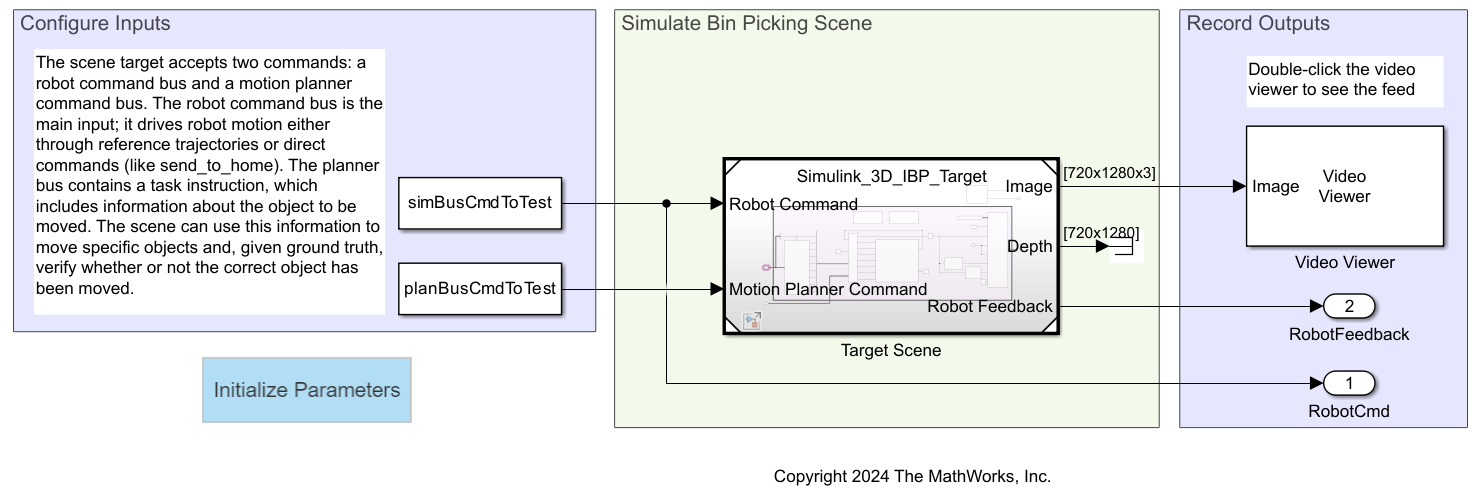
The model contains three main sections, identified by the three shaded areas in the model:
Configure Inputs — First, input buses are assembled. These are passed as constants with the correct bus type as the output
Simulate Bin Picking Scene — The scene is simulated as a referenced model, detailed above.
Record outputs — The outcome of the simulation is recorded in two outports as well as a video viewer, which displays the camera feed.
Build a Command to Test
To verify model behavior, build input commands that match some expected target behaviors.
%% Initialize the bus signal
simBusCmdToTest = robotCommandInitValue;
planBusCmdToTest = motionPlannerCmdInitValue;
The model primarily accepts a simulation bus input. This notably contains instructions on what task to execute, and if that task is a trajectory, it includes the reference profile.
simBusCmdToTest.CommandToProcess = int32(enumCmd.send_to_home);
The planner command is just used to validate that a planner execution. This means that the important parts are the task and target object.
% Assign a meaningful command
planBusCmdToTest.RequestID = int32(1);
planBusCmdToTest.NumTasks = uint32(4);
planBusCmdToTest.InitialPositions = homePosition(:);
planBusCmdToTest.MaxIterations = uint32(300);
planBusCmdToTest.SampleTime = 0.2;
planBusCmdToTest.NumObstacleObjects = uint32(2);

% Initialize a pick task
pickTask = planBusCmdToTest.Tasks(1);
pickTask.Name(1:14) = uint8('TooltipTaskSE3');
pickTask.Type(1:4) = uint8('Pick');
pickTask.FrameName(1:6) = uint8('Bellow');
pickTask.p = [0.485; -0.0032; -0.0368];
pickTask.eulZYX = [1.2041; pi; 0];
pickTask.MaxLinVel = 0.1;
pickTask.MaxAngVel = 0.4;
pickTask.Weight = 1;
pickTask.MaxLinError = 0.01;
pickTask.MaxAngError = 0.0349;
planBusCmdToTest.Tasks(1) = pickTask;
Simulate and Verify the Outcome
Simulate the model for each of the test cases, then verify that the outcome matches the expected behavior.
sim("BinPickingScene_Harness.slx");
See Also
Simulation 3D Scene Configuration | Simulation 3D Robot | Simulation 3D Camera