启用便利函数以设置坐标区属性
当您将图开发为 ChartContainer 类的子类时,请考虑启用一些 MATLAB® 便利函数来设置坐标区上的属性。例如,您可以将您的类设计为支持 title 函数。通过启用便利函数,您可以提供与 MATLAB 绘图函数一致的用户体验。
支持不同类型的属性
启用便利函数的方式取决于该函数是控制非计算属性还是计算属性。下表列出了您可以使用的便利函数。
| 便利函数 | 关联的坐标区属性 | 属性类型 |
|---|---|---|
| 非计算 | |
分别为 | 非计算 | |
分别为 | 计算 | |
xticks, yticks, zticks | 分别为 | 计算 |
分别为 | 计算 | |
| 计算 |
为非计算的属性启用函数
非计算的属性是固定值。除非用户或您的代码显式更改它们,否则它们不会变。
要为非计算的属性启用便利函数,请在类中定义公共属性,该属性存储要控制的坐标区属性值。然后定义公共方法,该方法与您要支持的便利函数具有相同的名称并支持相同的调用语法。向设置属性值的方法中添加一行代码。例如,假设有一个类,该类包含一个名为 TitleText 的公共属性来存储标题。以下代码显示该类的 title 方法。
function title(obj,txt)
       obj.TitleText = txt;
end
接下来,向 update 方法添加一行代码,该方法调用 MATLAB 便利函数来设置对应的坐标区属性。
title(getAxes(obj),obj.TitleText);
执行上述步骤并保存类文件后,您可以创建图实例,并调用 title 函数以显示标题。这样做会触发以下调用序列:
该类的
title方法设置TitleText属性,该属性标记要更新的图。下次
drawnow执行时,update方法会执行并对坐标区调用title函数。title函数更新坐标区上的Title属性。
为计算的属性启用函数
计算的属性由坐标区控制。坐标区根据坐标区的内容和基础数据重新计算其值。
要为计算的属性启用便利函数,请定义一个方法,该方法与要启用的便利函数具有相同的名称和调用语法。在该方法中,调用便利函数并将坐标区指定为第一个参量。例如,要启用 xlim 函数,请在您的类中定义名为 xlim 的方法。由于 xlim 函数接受可变数量的输入参量,您必须指定 varargin 作为第二个输入参量。xlim 函数还支持可变数量的输出参量,因此您必须指定 [varargout{1:nargout}] 来支持这些参量。
function varargout = xlim(obj,varargin)
    ax = getAxes(obj);
    [varargout{1:nargout}] = xlim(ax,varargin{:});
end
要提供对您的图上对应属性值的访问,请在您的类上定义两个从属属性。第一个属性提供对便利函数控制的值的访问。另一个属性提供对模式属性的访问,该属性指示如何控制第一个属性。模式属性的值可以是 'auto' 或 'manual'。将这些属性定义为从属属性,以便图不存储这些值。坐标区控制并存储这些值。例如,要提供对坐标区上 XLim 和 XLimMode 属性的访问,请定义一对从属属性,称为 XLimits 和 XLimitsMode。
properties (Dependent)
    XLimits (1,2) double
    XLimitsMode {mustBeMember(XLimitsMode,{'auto','manual'})}
end
接下来,为每个从属属性定义 set 和 get 方法。在每个方法中,设置对应的坐标区属性。以下代码显示 XLimits 和 XLimitsMode 属性的 set 方法和 get 方法。
function set.XLimits(obj,xlm)
    ax = getAxes(obj);
    ax.XLim = xlm;
end
function xlm = get.XLimits(obj)
    ax = getAxes(obj);
    xlm = ax.XLim;
end
function set.XLimitsMode(obj,xlmmode)
    ax = getAxes(obj);
    ax.XLimMode = xlmmode;
end
function xlm = get.XLimitsMode(obj)
    ax = getAxes(obj);
    xlm = ax.XLimMode;
end
执行上述步骤并保存类文件后,您可以创建图实例,并调用 xlim 函数来更改图中的 x 轴范围。会执行 xlim 方法,该方法又会调用 xlim 函数来更新坐标区上的 XLim 属性。
注意
默认情况下,当用户调用 xlim 和 ylim 函数时,MATLAB 不存储任何更改。因此,此示例在实时编辑器中不受支持。要支持涉及保存和加载更改的实时编辑器和工作流,请参阅保存和加载图类的实例。
支持 title、xlim 和 ylim 函数的图类
此示例说明如何定义一个支持 title、xlim 和 ylim 函数的图类。以下代码说明如何:
定义一个
TitleText属性并实现一个title方法,以便图的实例支持title函数。实现
xlim和ylim方法,以便图实例支持xlim和ylim函数。定义允许用户获取和设置 x 和 y 轴范围的属性。
将
Bar和ErrorBar对象合并到单一图中。
要定义该类,请将以下代码复制到编辑器中,并将其以名称 BarErrorBarChart.m 保存在可写文件夹中。
classdef BarErrorBarChart < matlab.graphics.chartcontainer.ChartContainer
    properties
        XData (1,:) double = NaN
        YData (1,:) double = NaN
        EData (1,:) double = NaN
        TitleText (:,:) char = ''
    end
    properties (Dependent)
        % Provide properties to support setting & getting
        XLimits (1,2) double
        XLimitsMode {mustBeMember(XLimitsMode,{'auto','manual'})}
        YLimits (1,2) double
        YLimitsMode {mustBeMember(YLimitsMode,{'auto','manual'})}
    end
    properties (Access = private)
        BarObject (1,1) matlab.graphics.chart.primitive.Bar
        ErrorBarObject (1,1) matlab.graphics.chart.primitive.ErrorBar
    end

    methods(Access = protected)
        function setup(obj)
            ax = getAxes(obj);
            obj.BarObject = bar(ax,NaN,NaN);
            hold(ax,'on')
            obj.ErrorBarObject = errorbar(ax,NaN,NaN,NaN);
            obj.ErrorBarObject.LineStyle = 'none';
            obj.ErrorBarObject.LineWidth = 2;
            obj.ErrorBarObject.Color = [0.6 0.7 1];
            hold(ax,'off');
        end
        function update(obj)
            % Update Bar and ErrorBar XData and YData
            obj.BarObject.XData = obj.XData;
            obj.BarObject.YData = obj.YData;
            obj.ErrorBarObject.XData = obj.XData;
            obj.ErrorBarObject.YData = obj.YData;

            % Update ErrorBar delta values
            obj.ErrorBarObject.YNegativeDelta = obj.EData;
            obj.ErrorBarObject.YPositiveDelta = obj.EData;

            % Update axes title
            ax = getAxes(obj);
            title(ax,obj.TitleText);
        end
    end

    methods
        % xlim method
        function varargout = xlim(obj,varargin)
            ax = getAxes(obj);
            [varargout{1:nargout}] = xlim(ax,varargin{:});
        end
        % ylim method
        function varargout = ylim(obj,varargin)
            ax = getAxes(obj);
            [varargout{1:nargout}] = ylim(ax,varargin{:});
        end
        % title method
        function title(obj,txt)
            obj.TitleText = txt;
        end

        % set and get methods for XLimits and XLimitsMode
        function set.XLimits(obj,xlm)
            ax = getAxes(obj);
            ax.XLim = xlm;
        end
        function xlm = get.XLimits(obj)
            ax = getAxes(obj);
            xlm = ax.XLim;
        end
        function set.XLimitsMode(obj,xlmmode)
            ax = getAxes(obj);
            ax.XLimMode = xlmmode;
        end
        function xlm = get.XLimitsMode(obj)
            ax = getAxes(obj);
            xlm = ax.XLimMode;
        end

        % set and get methods for YLimits and YLimitsMode
        function set.YLimits(obj,ylm)
            ax = getAxes(obj);
            ax.YLim = ylm;
        end
        function ylm = get.YLimits(obj)
            ax = getAxes(obj);
            ylm = ax.YLim;
        end
        function set.YLimitsMode(obj,ylmmode)
            ax = getAxes(obj);
            ax.YLimMode = ylmmode;
        end
        function ylm = get.YLimitsMode(obj)
            ax = getAxes(obj);
            ylm = ax.YLimMode;
        end
    end
end
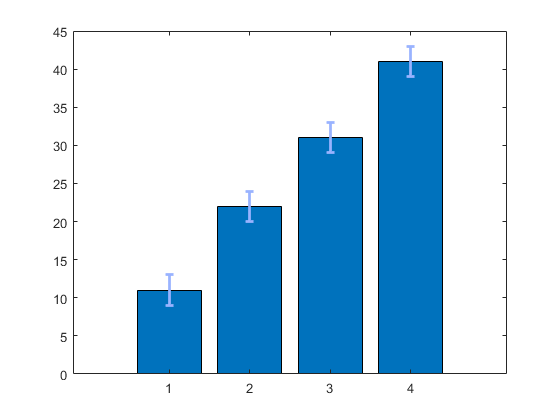
保存 BarErrorBarChart.m 后,创建图实例。
BarErrorBarChart('XData',[1 2 3 4],'YData',[11 22 31 41],'EData',[2 2 2 2]);

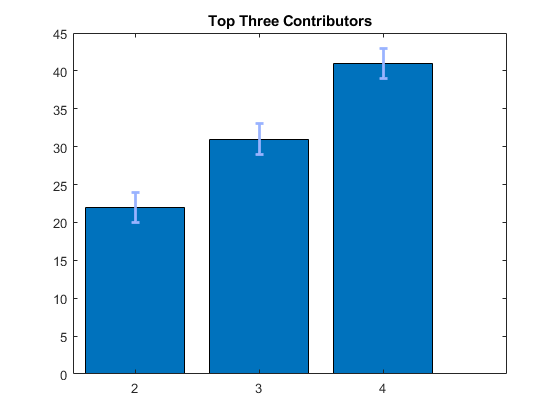
通过调用 title 函数指定标题。然后通过调用 xlim 函数放大最后三个条形。
title('Top Three Contributors')
xlim([1.5 5])

另请参阅
类
函数
属性
- Axes 属性 | Bar 属性 | ErrorBar 属性