使用 YOLO v3 深度学习进行目标检测
R2026b此示例说明如何使用 You Only Look Once 版本 3 (YOLO v3) 深度学习网络检测图像中的目标。在此示例中,您将:
配置用于训练和测试 YOLO v3 目标检测网络的数据集。还将对训练数据集执行数据增强,以提高网络效率。
使用
yolov3ObjectDetector(Computer Vision Toolbox) 函数创建 YOLO v3 目标检测器,并使用trainYOLOv3ObjectDetector(Computer Vision Toolbox) 函数训练该检测器。
此示例还提供了一个预训练的 YOLO v3 目标检测器,用于检测图像中的车辆。该预训练网络使用 SqueezeNet 作为骨干网络,并基于车辆数据集对其进行训练。有关 YOLO v3 目标检测网络的详细信息,请参阅Getting Started with YOLO v3 (Computer Vision Toolbox)。
加载数据
此示例使用包含 295 个图像的小型标注数据集。其中许多图像来自加州理工学院的 Caltech Cars 1999 和 2001 数据集,由 Pietro Perona 创建并经许可使用。每个图像包含一个或两个带标签的车辆实例。小型数据集适用于探查 YOLO v3 训练过程,但在实践中,需要更多带标签的图像才能训练出稳健的网络。
解压缩车辆图像并加载车辆真实值数据。
unzip vehicleDatasetImages.zip
data = load("vehicleDatasetGroundTruth.mat");
vehicleDataset = data.vehicleDataset;
车辆数据存储在一个包含两列的表中。第一列包含图像文件路径,第二列包含边界框。
显示数据集的前几行。
vehicleDataset(1:4,:)
ans = 4×2 table
    'vehicleImages/image_00001.jpg'    [220,136,35,28]
    'vehicleImages/image_00002.jpg'    [175,126,61,45]
    'vehicleImages/image_00003.jpg'    [108,120,45,33]
    'vehicleImages/image_00004.jpg'    [124,112,38,36]
添加本地车辆数据文件夹的完整路径。
vehicleDataset.imageFilename = fullfile(pwd,vehicleDataset.imageFilename);
将数据集分成训练集、验证集和测试集。选择 60% 的数据用于训练,10% 用于验证,其余用于测试经过训练的检测器。
rng(0);
shuffledIndices = randperm(height(vehicleDataset));
idx = floor(0.6 * length(shuffledIndices) );

trainingIdx = 1:idx;
trainingDataTbl = vehicleDataset(shuffledIndices(trainingIdx),:);

validationIdx = idx+1 : idx + 1 + floor(0.1 * length(shuffledIndices) );
validationDataTbl = vehicleDataset(shuffledIndices(validationIdx),:);

testIdx = validationIdx(end)+1 : length(shuffledIndices);
testDataTbl = vehicleDataset(shuffledIndices(testIdx),:);
使用 imageDatastore 和 boxLabelDatastore (Computer Vision Toolbox) 对象创建数据存储,以便在训练和评估期间加载图像和标签数据。
imdsTrain = imageDatastore(trainingDataTbl{:,"imageFilename"});
bldsTrain = boxLabelDatastore(trainingDataTbl(:,"vehicle"));

imdsValidation = imageDatastore(validationDataTbl{:,"imageFilename"});
bldsValidation = boxLabelDatastore(validationDataTbl(:,"vehicle"));

imdsTest = imageDatastore(testDataTbl{:,"imageFilename"});
bldsTest = boxLabelDatastore(testDataTbl(:,"vehicle"));
合并图像数据存储和边界框标签数据存储。
trainingData = combine(imdsTrain,bldsTrain);
validationData = combine(imdsValidation,bldsValidation);
testData = combine(imdsTest,bldsTest);
使用随此示例附带的 validateInputData 支持函数来检测无效输入数据,例如:
格式无效或包含 NaN 的图像
包含零值/NaN/Inf/空值的边界框
缺失/非分类标签
边界框的值应为有限的正整数值,不能包含 NaN 值。边界框应位于图像边界内,且其高度和宽度均为正值。必须丢弃或修复任何无效的输入数据,以确保正确训练。
validateInputData(trainingData);
validateInputData(validationData);
validateInputData(testData);
数据增强
数据增强可通过在训练期间随机变换原始数据来提高网络准确度。通过使用数据增强,您可以为训练数据添加更多变化,但又不必增加带标签的训练样本的数量。
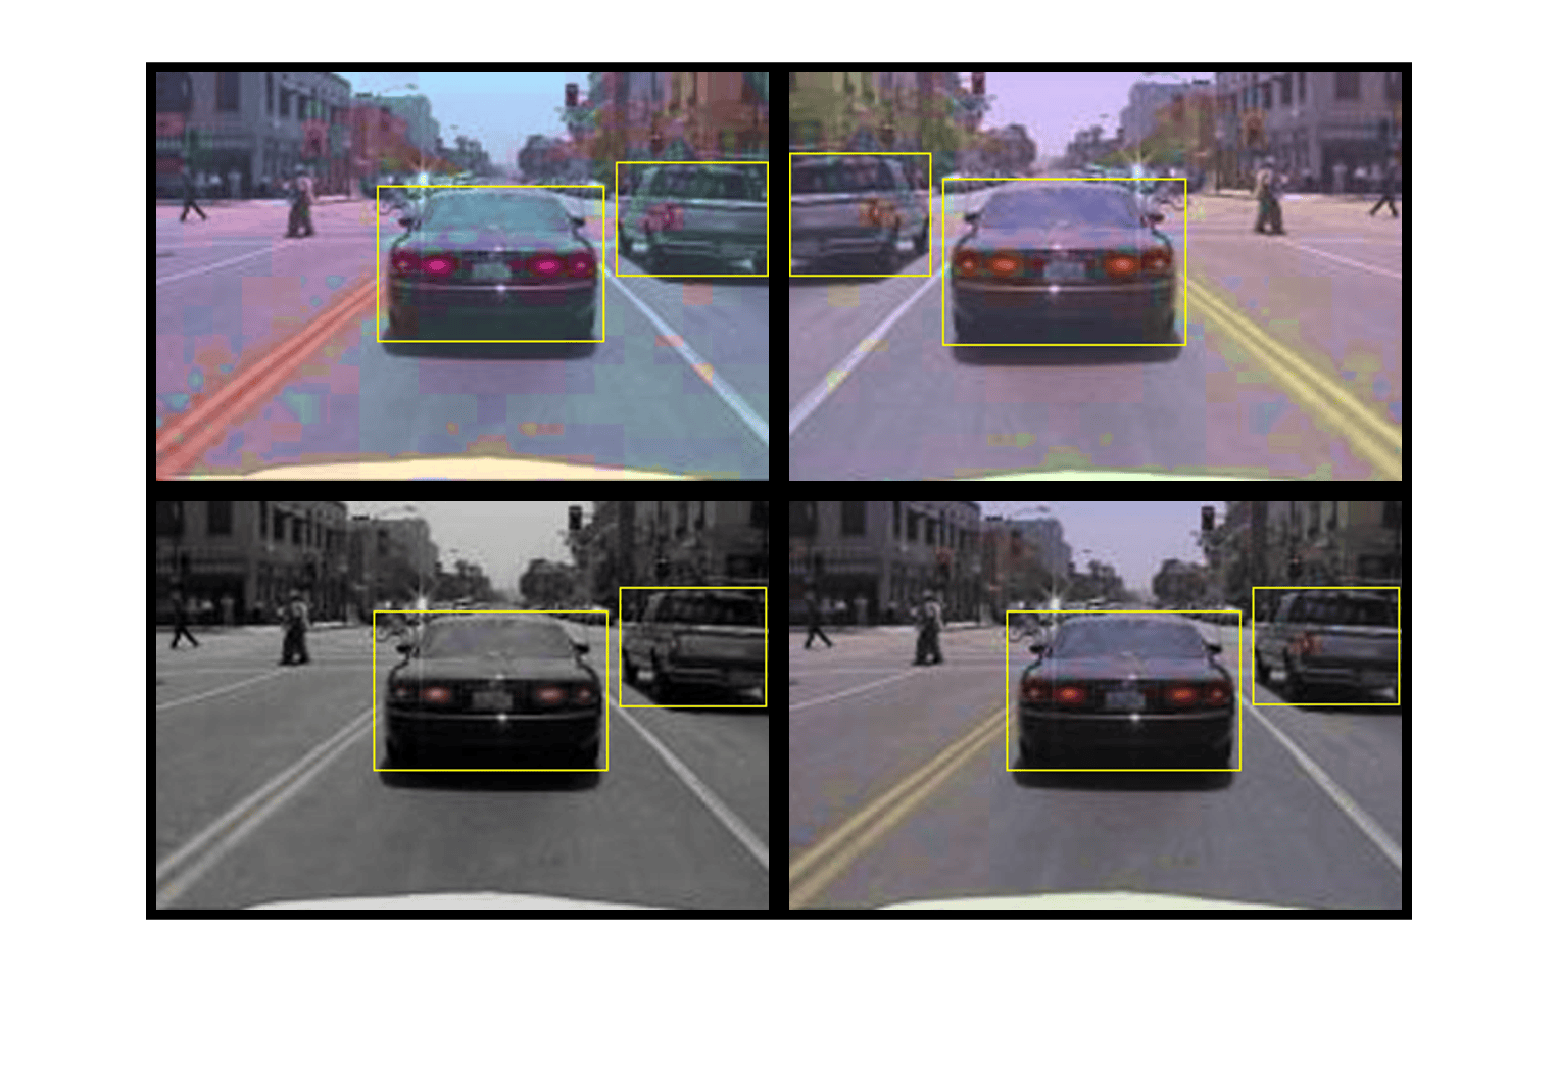
使用 transform 函数对训练数据应用自定义数据增强。augmentData 辅助函数对输入数据应用以下增强:
HSV 空间中的颜色抖动增强
随机水平翻转
随机缩放 10%
augmentedTrainingData = transform(trainingData,@augmentData);
读取同一图像四次,并显示增强的训练数据。
augmentedData = cell(4,1);
for k = 1:4
    data = read(augmentedTrainingData);
    augmentedData{k} = insertShape(data{1,1},"Rectangle",data{1,2});
    reset(augmentedTrainingData);
end
figure
montage(augmentedData,BorderSize=10)
reset(augmentedTrainingData);
定义 YOLO v3 目标检测器
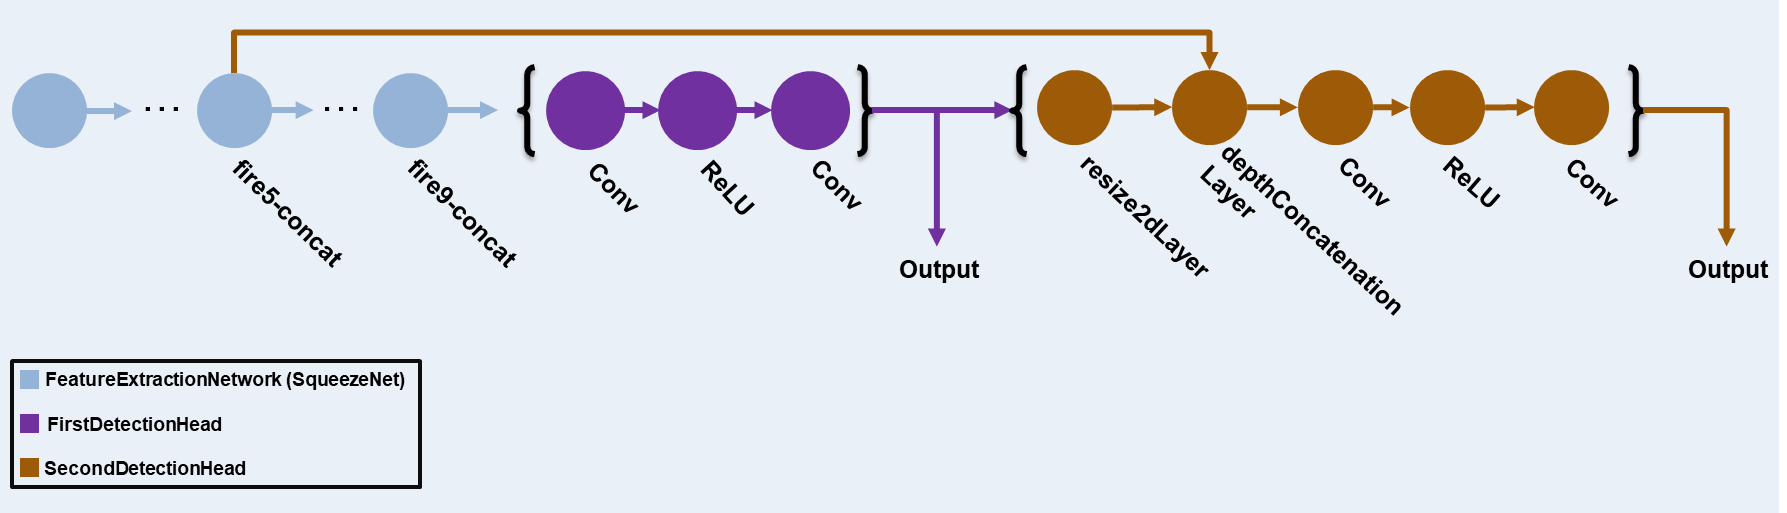
此示例中的 YOLO v3 检测器基于 SqueezeNet,并使用 SqueezeNet 中的特征提取网络,在末端增加两个检测头。第二个检测头的大小是第一个检测头的两倍,以便它能够更好地检测小目标。请注意,您可以根据要检测的目标大小指定任意数量的不同大小的检测头。YOLO v3 检测器使用根据训练数据估计的锚框,获得与数据集类型相对应的更好的初始先验,并帮助检测器学习准确地预测边界框。有关锚框的信息,请参阅Anchor Boxes for Object Detection (Computer Vision Toolbox)。
YOLO v3 检测器中使用的 YOLO v3 网络如下图所示。
您可以使用 深度网络设计器 创建图中所示的网络。
指定网络输入大小。选择网络输入大小时,请考虑运行网络本身所需的最低大小、训练图像的大小以及基于所选大小处理数据所产生的计算成本。如果可行,请选择接近训练图像大小且大于网络所需输入大小的网络输入大小。为了降低运行示例的计算成本,请将网络输入大小指定为 [227 227 3]。
networkInputSize = [227 227 3];
首先,由于此示例中使用的训练图像大于 227×227 且大小各不相同,因此使用 transform 函数对训练数据进行预处理,以用于计算锚框。将锚框数指定为 6,以在锚框数与平均交并比 (IoU) 之间取得良好的权衡。使用 estimateAnchorBoxes 函数估计锚框的数量及其平均 IoU 值。有关估计锚框的详细信息,请参阅Estimate Anchor Boxes from Training Data (Computer Vision Toolbox)。如果使用预训练的 YOLOv3 目标检测器,则需要指定基于该特定训练数据集计算出的锚框。请注意,估计过程不是确定性的。为了防止在调节其他超参数时估计的锚框发生变化,请在估计之前使用 rng 函数设置随机种子。
rng(0)
trainingDataForEstimation = transform(trainingData,@(data)preprocessData(data,networkInputSize));
numAnchors = 6;
[anchors,meanIoU] = estimateAnchorBoxes(trainingDataForEstimation,numAnchors)
anchors = 6×2

     42     37
    160    130
     96     92
    141    123
     35     25
     69     66
meanIoU =
0.8430
指定要在两个检测头中使用的 anchorBoxes。anchorBoxes 是 [Mx1] 元胞数组,其中 M 表示检测头的数量。每个检测头由一个 [Nx2] 的 anchors 矩阵组成,其中 N 是要使用的锚框数量。根据特征图大小为每个检测头选择 anchorBoxes。在较低尺度处使用较大的 anchors,在较高尺度处使用较小的 anchors。为此,请对 anchors 进行排序(较大的锚框排在前面),然后将前 3 个锚框分配给第一个检测头,将接下来的 3 个锚框分配给第二个检测头。
area = anchors(:,1).*anchors(:,2);
[~,idx] = sort(area,"descend");
anchors = anchors(idx,:);
anchorBoxes = {anchors(1:3,:)
    anchors(4:6,:)
    };
加载基于 ImageNet 数据集预训练的 SqueezeNet 网络,然后指定类名称。您也可以选择加载基于 COCO 数据集训练的不同预训练网络(例如 tiny-yolov3-coco 或 darknet53-coco),或者基于 ImageNet 数据集训练的不同预训练网络(例如 MobileNet-v2 或 ResNet-18)。使用预训练网络时,YOLO v3 的性能更好,训练速度也更快。
baseNetwork = imagePretrainedNetwork("squeezenet");
classNames = trainingDataTbl.Properties.VariableNames(2:end);
接下来,通过添加检测网络源来创建 yolov3ObjectDetector 对象。选择最佳的检测网络源需要反复试错,您可以使用 analyzeNetwork 查找网络中潜在检测网络源的名称。将 DetectionNetworkSource 输入参量指定为 fire9-concat 和 fire5-concat 层。
yolov3Detector = yolov3ObjectDetector(baseNetwork,classNames,anchorBoxes, ...
    DetectionNetworkSource=["fire9-concat","fire5-concat"],InputSize=networkInputSize);
或者,您也可以不使用上述基于 SqueezeNet 创建的网络,而是使用其他基于更大数据集(例如 MS-COCO)训练的预训练 YOLO v3 架构,在自定义目标检测任务上训练检测器。要执行迁移学习,请修改 classNames 和 anchorBoxes 名称-值参量值。
指定训练选项
使用 trainingOptions 指定网络训练选项。使用 Adam 求解器以恒定学习率 0.001 对目标检测器进行 80 轮训练。将 ValidationData 名称-值参量指定为验证数据,并将 ValidationFrequency 名称-值参量指定为 1000。要更频繁地验证数据,您可以减小 ValidationFrequency,但这也会增加训练时间。使用 mAPObjectDetectionMetric (Computer Vision Toolbox) 函数指定 Metrics 参量,以在训练期间监控检测器的平均精确率均值 (mAP)。要在训练期间保存部分训练的检测器,请将 CheckpointPath 名称-值参量指定为临时位置 tempdir。如果由于停电或系统故障等原因导致训练中断,您可以从保存的检查点继续训练。
options = trainingOptions("adam", ...
    GradientDecayFactor=0.9, ...
    SquaredGradientDecayFactor=0.999, ...
    InitialLearnRate=0.001, ...
    LearnRateSchedule="none", ...
    MiniBatchSize=8, ...
    L2Regularization=0.0005, ...
    MaxEpochs=80, ...
    PreprocessingEnvironment="parallel", ...
    ResetInputNormalization=true, ...
    Shuffle="every-epoch", ...
    VerboseFrequency=20, ...
    ValidationFrequency=1000, ...
    CheckpointPath=tempdir, ...
    ValidationData=validationData, ...
    Metrics = mAPObjectDetectionMetric(Name="map50"));
训练 YOLO v3 目标检测器
使用 trainYOLOv3ObjectDetector (Computer Vision Toolbox) 函数训练 YOLO v3 目标检测器。除了训练网络之外,您还可以使用预训练的 YOLO v3 目标检测器。
使用辅助函数 downloadPretrainedYOLOv3Detector 下载预训练网络。如果要使用一组新数据训练网络,请将 doTraining 变量设置为 true。
doTraining = false;
if doTraining
    % Train the YOLO v3 detector.
    [yolov3Detector,info] = trainYOLOv3ObjectDetector(augmentedTrainingData,yolov3Detector,options);
else
    % Load pretrained detector for the example.
    yolov3Detector = downloadPretrainedYOLOv3Detector();
end
评估检测器性能
对所有测试图像运行检测器。将检测阈值设置为较低的值以检测到尽可能多的对象。这有助于您在整个召回值范围内评估检测器的精度。
results = detect(yolov3Detector,testData,MiniBatchSize=8,Threshold=0.01);
以交互方式可视化和评估性能
您可以使用Object Detector Analyzer (Computer Vision Toolbox),以交互方式可视化检测器的性能并对照真实值进行评估。该 App 在测试集上运行检测器并计算 AP 和 mAP 等度量,绘制精确率-召回率曲线,并在测试集中的每个图像上显示检测结果。您可以同时可视化真实值数据以及正确和不正确的检测器预测结果,并快速导航到检测器出错最多的图像,以便更好地了解其性能。要启动该 App,请使用 objectDetectorAnalyzer 函数。
objectDetectorAnalyzer(results,testData)
计算性能度量
使用 evaluateObjectDetection (Computer Vision Toolbox) 函数,基于测试集检测结果计算目标检测性能度量。有关性能度量的详细信息,请参阅Evaluate Object Detector Performance (Computer Vision Toolbox)。
metrics = evaluateObjectDetection(results,testData);
平均精确率 (AP) 提供单一数字,该数字综合反映了检测器进行正确分类的能力(精确率)和检测器找到所有相关目标的能力(召回率)。精确率-召回率 (PR) 曲线显示检测器在不同召回水平下的精确程度。理想情况下,所有召回水平下的精确率均为 1。绘制 PR 曲线,同时显示平均精确率。
[precision,recall] = precisionRecall(metrics);
AP = averagePrecision(metrics);

figure
plot(recall{:},precision{:})
xlabel("Recall")
ylabel("Precision")
grid on
title("Average Precision = "+AP)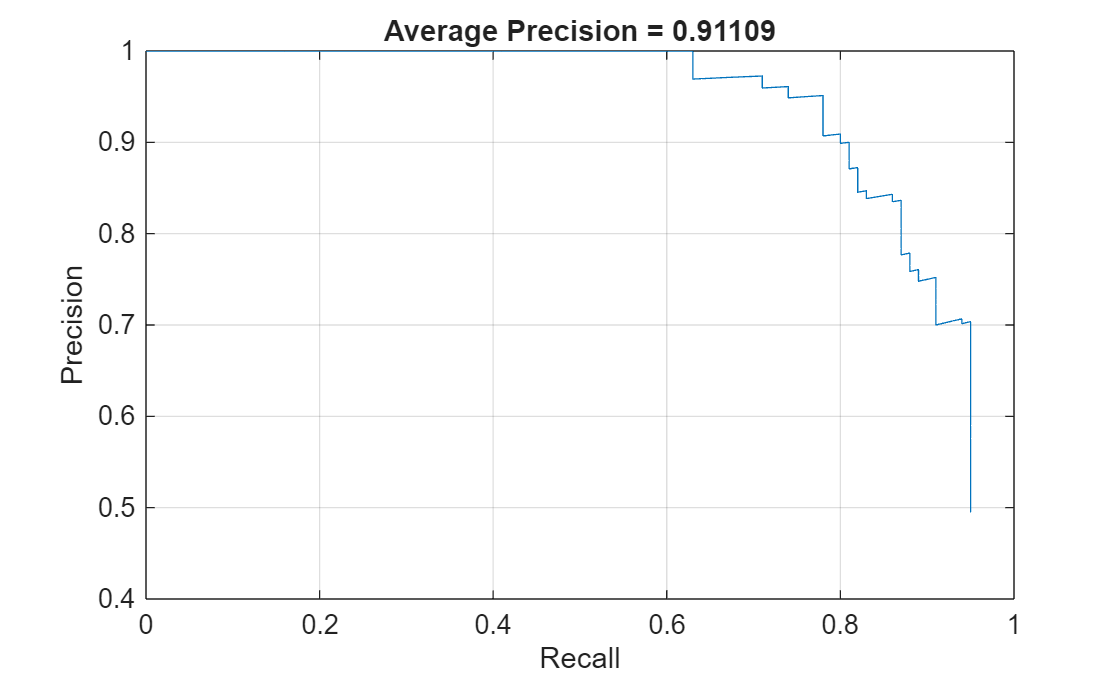
使用 YOLO v3 检测目标
使用经过训练的 YOLO v3 目标检测器对测试图像执行推断。
读取测试数据存储,并选择一个示例图像。
data = read(testData);
I = data{1};
使用 detect (Computer Vision Toolbox) 对象函数预测每个目标的掩膜、标签和置信度分数。
[bboxes,scores,labels] = detect(yolov3Detector,I);
使用 insertObjectAnnotation (Computer Vision Toolbox) 函数在图像上叠加显示目标注解。
I = insertObjectAnnotation(I,"rectangle",bboxes,scores);
figure
imshow(I)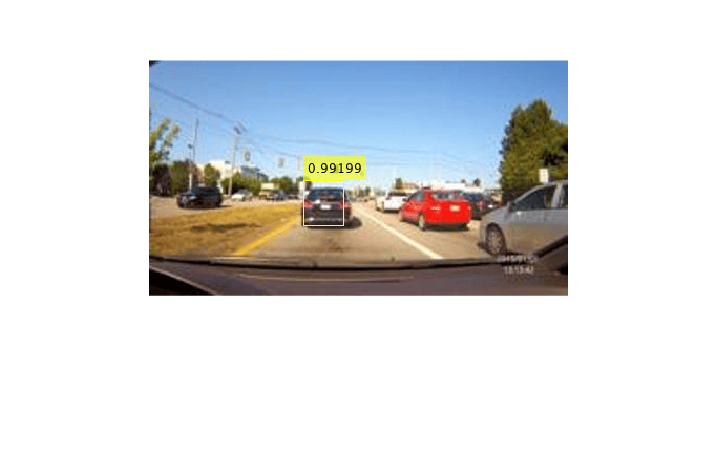
支持函数
augmentData
function data = augmentData(A)
% Apply random horizontal flipping, and random X/Y scaling. Boxes that get
% scaled outside the bounds are clipped if the overlap is above 0.25. Also,
% jitter image color.

data = cell(size(A));
for ii = 1:size(A,1)
    I = A{ii,1};
    bboxes = A{ii,2};
    labels = A{ii,3};
    sz = size(I);

    if numel(sz) == 3 && sz(3) == 3
        I = jitterColorHSV(I, ...
            Contrast=0, ...
            Hue=0.1, ...
            Saturation=0.2, ...
            Brightness=0.2);
    end

    % Randomly flip image.
    tform = randomAffine2d(XReflection=true,Scale=[1 1.1]);
    rout = affineOutputView(sz,tform,BoundsStyle="centerOutput");
    I = imwarp(I,tform,OutputView=rout);

    % Apply same transform to boxes.
    [bboxes,indices] = bboxwarp(bboxes,tform,rout,OverlapThreshold=0.25);
    bboxes = round(bboxes);
    labels = labels(indices);

    % Return original data only when all boxes are removed by warping.
    if isempty(indices)
        data(ii,:) = A(ii,:);
    else
        data(ii,:) = {I,bboxes,labels};
    end
end
end
preprocessData
function data = preprocessData(data,targetSize)
% Resize the images and scale the pixels to between 0 and 1. Also scale the
% corresponding bounding boxes.

for ii = 1:size(data,1)
    I = data{ii,1};
    imgSize = size(I);

    % Convert an input image with single channel to 3 channels.
    if numel(imgSize) < 3
        I = repmat(I,1,1,3);
    end
    bboxes = data{ii,2};

    I = im2single(imresize(I,targetSize(1:2)));
    scale = targetSize(1:2)./imgSize(1:2);
    bboxes = bboxresize(bboxes,scale);

    data(ii,1:2) = {I,bboxes};
end
end
downloadPretrainedYOLOv3Detector
function detector = downloadPretrainedYOLOv3Detector()
% Download a pretrained yolov3 detector.
if ~exist("yolov3SqueezeNetVehicleExample_21aSPKG.mat","file")
    if ~exist("yolov3SqueezeNetVehicleExample_21aSPKG.zip","file")
        disp("Downloading pretrained detector...");
        pretrainedURL = "https://ssd.mathworks.com/supportfiles/vision/data/yolov3SqueezeNetVehicleExample_21aSPKG.zip";
        websave("yolov3SqueezeNetVehicleExample_21aSPKG.zip",pretrainedURL);
    end
    unzip("yolov3SqueezeNetVehicleExample_21aSPKG.zip");
end
pretrained = load("yolov3SqueezeNetVehicleExample_21aSPKG.mat");
detector = pretrained.detector;
end
参考资料
[1] Redmon, Joseph, and Ali Farhadi.“YOLOv3:An Incremental Improvement.”Preprint, submitted April 8, 2018. https://arxiv.org/abs/1804.02767.
另请参阅
App
函数
estimateAnchorBoxes(Computer Vision Toolbox) |analyzeNetwork|combine|transform|read|evaluateObjectDetection(Computer Vision Toolbox)
对象
boxLabelDatastore(Computer Vision Toolbox) |imageDatastore|dlnetwork|dlarray
主题
- Anchor Boxes for Object Detection (Computer Vision Toolbox)
- Estimate Anchor Boxes from Training Data (Computer Vision Toolbox)
- 使用深度网络设计器为迁移学习准备网络
- Get Started with Object Detection Using Deep Learning (Computer Vision Toolbox)

