Generate Code for Vision Vehicle Detector
This example shows how to test a monocular-camera-based vehicle detector and generate deployable code for real-time applications on a prebuilt 3D scene from the Unreal Engine® driving simulation environment.
In this example, you:
Design the test bench model to verify the functionality of a monocular-camera-based vehicle detector using ground truth information.
Simulate the test bench model with ACF and YOLOv2 based vehicle detectors and compare performance.
Generate C++ code for the ACF based detector and CUDA code for the YOLOv2 based detector, and validate the functional equivalence with simulation.
Introduction
A vehicle detector is a fundamental perception component of an automated driving application. The detector analyzes images of roads captured using a monocular camera sensor and returns information about the positions of different vehicles that are in the visible range of the camera. You can design and simulate a vehicle detector algorithm using MATLAB® or Simulink® and assess its accuracy using known ground truth. You can use different detectors to detect vehicles, including vehicleDetectorACF and vehicleDetectorYOLOv2. Based on the chosen detector and the target platform, you can do C++ or CUDA code generation and integrate the detector into an external software environment, and deploy it to a vehicle. Performing code generation and verification of the Simulink model ensures functional equivalence between simulation and real-time implementation.
This example shows how to test the vehicle detector in an Unreal Engine driving simulation environment and generate deployable code for real-time implementation. In this example, you:
Explore the test bench model — The test bench model contains the scenario and environment, vision vehicle detector, and metrics to assess the functionality.
Simulate with ACF and YOLOv2 vehicle detectors — Configure the ACF and YOLOv2 variants of the vehicle detector and assess performance using metrics.
Generate C++ code for ACF vehicle detector — Configure the ACF vehicle detector to generate C++ code for CPU targets.
Assess the functionality of generated code using software-in-the-loop — Verify implementation with software-in-the-loop (SIL) simulation.
Generate CUDA code for YOLOv2 vehicle detector — Configure the YOLOv2 vehicle detector to generate CUDA code for GPU targets.
You can apply the modeling patterns used in this example to test your own vehicle detector component.
This example tests the vehicle detector algorithm in a 3D simulation environment that uses the Unreal Engine from Epic Games®.
if ~ispc
    error(['This example is supported only on Microsoft', char(174), ' Windows', char(174), '.'])
end
To explore the test bench model, load the vision vehicle detector project.
openProject("VisionVehicleDetector");
Explore Test Bench Model
The vision vehicle detector system in this example comprises a test bench and a reference model that implements the vehicle detection algorithm.
Test bench model — The test bench model simulates and tests the behavior of the vision vehicle detector algorithm in an open-loop.
Reference model — The Vision Vehicle Detector block in the test bench model invokes the
VisionVehicleDetectorreference model. The reference model implements the vehicle detection algorithm and generates C++ code for the ACF vehicle detector and CUDA code for the YOLOv2 vehicle detector. This reference model can be integrated with closed-loop systems such as Highway Lane Following system.
Open the test bench model.
open_system("VisionVehicleDetectorTestBench");
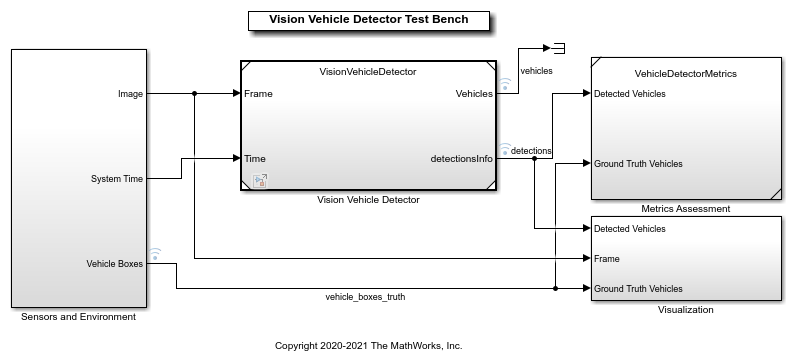
Opening this model runs the helperSLVisionVehicleDetectorSetup script, which initializes the road scenario using the drivingScenario object in the base workspace. It also configures the vehicle detector parameters, vehicle model parameters, and Simulink bus signals required for defining the inputs and outputs for the VisionVehicleDetectorTestBench model. The test bench model contains these subsystems:
Sensors and Environment — Subsystem that specifies the scene, vehicles, and camera sensor used for simulation and computes the ground truth vehicle bounding boxes.
Vision Vehicle Detector — Subsystem that implements the vehicle detection algorithm.
Metrics Assessment — Subsystem that assesses the vehicle detection algorithm using metrics that include true positives, false positives, and false negatives.
The Sensors and Environment subsystem configures the road network, sets vehicle positions, and synthesizes the camera sensor.
This subsystem is similar to the Simulation 3D Scenario subsystem in the Highway Lane Following example. Additionally, it also computes the ground truth vehicle bounding boxes using the actual actor positions from the Scenario Reader and the labeled image from the Simulation 3D Camera Forward Facing block. Open the Sensors and Environment subsystem.
open_system("VisionVehicleDetectorTestBench/Sensors and Environment");

Vision Vehicle Detector is the reference model that detects the vehicles in the camera frames. Open the Vision Vehicle Detector reference model.
open_system("VisionVehicleDetector");
The Vision Vehicle Detector reference model contains a variant subsystem. It contains two vehicle detector variants: ACF and YOLOv2.
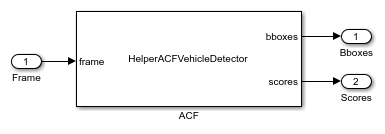
ACF — This is the default variant. To detect vehicles from each camera frame, the
HelperACFVehicleDetectorSystem object™ loads thevehicleDetectorACFModel.matfile, which contains the ACF object detector. Open the ACF variant.
open_system("VisionVehicleDetector/Vision Vehicle Detector/ACF")
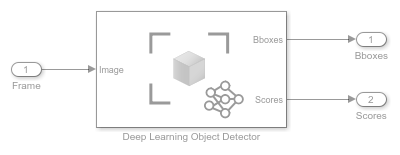
YOLOv2 — This variant has a Deep Learning Object Detector block that predicts the bounding boxes, and scores of the vehilces present in the input image by using the trained YOLOv2 object detector. The
vehicleDetectorYOLOv2function is used in the block parameter to load the trained network. Open the YOLOv2 variant.
open_system("VisionVehicleDetector/Vision Vehicle Detector/YOLOv2");

You can configure the desired variant using the helperSLVisionVehicleDetectorSetup function. Each variant outputs bounding boxes and scores for detected vehicles. The Pack Detections subsystem packs the bounding boxes and scores outputs into two different buses.
The Metrics Assessment subsystem evaluates the accuracy of detection results using the ground truth information. Open the Metrics Assessment subsystem.
open_system("VisionVehicleDetectorTestBench/Metrics Assessment");
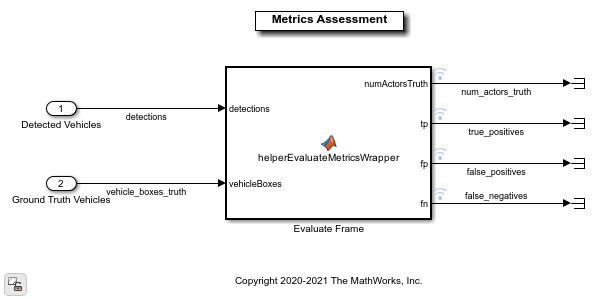
The Metrics Assessment subsystem computes the true positives, false negatives, and false positives for the detections.
Simulate with ACF and YOLOv2 Vehicle Detectors
In this section, you assess and compare the simulation results of the ACF and YOLOv2 vehicle detectors using a test scenario. This scenario contains five vehicles, including the ego vehicle. In this test scenario, a lead vehicle travels in the ego lane with a constant velocity of 14 m/s, and a headway distance of 20 meters. Another target vehicle travels in the adjacent right lane with a constant velocity of 14 m/s. The other two vehicles travel in the opposite direction in the left lane adjacent to the ego lane.
Simulate with ACF
Configure the Vision Vehicle Detector Test Bench model to use the scenario_VVD_01_Curve_FiveVehicles scenario and ACF vehicle detector variant.
helperSLVisionVehicleDetectorSetup(...
    "scenarioFcnName", "scenario_VVD_01_Curve_FiveVehicles", ...
    "detectorVariantName", "ACF");
Simulate the test bench model. Use the visualization window to view the detection results while the simulation is running.
simoutACF = sim("VisionVehicleDetectorTestBench");
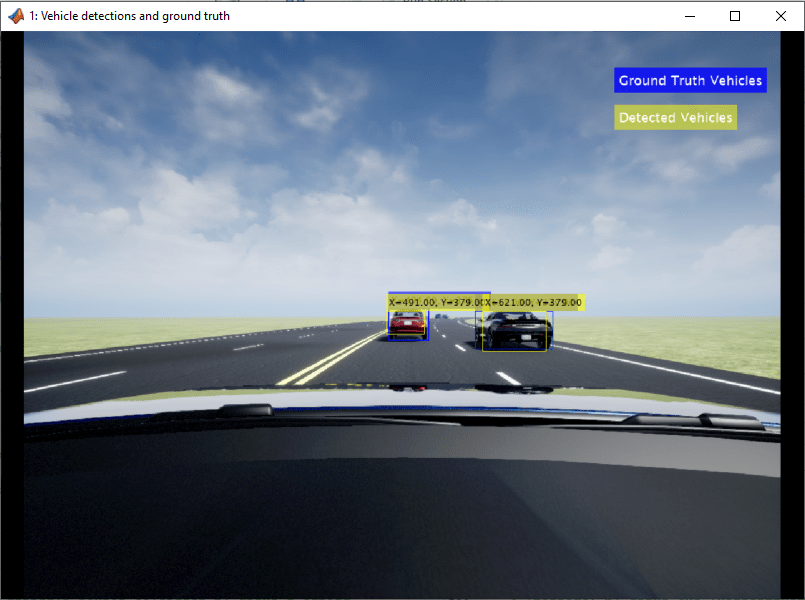
You can also visualize the ground truth vehicle bounding boxes by enabling the EnableTruthDisplay mask parameter in the Visualization block.
You can analyze the detection results and validate the overall performance of the algorithm by comparing the values of true positives, false positives, and false negatives with the number of vehicles in the ground truth.
The number of vehicles (ground truth) is the number of available vehicles in the range of the camera sensor at any given instant of time.
The true positives are the vehicles that the algorithm was able to detect correctly.
The false negatives are the vehicles that the algorithm was unable to detect.
The false positives are the vehicles that the algorithm detected when no vehicle was present.
During simulation, the model logs these values to the simoutACF.logsout workspace variable. You can plot the values in simoutACF.logsout by using the helperPlotDetectionMetrics function.
hFigACFResults = helperPlotDetectionMetrics("ACF", simoutACF.logsout);
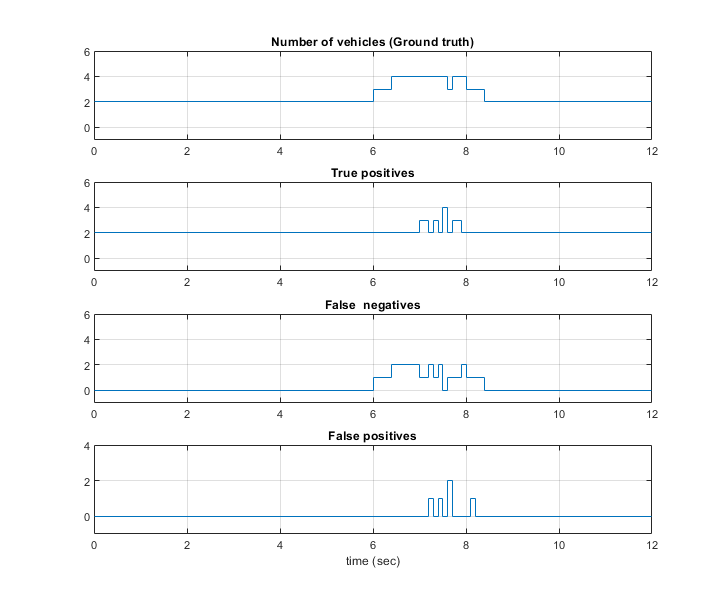
Note that the sum of true positives and false negatives is always equal to the ground truth number of vehicles.
Simulate with YOLOv2
Configure the Vision Vehicle Detector Test Bench model to use the scenario_VVD_01_Curve_FiveVehicles scenario and YOLOv2 vehicle detector variant and simulate the test bench model.
helperSLVisionVehicleDetectorSetup("scenarioFcnName", "scenario_VVD_01_Curve_FiveVehicles", ...
                                   "detectorVariantName", "YOLOv2");

simoutYOLOv2 = sim("VisionVehicleDetectorTestBench");
hFigYOLOV2Results = helperPlotDetectionMetrics("YOLOv2", simoutYOLOv2.logsout);
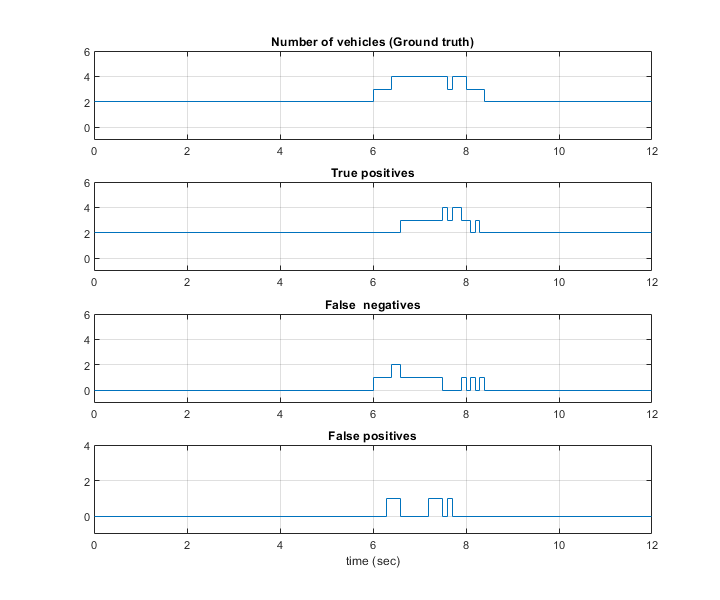
The plots indicate that the vehicle detections from the YOLOv2 vehicle detector are more consistent.
Close the figures.
close(hFigACFResults);
close(hFigYOLOV2Results);
You can also compare the overall performance of the ACF and YOLOv2 vehicle detectors by plotting the recall against the precision, and the false positives per image against the miss rate. You can plot these curves using the helperPlotPrecisionAndMissrate function.
detectionMetricsACF = helperComputePrecisionAndMissrate(simoutACF.logsout);
detectionMetricsYOLOv2 = helperComputePrecisionAndMissrate(simoutYOLOv2.logsout);
helperPlotPrecisionAndMissrate(detectionMetricsACF, "ACF", detectionMetricsYOLOv2, "YOLOv2");


The plot indicates that YOLOv2 performs slightly better than ACF for this test scenario.
You can also use this test bench to generate code for the ACF and YOLOv2 vehicle detectors.
Generate C++ Code for ACF Vehicle Detector
You can generate C++ code for the ACF algorithm, apply common optimizations, and generate a report to facilitate exploring the generated code. Configure the test bench model to use the ACF variant.
helperSLVisionVehicleDetectorSetup("detectorVariantName","ACF");
Configure the VisionVehicleDetector model to generate C++ code for real-time implementation of the algorithm. Set the model parameters to enable code generation and display the configuration values.
Set and view model parameters to enable C++ code generation.
helperSetModelParametersForCodeGeneration("VisionVehicleDetector");
save_system("VisionVehicleDetector");
 Model  configuration parameters:

                 Parameter                      Value                                                              Description
    ___________________________________    _______________    ______________________________________________________________________________________________________________________

    {'SystemTargetFile'               }    {'ert.tlc'    }    {'Code Generation>System target file'                                                                                }
    {'TargetLang'                     }    {'C++'        }    {'Code Generation>Language'                                                                                          }
    {'SolverType'                     }    {'Fixed-step' }    {'Solver>Type'                                                                                                       }
    {'FixedStep'                      }    {'auto'       }    {'Solver>Fixed-step size (fundamental sample time)'                                                                  }
    {'EnableMultiTasking'             }    {'on'         }    {'Solver>Treat each discrete rate as a separate task'                                                                }
    {'ProdLongLongMode'               }    {'on'         }    {'Hardware Implementation>Support long long'                                                                         }
    {'BlockReduction'                 }    {'on'         }    {'Simulation Target>Block reduction'                                                                                 }
    {'MATLABDynamicMemAlloc'          }    {'on'         }    {'Simulation Target>Simulation Target>Dynamic memory allocation in MATLAB functions'                                 }
    {'OptimizeBlockIOStorage'         }    {'on'         }    {'Simulation Target>Signal storage reuse'                                                                            }
    {'InlineInvariantSignals'         }    {'on'         }    {'Simulation Target>Inline invariant signals'                                                                        }
    {'BuildConfiguration'             }    {'Faster Runs'}    {'Code Generation>Build configuration'                                                                               }
    {'RTWVerbose'                     }    {'off'        }    {'Code Generation>Verbose build'                                                                                     }
    {'CombineSignalStateStructs'      }    {'on'         }    {'Code Generation>Interface>Combine signal/state structures'                                                         }
    {'SupportVariableSizeSignals'     }    {'on'         }    {'Code Generation>Interface>Support variable-size signals'                                                           }
    {'CodeInterfacePackaging'         }    {'C++ class'  }    {'Code Generation>Interface>Code interface packaging'                                                                }
    {'GenerateExternalIOAccessMethods'}    {'Method'     }    {'Code Generation>Interface>Data Member Visibility>External I/O access'                                              }
    {'EfficientFloat2IntCast'         }    {'on'         }    {'Code Generation>Optimization>Remove code from floating-point to integer conversions that wraps out-of-range values'}
    {'ZeroExternalMemoryAtStartup'    }    {'off'        }    {'Code Generation>Optimization>Remove root level I/O zero initialization (inverse logic)'                            }
    {'CustomSymbolStrGlobalVar'       }    {'$N$M'       }    {'Code Generation>Symbols>Global variables'                                                                          }
    {'CustomSymbolStrType'            }    {'$N$M_T'     }    {'Code Generation>Symbols>Global types'                                                                              }
    {'CustomSymbolStrField'           }    {'$N$M'       }    {'Code Generation>Symbols>Field name of global types'                                                                }
    {'CustomSymbolStrFcn'             }    {'APV_$N$M$F' }    {'Code Generation>Symbols>Subsystem methods'                                                                         }
    {'CustomSymbolStrTmpVar'          }    {'$N$M'       }    {'Code Generation>Symbols>Local temporary variables'                                                                 }
    {'CustomSymbolStrMacro'           }    {'$N$M'       }    {'Code Generation>Symbols>Constant macros'                                                                           }
Generate code and review the code generation report from the reference model.
slbuild("VisionVehicleDetector");
### Starting build procedure for: VisionVehicleDetector
### Successful completion of build procedure for: VisionVehicleDetector

Build Summary

Top model targets:

Model                  Build Reason                                         Status
==========================================================================================================
VisionVehicleDetector  Information cache folder or artifacts were missing.  Code generated and compiled.

1 of 1 models built (0 models already up to date)
Build duration: 0h 3m 17.866s
Use the code generation report to explore the generated code. For more information about the code generation report, see Reports for Code Generation (Embedded Coder). Use the code interface report link in the code generation report to explore these generated methods:
initialize— Call once on initialization.step— Call periodically every step to execute the vehicle detection algorithm.terminate— Call once on termination.
Additional get and set methods for signal interface are declared in VisionVehicleDetector.h and defined in VisionVehicleDetector.cpp.
Assess Functionality Using SIL
After generating C++ code for the ACF vision vehicle detector variant, you can now assess the code functionality using SIL simulation. It provides early insight into the behavior of a deployed application. For more information about SIL simulation, see SIL and PIL Simulations (Embedded Coder).
SIL simulation enables you to verify whether the compiled generated code on the host is functionally equivalent to the normal mode.
Configure the algorithm and test bench model parameters to support SIL simulation and log execution profiling information.
helperSetModelParametersForSIL("VisionVehicleDetector");
helperSetModelParametersForSIL("VisionVehicleDetectorTestBench");
    "VisionVehicleDetector"    " configuration parameters:"


               Parameter                       Value                                    Description
    ________________________________    ____________________    ____________________________________________________________

    {'SystemTargetFile'            }    {'ert.tlc'         }    {'Code Generation>System target file'                      }
    {'TargetLang'                  }    {'C++'             }    {'Code Generation>Language'                                }
    {'CodeExecutionProfiling'      }    {'on'              }    {'Code Generation>Verification>Measure task execution time'}
    {'CodeProfilingSaveOptions'    }    {'AllData'         }    {'Code Generation>Verification>Save options'               }
    {'CodeExecutionProfileVariable'}    {'executionProfile'}    {'Code Generation>Verification>Workspace variable'         }


    "VisionVehicleDetectorTestBench"    " configuration parameters:"


               Parameter                       Value                                    Description
    ________________________________    ____________________    ____________________________________________________________

    {'SystemTargetFile'            }    {'ert.tlc'         }    {'Code Generation>System target file'                      }
    {'TargetLang'                  }    {'C++'             }    {'Code Generation>Language'                                }
    {'CodeExecutionProfiling'      }    {'on'              }    {'Code Generation>Verification>Measure task execution time'}
    {'CodeProfilingSaveOptions'    }    {'AllData'         }    {'Code Generation>Verification>Save options'               }
    {'CodeExecutionProfileVariable'}    {'executionProfile'}    {'Code Generation>Verification>Workspace variable'         }
Configure the test bench model to simulate Vision Vehicle Detector in SIL mode.
set_param("VisionVehicleDetectorTestBench/Vision Vehicle Detector","SimulationMode","Software-in-the-loop (SIL)");
save_system("VisionVehicleDetector");
simoutACFSIL = sim("VisionVehicleDetectorTestBench");
### Searching for referenced models in model 'VisionVehicleDetectorTestBench'.
### Found 1 model reference targets to update.
### Starting build procedure for: VisionVehicleDetector
### Generated code for 'VisionVehicleDetector' is up to date because no structural, parameter or code replacement library changes were found.
### Successful completion of build procedure for: VisionVehicleDetector

Build Summary

0 of 1 models built (1 models already up to date)
Build duration: 0h 0m 4.7296s
### Preparing to start SIL simulation ...
Building with 'Microsoft Visual C++ 2019 (C)'.
MEX completed successfully.
### Starting SIL simulation for component: VisionVehicleDetector
### Application stopped
### Stopping SIL simulation for component: VisionVehicleDetector
You can compare the outputs from normal simulation mode and SIL simulation mode. You can verify if the differences between these runs are in the tolerance limits by using the following code. Plot the differences in value among the true positives, false positives, and false negatives between the normal simulation mode and SIL simulation mode.
runIDs = Simulink.sdi.getAllRunIDs;
normalSimRunID = runIDs(end - 2);
SilSimRunID = runIDs(end);
diffResult = Simulink.sdi.compareRuns(normalSimRunID, SilSimRunID);
Plot the differences between detection metric values computed from normal mode and SIL mode.
helperPlotDiffSignals(diffResult);

The differences between the detection metric values between the normal simulation mode and the SIL simulation mode are zero.
Assess Execution Time
During the SIL simulation, log the execution time metrics for the generated code on the host computer to the variable executionProfile in the MATLAB base workspace. These times can be an early indicator of the performance of the generated code. For accurate execution time measurements, profile the generated code when it is integrated into the external environment or when you use processor-in-the-loop (PIL) simulation. To learn more about PIL profiling, refer to Create Execution-Time Profile for Generated Code (Embedded Coder).
Plot how long the VisionVehicleDetector_step function takes to execute using helperPlotExecutionProfile function.
helperPlotExecutionProfile(simoutACFSIL.executionProfile);
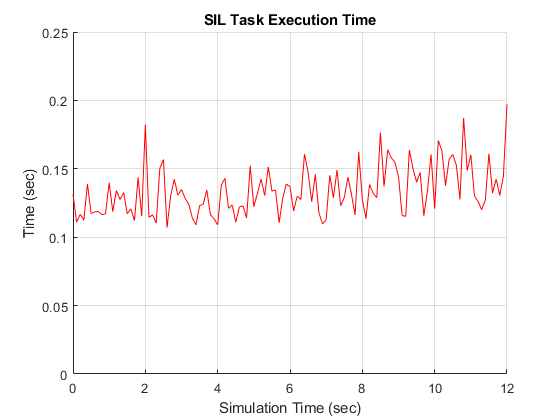
Using the plot, you can deduce the average time that the vision vehicle detector takes to execute each frame. For more information on generating execution profiles and analyzing them during SIL simulation, see Execution Time Profiling for SIL and PIL (Embedded Coder).
Generate CUDA Code for YOLOv2 Vehicle Detector
If you have a GPU Coder™ license, you can configure the model to generate CUDA code for the YOLOv2 vehicle detector. Configure the test bench model to use the YOLOv2 variant.
isGPCAvailable = license("test", "GPU_Coder");

if(isGPCAvailable)
  helperSLVisionVehicleDetectorSetup("detectorVariantName","YOLOv2");
end
Verify GPU Environment
To verify that the compilers and libraries necessary for running this section are set up correctly, use the coder.checkGpuInstall function. Set DeepLibTarget to either 'cudnn' or 'tensorrt' based on availability of the relevant libraries on the target.
if(isGPCAvailable)
     % Deep learning code generation for target library cuDNN requires the
     % GPU Coder Interface for Deep Learning Libraries support package.
     info = matlabshared.supportpkg.getInstalled;
     isDLGPUCodegenAvailable = 0;
     if(~isempty(info))
         for i = 1:length(info)
             if(strcmp(info(i).Name, 'GPU Coder Interface for Deep Learning Libraries'))
                 isDLGPUCodegenAvailable = 1;
             end
         end
     end

    if(isDLGPUCodegenAvailable)
        envCfg = coder.gpuEnvConfig('host');
        envCfg.DeepLibTarget = 'cudnn';
        envCfg.DeepCodegen = 1;
        envCfg.Quiet = 1;
        coder.checkGpuInstall(envCfg);
    end
end
Open the configuration parameters dialog box. In the Code Generation pane, set Language to C++ and enable Generate GPU code.
if(isGPCAvailable && isDLGPUCodegenAvailable)
    set_param("VisionVehicleDetector","TargetLang","C++");
    set_param("VisionVehicleDetector","GenerateGPUCode","CUDA");
    set_param("VisionVehicleDetector","DLTargetLibrary","cuDNN");
    save_system("VisionVehicleDetector");
end
Generate and build the Simulink model on the host GPU by using the slbuild command. The code generator places the files in the build folder, which is a subfolder named VisionVehicleDetector_ert_rtw under your current working folder.
if(isGPCAvailable && isDLGPUCodegenAvailable)
    slbuild("VisionVehicleDetector");
end
Use the code generation report to explore the generated code. For more information about the code generation report, see Reports for Code Generation (Embedded Coder). Use the code interface report link in the code generation report to explore these generated methods:
initialize— Call once on initialization.step— Call periodically every step to execute the vehicle detection algorithm.terminate— Call once on termination.
After generating CUDA code for the vision vehicle detector, you can now assess the code functionality using SIL simulation similar to the ACF vehicle detector variant.
In this example, you compared the performance of ACF and YOLOv2 vehicle detection algorithms, generated C++ code for ACF detector and assessed functionality using SIL simulation, and generated CUDA code for YOLOv2 detector.
See Also
Scenario Reader | Vehicle To World | Simulation 3D Scene Configuration | Cuboid To 3D Simulation | Simulation 3D Vehicle with Ground Following