Automate Ground Truth Labeling for Instance Segmentation
This example shows how to use a pretrained instance segmentation algorithm to detect cars and traffic lights in an image and automate polygon labeling in the Video Labeler app.These autogenerated polygon labels can then serve as ground truth data for training or fine-tuning instance segmentation models.
Manual annotation of polygon regions for instance segmentation is time-consuming. The Video Labeler app provides a framework to incorporate custom automation algorithms to accelerate this process. You can use custom algorithms to automatically label entire datasets and then perform a quick manual verification step.
This example demonstrates how to:
Use a pretrained SoloV2 instance segmentation network to detect cars and traffic lights.
Create an automation algorithm that generates polygon labels for cars and traffic lights.
Integrate and use the automation algorithm in the Video Labeler app.
Create a Car and Traffic Light Detection Algorithm
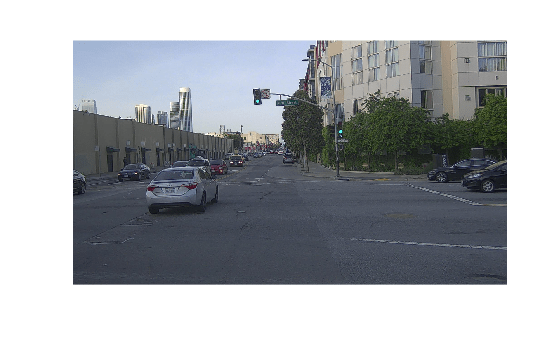
Load a sequence of images depicting a traffic scene from PandaSet [1] data set. Read and visualize the first image.
unzip("TrafficImages.zip","TrafficImages")
I = imread("TrafficImages\00.jpg");
imshow(I)
Load Pretrained Solov2 Instance Segmentation Network and Segment First Image
To create an instance segmentation algorithm that detects cars and traffic lights in an image, this example uses a Solov2 network pretrained on the COCO dataset. This network can predict 80 classes of instance segmentation labels. Load the pretrained Solov2 network using the solov2 object.
model = solov2("light-resnet18-coco");Segment the first image sequence and visualize the masks by overlaying them on the image.
[masks,~,~] = segmentObjects(model,I,Threshold=0.6);
overlayedImage = insertObjectMask(I,masks);
imshow(overlayedImage)
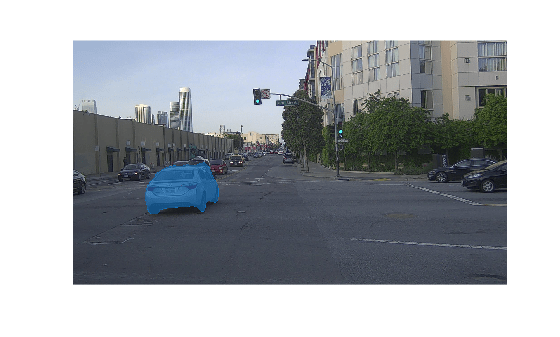
Note that the network only detected one car in the image even though multiple cars and traffic lights are present. This occurs because the model is not confident enough in its predictions of other objects. To improve detection, reduce the detection threshold so that the network detects more cars and traffic lights in the image.
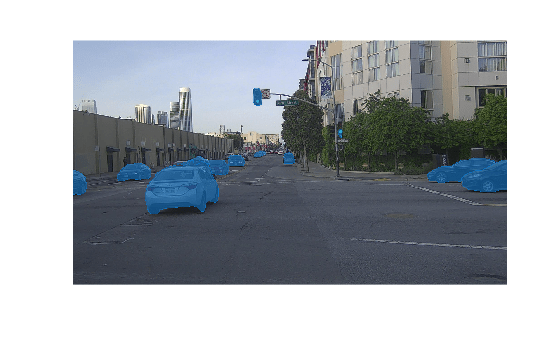
[masks,classLabels,~] = segmentObjects(model,I,Threshold=0.25);
overlayedImage = insertObjectMask(I,masks);
imshow(overlayedImage)
Get Polygon Boundaries From Segmented Masks
To get polygon boundaries from the segmented masks, follow these steps:
Filter and separate the car and traffic light masks from the network output.
Get polygon boundaries using the bwboundaries function.
The network outputs the car masks in two classes: car and truck. The network also outputs the traffic light masks in the traffic light class. Find the corresponding indices for these classes in the array of masks output by the network.
% Get individual segmentation masks for car and traffic light labels
carClassIdxs = find(classLabels=="car" | classLabels=="truck");
trafficLightClassIdxs = find(classLabels=="traffic light");
For each detected car and traffic light mask in the corresponding array of masks, get the polygon boundaries using the bwboundaries function. The noholes option in bwboundaries function discards holes within object boundaries and ensures that only the outer contour is returned, which prevents erroneous polygons from being generated. To improve performance by simplifying polygon representation, use the reducepoly function. The reducepoly function interpolates polygon boundaries and reduces the number of vertices retained.
% Get car polygon boundaries from each car segmentation mask
carBoundaries = cell(size(carClassIdxs));
for i = 1:numel(carClassIdxs)
    carMask = masks(:,:,carClassIdxs(i));
    maskBoundaries = bwboundaries(carMask,"noholes",CoordinateOrder="xy");
    % Interpolate to retain fewer polygon vertices for improved performance
    carBoundaries(i) = {reducepoly(maskBoundaries{1},0.01)};
end

% Get traffic light polygon boundaries from each traffic light segmentation mask
trafficLightBoundaries = cell(size(trafficLightClassIdxs));
for i = 1:numel(trafficLightClassIdxs)
    trafficLightMask = masks(:,:,trafficLightClassIdxs(i));
    maskBoundaries = bwboundaries(trafficLightMask,"noholes",CoordinateOrder="xy");
    % Interpolate to retain fewer polygon vertices for improved performance
    trafficLightBoundaries(i) = {reducepoly(maskBoundaries{1},0.01)};
end
Overlay the car and traffic light polygon boundaries on the image.
polygonOverlayedImage = I;
for i = 1:numel(carBoundaries)
    polygonOverlayedImage = insertShape(polygonOverlayedImage,"polygon",carBoundaries{i},LineWidth=5);
end
for i = 1:numel(trafficLightBoundaries)
    polygonOverlayedImage = insertShape(polygonOverlayedImage,"polygon",trafficLightBoundaries{i},LineWidth=5,ShapeColor="red");
end
Visualize the final image overlaid with car and traffic light polygon boundaries.
imshow(polygonOverlayedImage)
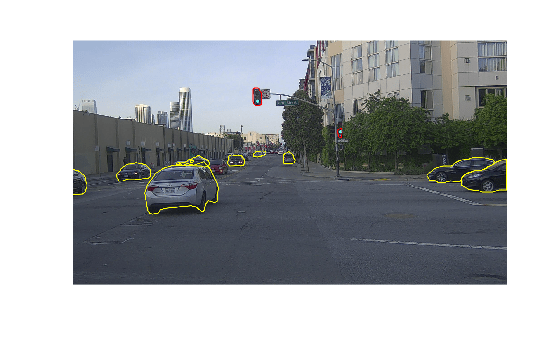
The predicted polygon boundaries are quite good. The next step is to create the automation algorithm and integrate it in the Video Labeler app.
Create Polygon Labeling Automation Algorithm for Video Labeler
This example provides the CarAndTrafficLightSegmentation class as a ready-to-use automation algorithm for polygon labeling using instance segmentation.The CarAndTrafficLightSegmentation class inherits from the vision.labeler.AutomationAlgorithm abstract base class, which defines the class-based API that the Video Labeler app uses to configure and run custom automation algorithms.To help you get started with writing your own custom automation algorithm, the Video Labeler app offers a convenient initial automation class template where you can add custom logic and integrate it into the app. For more details on accessing the template from the Video Labeler app, see Create Custom Automation Algorithm for Labeling.
The first set of properties in the CarAndTrafficLightSegmentation.m class specify the name of the algorithm, provide a brief description of it, and give directions for using it.
properties(Constant)

        % Name: Give a name for your algorithm.
        Name = 'CarAndTrafficLightSegmentation';

        % Description: Provide a one-line description for your algorithm.
        Description = 'This algorithm uses instance segmentation with a pretrained network to annotate cars and traffic lights.';

        % UserDirections: Provide a set of directions that are displayed
        %                 when this algorithm is invoked. The directions
        %                 are to be provided as a cell array of character
        %                 vectors, with each element of the cell array
        %                 representing a step in the list of directions.
        UserDirections = {...
            ['Automation algorithms are a way to automate manual labeling ' ...
            'tasks. This AutomationAlgorithm creates polygon labels for cars ' ...
            'and traffic lights in the scene using a pretrained Solov2 network.'], ...
            ['Run: Press RUN to run the automation algorithm. '], ...
            ['Review and Modify: Review automated labels over the interval ', ...
            'using playback controls. Modify/delete/add ROIs that were not ' ...
            'satisfactorily automated at this stage. If the results are ' ...
            'satisfactory, click Accept to accept the automated labels.'], ...
            ['Change Settings and Rerun: If automated results are not ' ...
            'satisfactory, you can try to re-run the algorithm with ' ...
            'different settings. In order to do so, click Undo Run to undo ' ...
            'current automation run, click Settings and make changes to ' ...
            'Settings, and press Run again.'], ...
            ['Accept/Cancel: If results of automation are satisfactory, ' ...
            'click Accept to accept all automated labels and return to ' ...
            'manual labeling. If results of automation are not ' ...
            'satisfactory, click Cancel to return to manual labeling ' ...
            'without saving automated labels.']};
   end
The next section of the CarAndTrafficLightSegmentation class specifies the custom properties needed by the core algorithm. The PretrainedNetwork property holds the pretrained Solov2 network. The CarLabelDefinitionName and TrafficLightLabelDefinitionName properties hold the names given to the car and traffic light polygon label definitions in the Video Labeler app.
 properties
        PretrainedNetwork
        CarLabelDefinitionName
        TrafficLightLabelDefinitionName
 end
checkLabelDefinition, the first method defined in CarAndTrafficLightSegmentation, checks that only labels of type PolygonLabel are enabled for automation. PolygonLabel is the only type needed because the CarAndTrafficLightSegmentation algorithm is automating polygon labeling for instance segmentation.
methods
        function isValid = checkLabelDefinition(algObj, labelDef)
            isValid = false;
            if (strcmpi(labelDef.Name,'car') && labelDef.Type == labelType.Polygon)
                isValid = true;
                algObj.CarLabelDefinitionName = labelDef.Name;
            elseif (strcmpi(labelDef.Name,'traffic_light') && labelDef.Type == labelType.Polygon)
                isValid = true;
                algObj.TrafficLightLabelDefinitionName = labelDef.Name;
            end
        end
end
The next set of methods control the execution of the algorithm. The vision.labeler.AutomationAlgorithm class includes an interface that contains methods like initialize, run, and terminate for setting up and running the automation with ease. The initialize function runs once per automation session and populates the initial algorithm state based on the existing labels in the app. In the CarAndTrafficLightSegmentation class, the initialize function is customized to load the pretrained Solov2 instance segmentation network save it to the PretrainedNetwork property.
function initialize(algObj, ~)
      algObj.PretrainedNetwork = solov2("light-resnet18-coco");
end
Next, the run function defines the core instance segmentation algorithm of this automation class. run is called for each video frame, and expects the automation class to return a set of labels. The run function in CarAndTrafficLightSegmentation.m contains the logic introduced previously for creating a cell array of polygon labels corresponding to car and traffic_light. The run method uses the pretrained Solov2 instance segmentation network to first segment images, and then get polygon boundaries from the segmented masks using the bwboundaries function. Additionally, the algorithm assigns car and traffic light polygon label boundaries to the output structure array. If no polygons are detected for a class, it assigns an empty array to maintain consistency in the output structure. For more information about the output structure definitions for different label types, see autoLabels.
function autoLabels = run(algObj, I)
    % Create empty structure array for the generated output labels
    autoLabels = struct("Type",{},"Name",{},"Position",{});

    % Resize the image and get instance segmentation mask
    [segmentedMask,classLabels,~] = segmentObjects(algObj.PretrainedNetwork,I,Threshold=0.25);

    % Get individual segmentation masks for car and traffic light labels
    carClassIdxs = find(classLabels=="car" | classLabels=="truck");
    trafficLightClassIdxs = find(classLabels=="traffic light");

    % Get car polygon boundaries from each car segmentation mask
    carBoundaries = cell(size(carClassIdxs));
    for i = 1:numel(carClassIdxs)
        carMask = segmentedMask(:,:,carClassIdxs(i));
        maskBoundaries = bwboundaries(carMask,"noholes",CoordinateOrder="xy");
        maskBoundaries = maskBoundaries{1};
        % Interpolate to retain fewer polygon vertices for improved performance
        carBoundaries(i) = {reducepoly(maskBoundaries{1},0.01)};

    end

    % Get traffic light polygon boundaries from each traffic light segmentation mask
    trafficLightBoundaries = cell(size(trafficLightClassIdxs));
    for i = 1:numel(trafficLightClassIdxs)
        trafficLightMask = segmentedMask(:,:,trafficLightClassIdxs(i));
        maskBoundaries = bwboundaries(trafficLightMask,"noholes",CoordinateOrder="xy");
        maskBoundaries = maskBoundaries{1};
        % Interpolate to retain fewer polygon vertices for improved performance
        trafficLightBoundaries(i) = {reducepoly(maskBoundaries{1},0.01)};
    end

    % Assign car polygon label boundaries to the output structure array
    autoLabels(1).Type=labelType("Polygon");
    autoLabels(1).Name=algObj.CarLabelDefinitionName;
    if isempty(carBoundaries)
        autoLabels(1).Position=[];
    else
        autoLabels(1).Position=carBoundaries;
    end
    % Assign traffic light polygon label boundaries to the output structure array
    autoLabels(2).Type=labelType("Polygon");
    autoLabels(2).Name=algObj.TrafficLightLabelDefinitionName;
    if isempty(trafficLightBoundaries)
        autoLabels(2).Position=[];
    else
        autoLabels(2).Position=trafficLightBoundaries;
    end
end
Integrate and Use Polygon Labeling Automation Class in Video Labeler App
The CarAndTrafficLightSegmentation.m automation algorithm class file implements the properties and methods described in the previous section. To integrate and use this class in the Video Labeler app, follow these steps:
1. Create the folder structure +vision/+labeler required under the current folder, and copy the automation class into it.
mkdir('+vision/+labeler');
copyfile('CarAndTrafficLightSegmentation.m','+vision/+labeler');
2. Open the videoLabeler app with the loaded image sequence data to label.
videoLabeler("TrafficImages/")
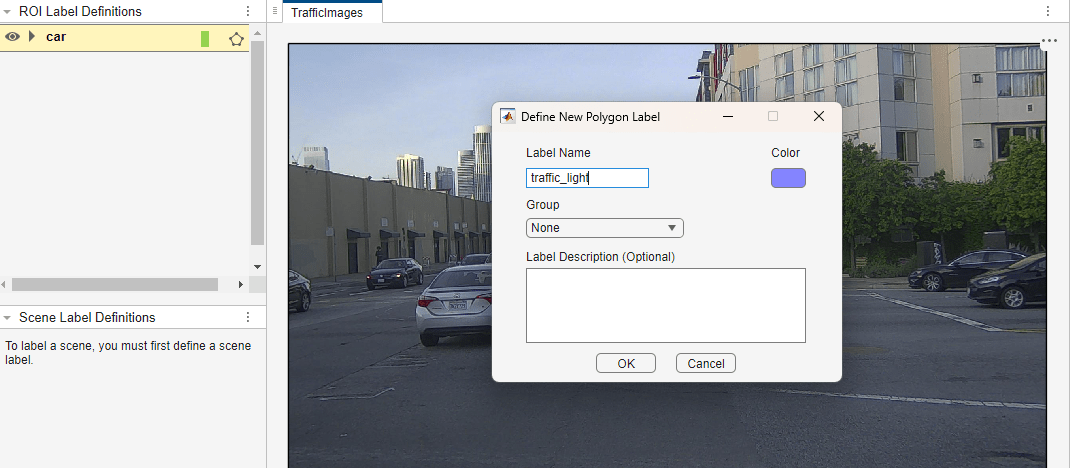
3. On the Video Labeler tab of the app toolstrip, in the Label Definition section, click Add Label and select Polygon from the drop down. Define two polygon labels with names car and traffic_light. You can choose a color for each label. Click OK.
4. On the Video Labeler tab, in the Automate Labeling section, click Select Algorithm > Refresh list.
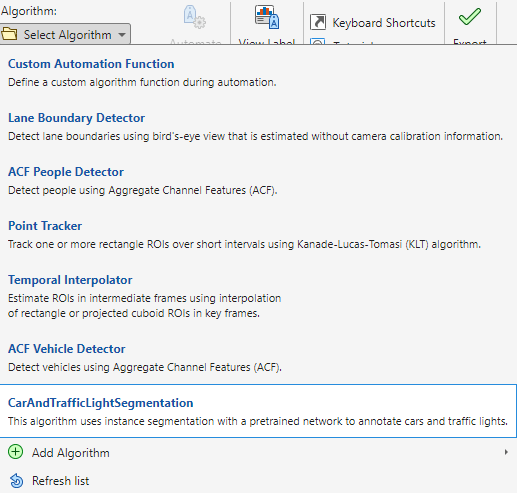
5. From the Select Algorithm options, select CarAndTrafficLightSegmentation. If you do not see this option, ensure that the current working folder has a folder called +vision/+labeler that contains a file named CarAndTrafficLightSegmentation.m.
6. In the Automate Labeling section of the app toolstrip, click Automate. A new panel opens, displaying directions for using the algorithm.
7. On the Automate tab of the app toolstrip, click Run. The created algorithm executes on each frame of the image sequence, segmenting car and traffic_light categories. After the run is complete, use the slider or arrow keys to scroll through all the frames and verify the results of the automation algorithm.
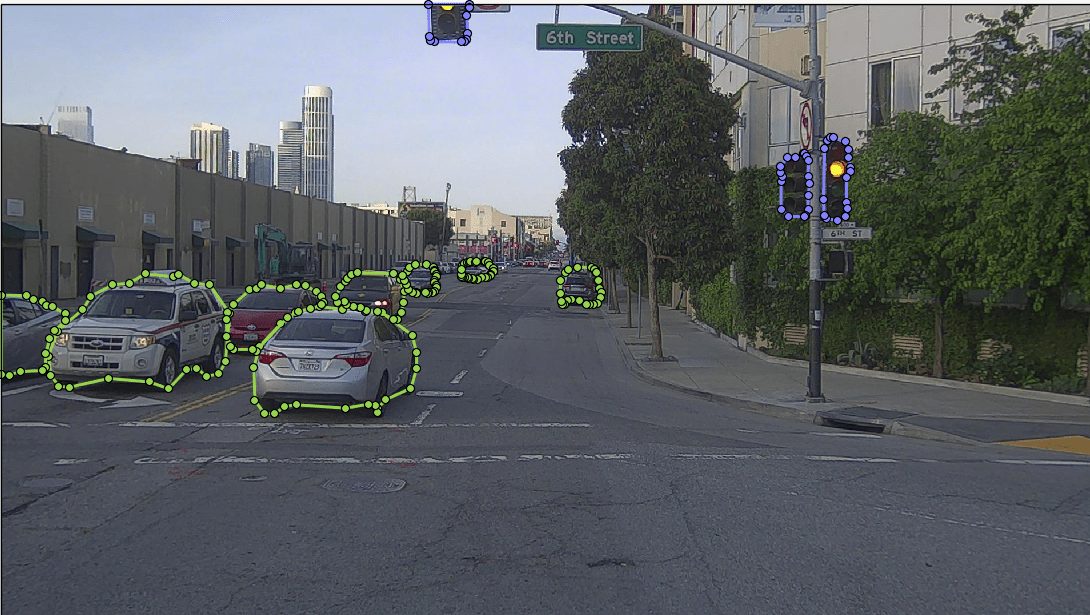
7. Note that the automation does well in labeling the cars and traffic lights, but some parts of the car like tires may be partially covered by the labels. For such labels, you can make manual corrections and refine them further. Click on any label you wish to refine and then you can make corrections by adjusting the autogenerated polygon vertices.
8. Once you are satisfied with the polygon labels for the entire image sequence, click Accept on the app toolstrip.
Next Steps
With the automation for polygon labeling complete, you can now save the session or export the results of the labeling run. For more information about creating instance segmentation training data from the exported ground truth from the labeler app, see Create Instance Segmentation Training Data From Ground Truth. To learn more about accurate polygon labeling using open‑vocabulary object detection support across more object classes using Grounding DINO and Segment Anything Model 2 (SAM 2), see Automate Ground Truth Polygon Labeling Using Grounded SAM Model.
This automation workflow is useful in generating first-pass labels which can significantly accelerate labeling. To learn more about automation for other computer vision tasks such as semantic segmentation, optical character recognition (OCR), and Re-Identification (ReID) labeling see Automate Ground Truth Labeling for Semantic Segmentation, Automate Ground Truth Labeling for OCR and Automate Ground Truth Labeling for Object Tracking and Re-Identification, respectively.
References
[1] Hesai and Scale. PandaSet. Accessed September 18, 2025. https://pandaset.org/. The PandaSet data set is provided under the CC-BY-4.0 license.
See Also
solov2 | segmentObjects | insertShape | bwboundaries
Topics
- Create Instance Segmentation Training Data From Ground Truth
- Get Started with AI-Assisted and Automated Labeling
- Create Custom Automation Algorithm for Labeling
- Automate Ground Truth Polygon Labeling Using Grounded SAM Model
- Automate Ground Truth Labeling for Semantic Segmentation
- Automate Ground Truth Labeling for OCR
- Automate Ground Truth Labeling for Object Tracking and Re-Identification