Object Detection Using YOLO v4 Deep Learning
R2026bThis example shows how to detect objects in images using you only look once version 4 (YOLO v4) deep learning network. In this example, you will
Configure a dataset for training, validation, and testing of YOLO v4 object detection network. You will also perform data augmentation on the training dataset to improve the network efficiency.
Compute anchor boxes from the training data to use for training the YOLO v4 object detection network.
Create a YOLO v4 object detector by using the
yolov4ObjectDetectorfunction and train the detector usingtrainYOLOv4ObjectDetectorfunction.
This example also provides a pretrained YOLO v4 object detector to use for detecting vehicles in an image. The pretrained network uses tiny-yolov4-coco as the backbone network and is trained on a vehicle dataset. For information about YOLO v4 object detection network, see Getting Started with YOLO v4.
Load Dataset
This example uses a small vehicle dataset that contains 295 images. Many of these images come from the Caltech Cars 1999 and 2001 datasets, available at the Caltech Computational Vision website created by Pietro Perona and used with permission. Each image contain one or two labeled instances of a vehicle. A small dataset is useful for exploring the YOLO v4 training procedure, but in practice, more labeled images are needed to train a robust detector.
Unzip the vehicle images and load the vehicle ground truth data.
unzip vehicleDatasetImages.zip
data = load("vehicleDatasetGroundTruth.mat");
vehicleDataset = data.vehicleDataset;
The vehicle data is stored in a two-column table. The first column contain the image file paths and the second column contain the bounding boxes.
Display first few rows of the data set.
vehicleDataset(1:4,:)
ans = 4×2 table
    'vehicleImages/image_00001.jpg'    [220,136,35,28]
    'vehicleImages/image_00002.jpg'    [175,126,61,45]
    'vehicleImages/image_00003.jpg'    [108,120,45,33]
    'vehicleImages/image_00004.jpg'    [124,112,38,36]
Add the full path to the local vehicle data folder.
vehicleDataset.imageFilename = fullfile(pwd,vehicleDataset.imageFilename);
Split the dataset into training, validation, and test sets. Select 60% of the data for training, 10% for validation, and the rest for testing the trained detector.
rng("default");
shuffledIndices = randperm(height(vehicleDataset));
idx = floor(0.6 * length(shuffledIndices) );

trainingIdx = 1:idx;
trainingDataTbl = vehicleDataset(shuffledIndices(trainingIdx),:);

validationIdx = idx+1 : idx + 1 + floor(0.1 * length(shuffledIndices) );
validationDataTbl = vehicleDataset(shuffledIndices(validationIdx),:);

testIdx = validationIdx(end)+1 : length(shuffledIndices);
testDataTbl = vehicleDataset(shuffledIndices(testIdx),:);
Use imageDatastore and boxLabelDatastore to create datastores for loading the image and label data during training and evaluation.
imdsTrain = imageDatastore(trainingDataTbl{:,"imageFilename"});
bldsTrain = boxLabelDatastore(trainingDataTbl(:,"vehicle"));

imdsValidation = imageDatastore(validationDataTbl{:,"imageFilename"});
bldsValidation = boxLabelDatastore(validationDataTbl(:,"vehicle"));

imdsTest = imageDatastore(testDataTbl{:,"imageFilename"});
bldsTest = boxLabelDatastore(testDataTbl(:,"vehicle"));
Combine image and box label datastores.
trainingData = combine(imdsTrain,bldsTrain);
validationData = combine(imdsValidation,bldsValidation);
testData = combine(imdsTest,bldsTest);
Use validateInputData to detect invalid images, bounding boxes or labels when the data set contains one or more of the following:
Samples with invalid image format or NaN values
Bounding boxes containing zeros/NaN values/Inf values/empty
Missing or non-categorical labels
The values of the bounding boxes must be finite positive integers and must not be NaN. The height and the width of the bounding box values must be positive and lie within the image boundary.
validateInputData(trainingData);
validateInputData(validationData);
validateInputData(testData);
Display one of the training images and box labels.
data = read(trainingData);
I = data{1};
bbox = data{2};
annotatedImage = insertShape(I,"Rectangle",bbox);
annotatedImage = imresize(annotatedImage,2);
figure
imshow(annotatedImage)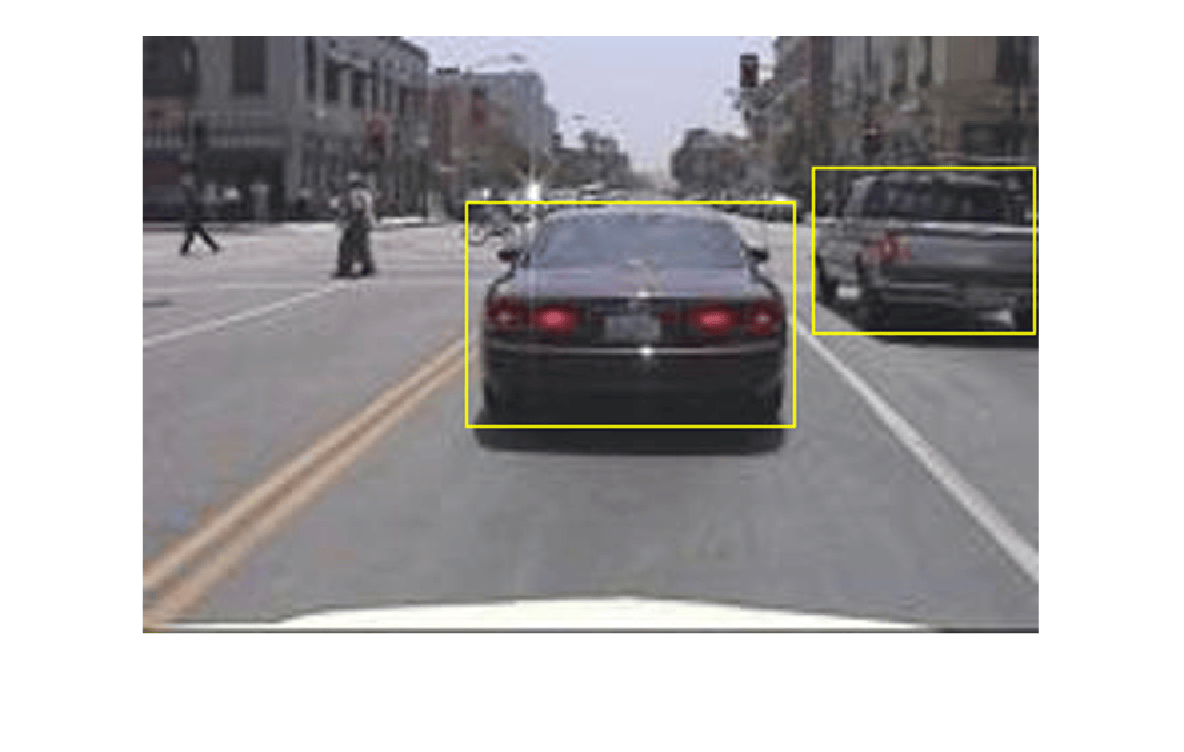
reset(trainingData);
Create a YOLO v4 Object Detector Network
Specify the network input size to be used for training.
inputSize = [416 416 3];
Specify the name of the object class to detect.
className = "vehicle";Use the estimateAnchorBoxes function to estimate anchor boxes based on the size of objects in the training data. To account for the resizing of the images prior to training, resize the training data for estimating anchor boxes. Use the transform function to preprocess the training data, then define the number of anchor boxes and estimate the anchor boxes. Resize the training data to the input size of the network by using the preprocessData helper function.
rng("default")
trainingDataForEstimation = transform(trainingData,@(data)preprocessData(data,inputSize));
numAnchors = 6;
[anchors,meanIoU] = estimateAnchorBoxes(trainingDataForEstimation,numAnchors);
Specify the anchorBoxes argument as the anchor boxes to use in all the detection heads. The anchor boxes are specified as a cell array of [M x 1], where M denotes the number of detection heads. Each detection head consists of a [N x 2] matrix that is stored in the anchors argument, where N is the number of anchors to use. Specify the anchorBoxes for each detection head based on the feature map size. Use larger anchors at lower scale and smaller anchors at higher scale. To do so, sort anchors by area, in descending order, and assign the first three to the first detection head and the last three to the second detection head.
area = anchors(:, 1).*anchors(:,2);
[~,idx] = sort(area,"descend");

anchors = anchors(idx,:);
anchorBoxes = {anchors(1:3,:)
    anchors(4:6,:)};
For more information on choosing anchor boxes, see Estimate Anchor Boxes from Training Data (Computer Vision Toolbox™) and Anchor Boxes for Object Detection.
Create the YOLO v4 object detector by using the yolov4ObjectDetector function. specify the name of the pretrained YOLO v4 detection network trained on COCO dataset. Specify the class name and the estimated anchor boxes.
detector = yolov4ObjectDetector("tiny-yolov4-coco",className,anchorBoxes,InputSize=inputSize);Perform Data Augmentation
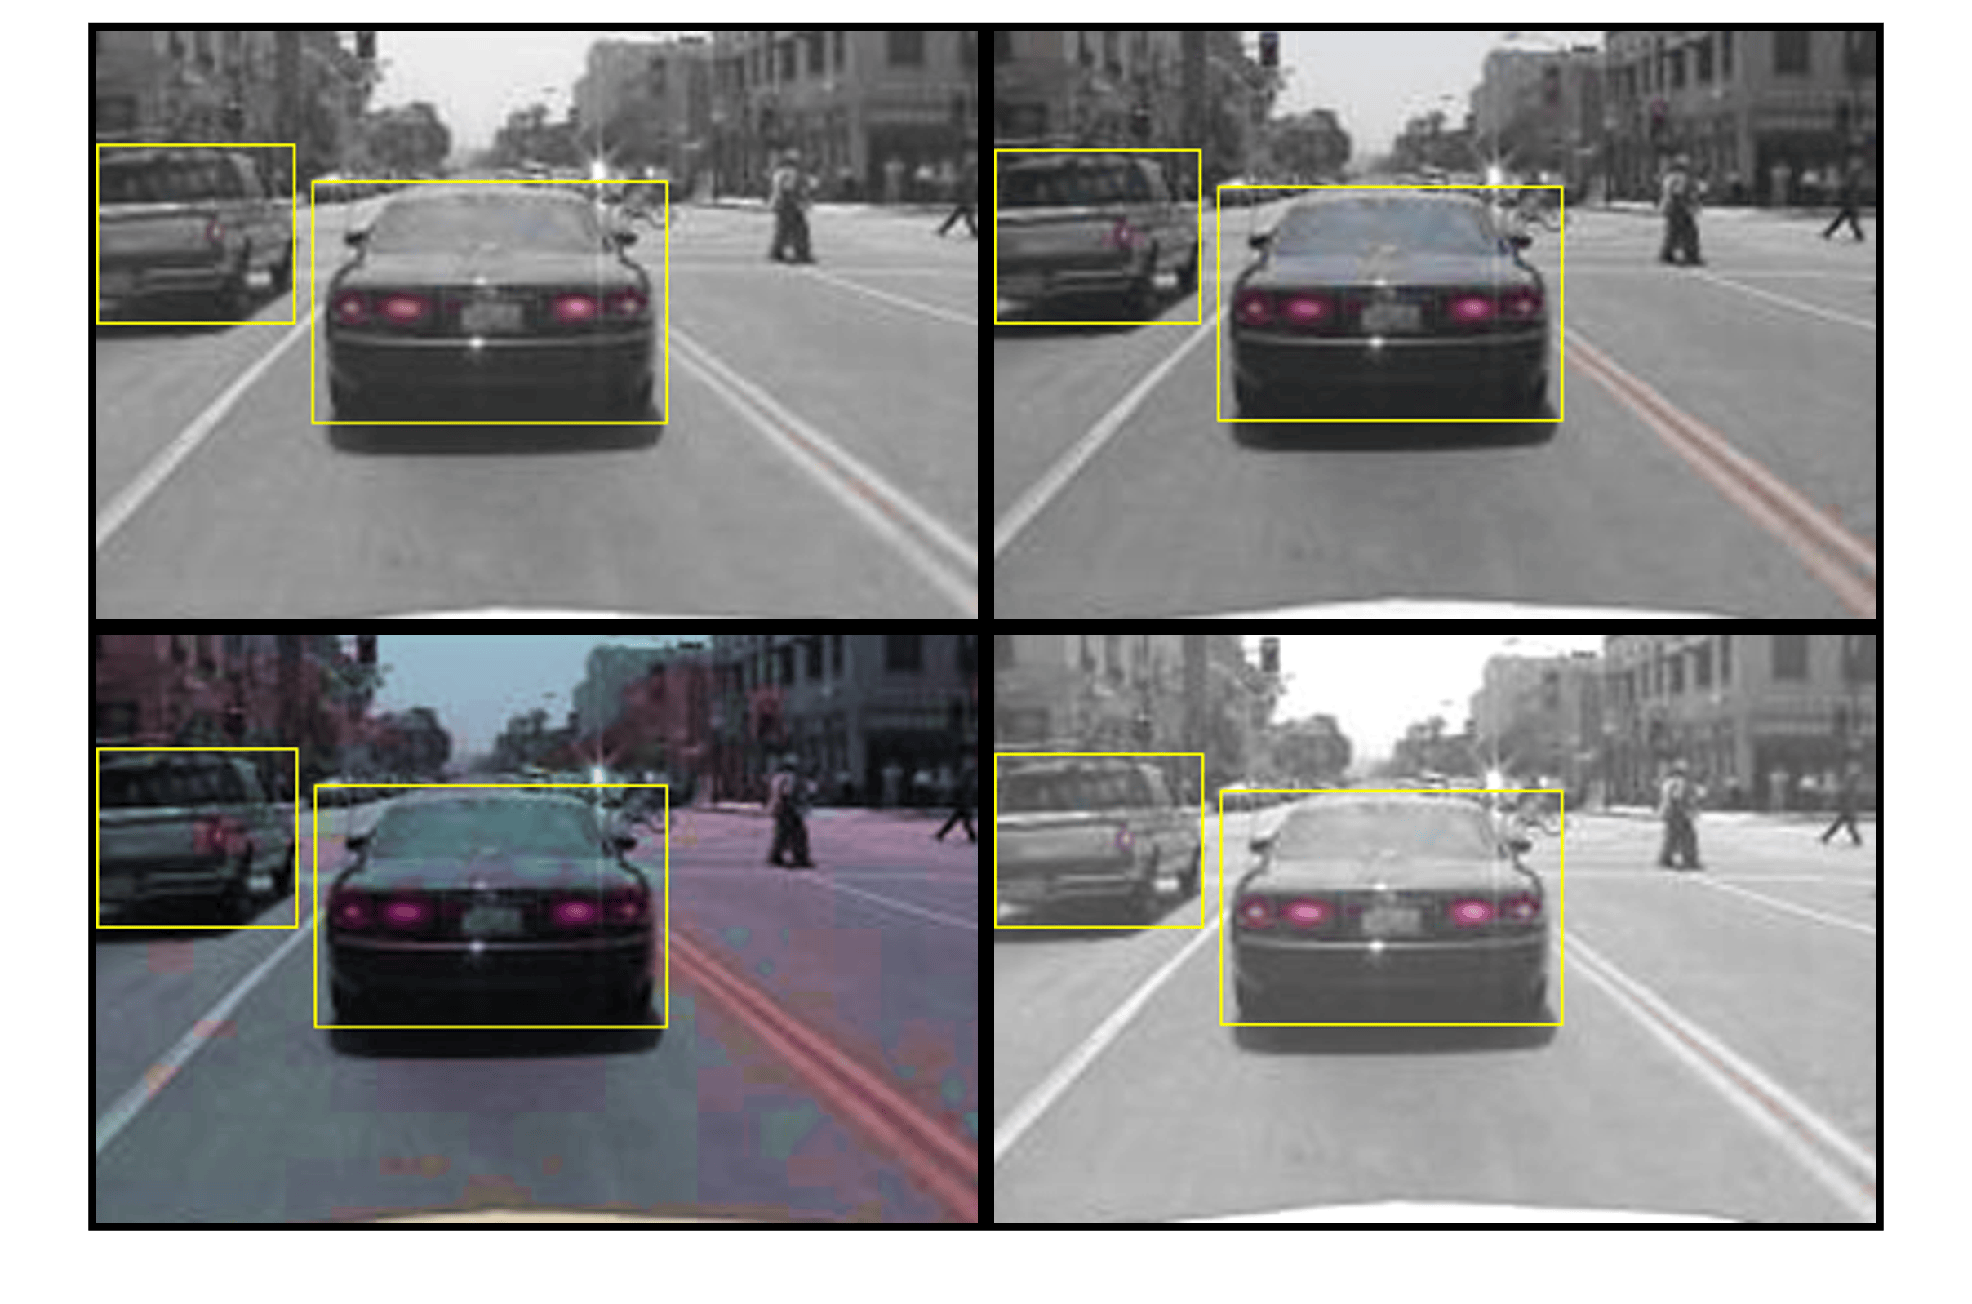
Perform data augmentation to improve training accuracy. Use the transform function to apply custom data augmentations to the training data. The augmentData helper function applies the following augmentations to the input data:
Color jitter augmentation in HSV space
Random horizontal flip
Random scaling by 10 percent
Note that data augmentation is not applied to the test and validation data. Ideally, test and validation data should be representative of the original data and is left unmodified for unbiased evaluation.
augmentedTrainingData = transform(trainingData,@augmentData);
Read and display samples of augmented training data.
augmentedData = cell(4,1);
for k = 1:4
    data = read(augmentedTrainingData);
    augmentedData{k} = insertShape(data{1},"rectangle",data{2});
    reset(augmentedTrainingData);
end
figure
montage(augmentedData,BorderSize=10)
Specify Training Options
Use trainingOptions to specify network training options. Train the object detector using the Adam solver for 80 epochs with a constant learning rate 0.001. To get trained detector with lowest validation loss, set OutputNetwork to "best-validation-loss". Set ValidationData to the validation data and ValidationFrequency to 1000. To validate the data more often, you can reduce the ValidationFrequency which also increases the training time. Use ExecutionEnvironment to determine what hardware resources will be used to train the network. The default value for ExecutionEnvironment is "auto", which selects a GPU if it is available, and otherwise selects the CPU. Set CheckpointPath to a temporary location to enable the saving of partially trained detectors during the training process. If training is interrupted, for instance by a power outage or system failure, you can resume training from the saved checkpoint.
options = trainingOptions("adam", ...
    GradientDecayFactor=0.9, ...
    SquaredGradientDecayFactor=0.999, ...
    InitialLearnRate=0.001, ...
    LearnRateSchedule="none", ...
    MiniBatchSize=4, ...
    L2Regularization=0.0005, ...
    MaxEpochs=80, ...
    PreprocessingEnvironment="parallel", ...
    ResetInputNormalization=true, ...
    Shuffle="every-epoch", ...
    VerboseFrequency=20, ...
    ValidationFrequency=1000, ...
    CheckpointPath=tempdir, ...
    ValidationData=validationData, ...
    OutputNetwork="best-validation-loss");
Train YOLO v4 Object Detector
Use the trainYOLOv4ObjectDetector function to train YOLO v4 object detector. This example is run on an NVIDIA™ RTX A5000 with 24 GB of memory. Training this network took approximately 33 minutes using this setup. The training time will vary depending on the hardware you use. Instead of training the network, you can also use a pretrained YOLO v4 object detector in the Computer Vision Toolbox™.
Download the pretrained detector by using the downloadPretrainedYOLOv4Detector helper function. To train the detector on the augmented training data, set the doTraining value to true.
doTraining = false;
if doTraining
    % Train the YOLO v4 detector.
    [detector,info] = trainYOLOv4ObjectDetector(augmentedTrainingData,detector,options);
else
    % Load pretrained detector for the example.
    detector = downloadPretrainedYOLOv4Detector();
end
Run the detector on a test image.
I = imread("highway.png");
[bboxes,scores,labels] = detect(detector,I);
Display the results.
I = insertObjectAnnotation(I,"rectangle",bboxes,scores);
figure
imshow(I)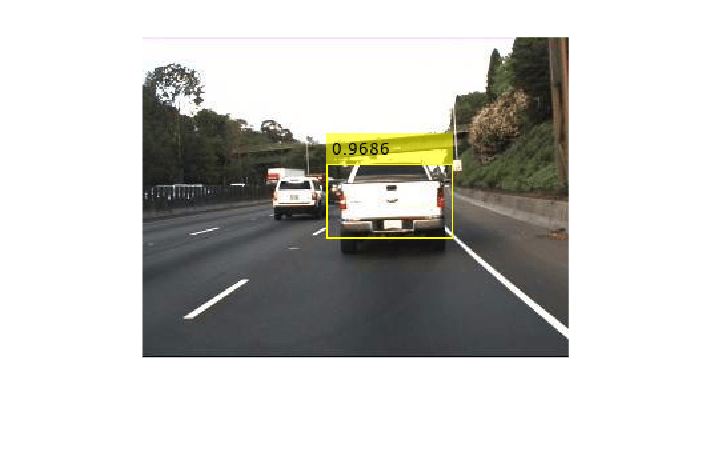
Evaluate Detector Using Test Set
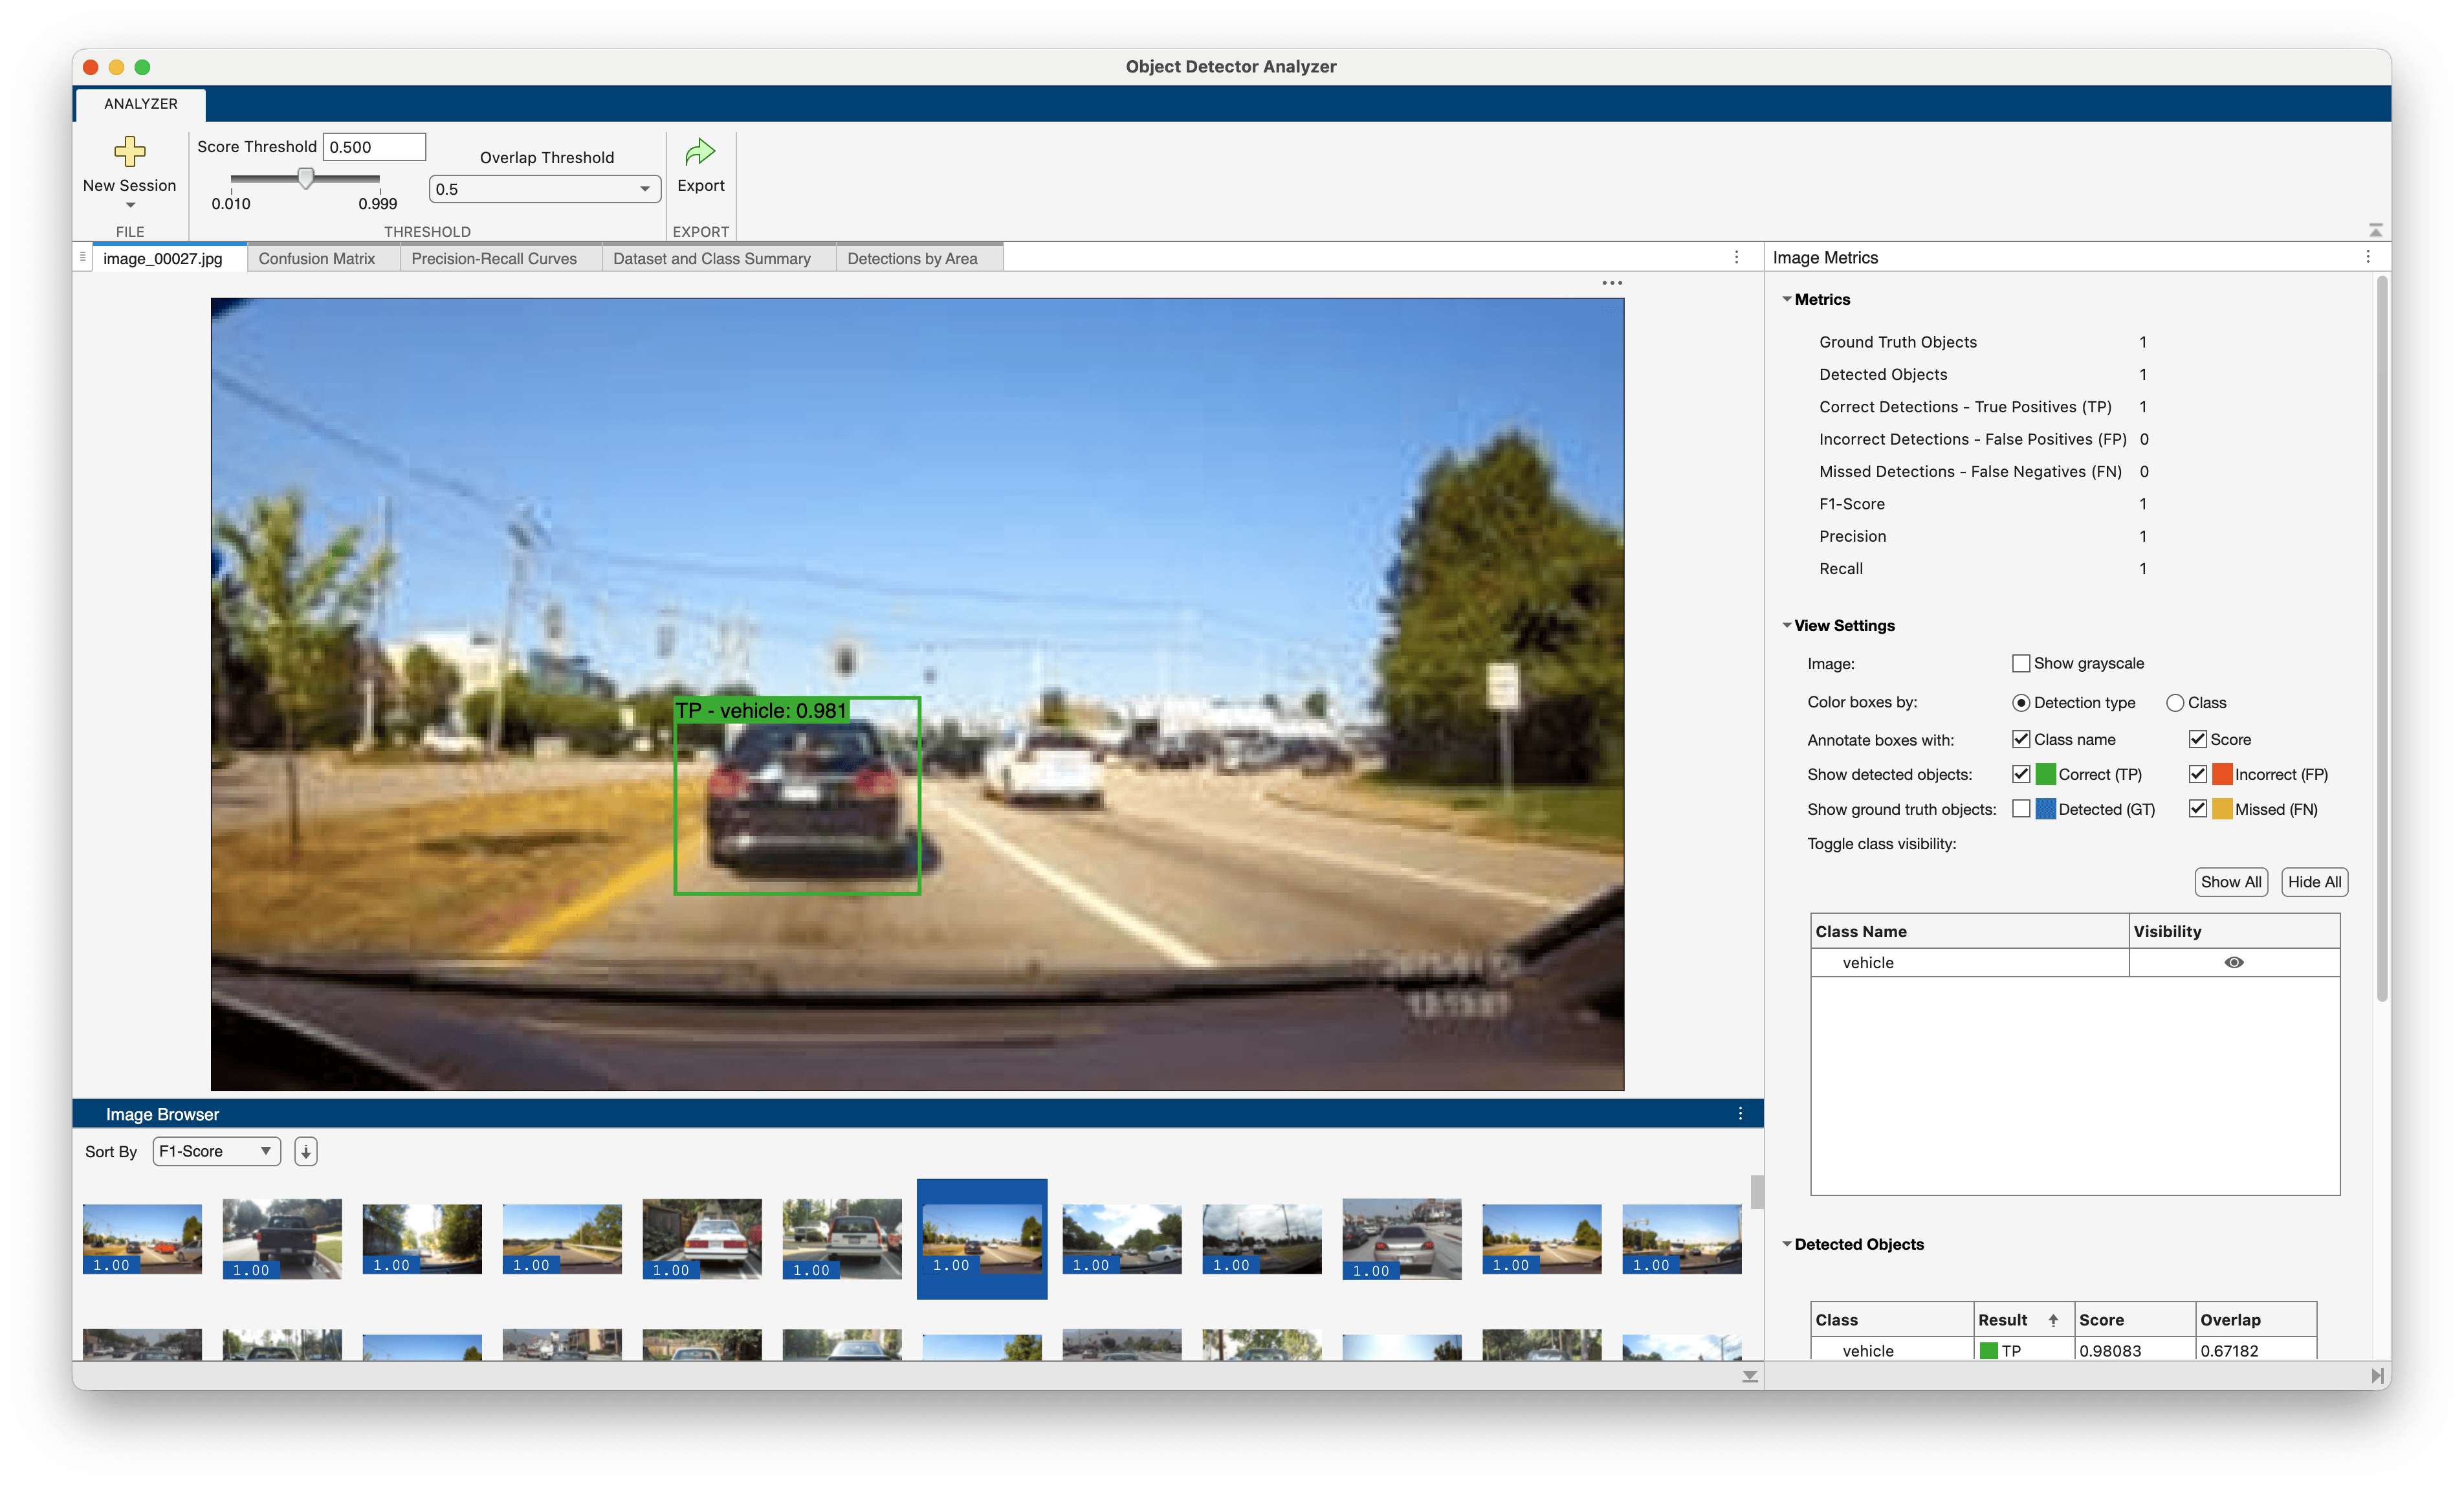
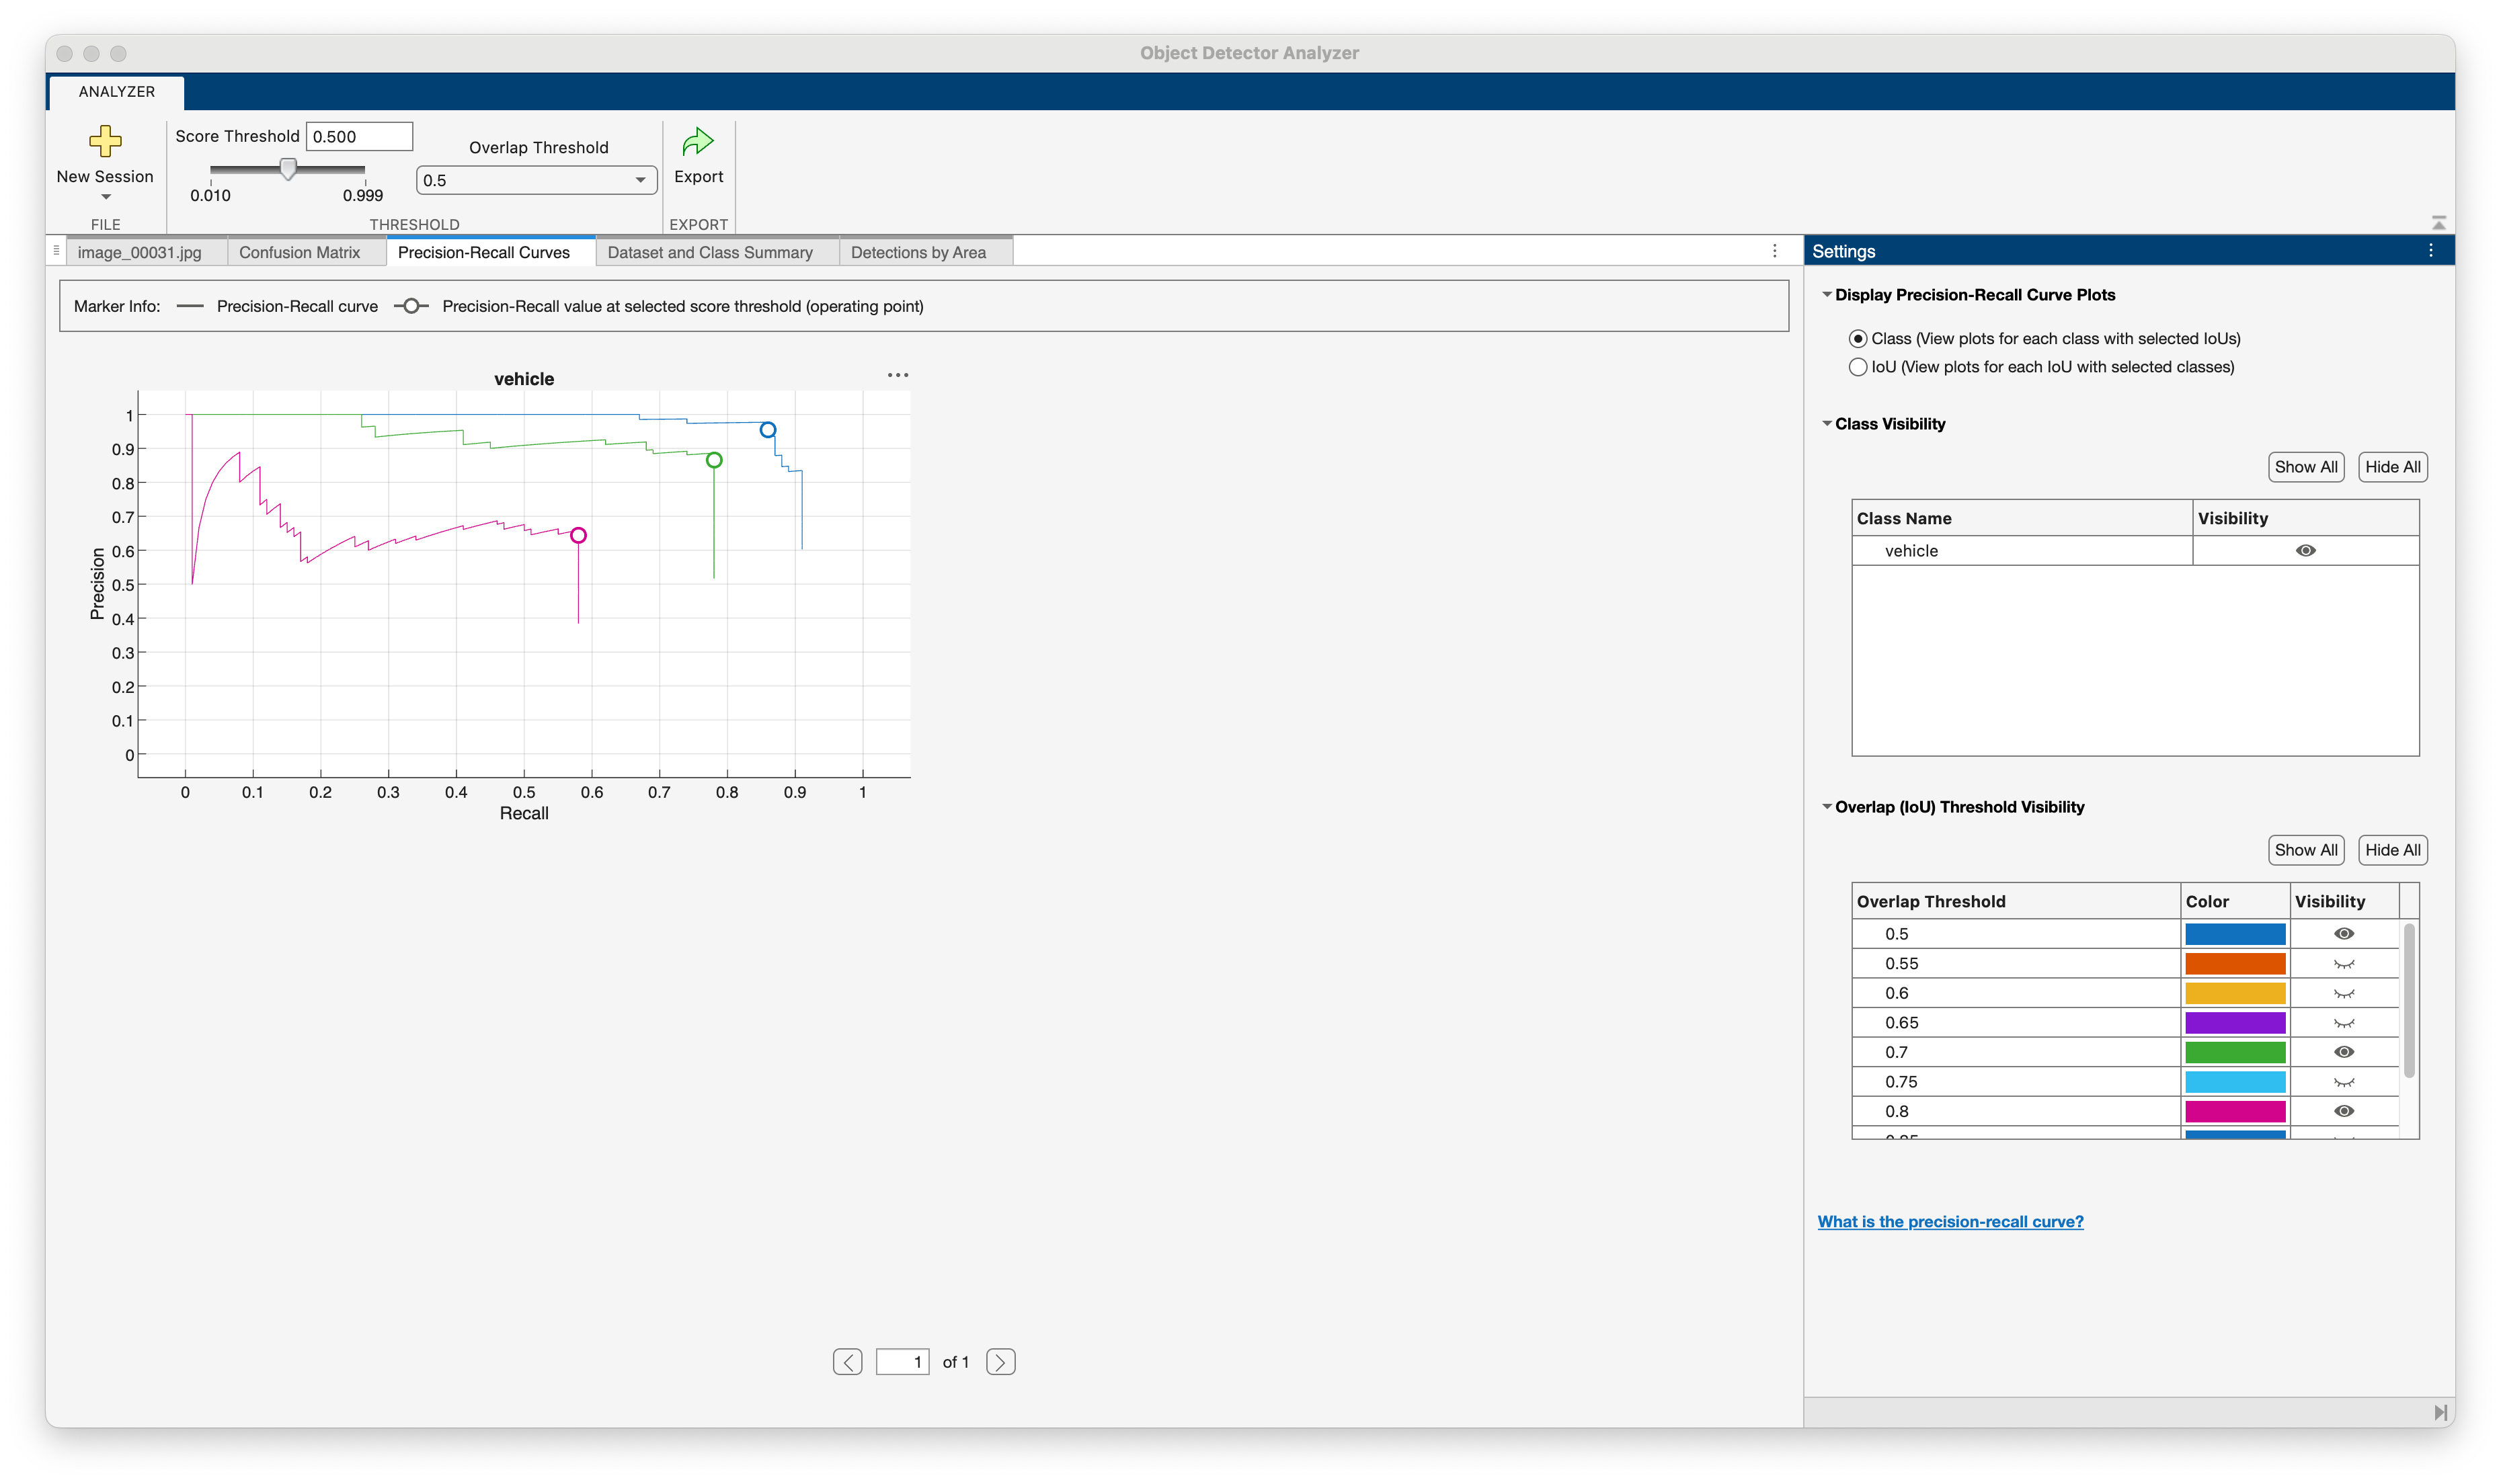
Use the Object Detector Analyzer app to visualize and evaluate the performance of the detector against ground truth. The app will run the detector on the test set and compute metrics such as average precision, plot the precision-recall curves, and display the detections on each image in the test set. You can visualize ground truth data along side correct and incorrect detector predictions and quickly navigate to images where the detector made the most mistakes to better understand the performance. For example, the detector may fail in specific scenarios that may indicate that the detector should be retrained with additional data that includes those specific scenarios.
objectDetectorAnalyzer(detector,testData)
Select the Precision-Recall Curve tab to see the precision-recall curves for the vehicle classes. The curves show that the detector performs well on the test set when the overlap threshold for evaluation is 0.5, but performance degrades as the overlap threshold increases to 0.7 and 0.8. The circular markers on the curve indicate the operating point of the detector. An operating point on a precision-recall curve is a specific detection score threshold setting that determines the balance between precision and recall achieved by the detector. You can adjust the score threshold slider to determine the optimal operating point for your application.
Explore the other tabs to see additional detection metrics:
Dataset and Class Summary: Summarizes the performance of the dataset across all classes.
Confusion Matrix: Displays the number of objects found and missed for each class.
Detections by Area: Visualize correct and incorrect detections by object size to spot errors caused by object size.
For custom visualization of evaluation metrics, see evaluateObjectDetection. For more information about object detection metrics, see Evaluate Object Detector Performance.
Supporting Functions
Helper function for performing data augmentation.
function data = augmentData(A)
% Apply random horizontal flipping, and random X/Y scaling. Boxes that get
% scaled outside the bounds are clipped if the overlap is above 0.25. Also,
% jitter image color.

data = cell(size(A));
for ii = 1:size(A,1)
    I = A{ii,1};
    bboxes = A{ii,2};
    labels = A{ii,3};
    sz = size(I);

    if numel(sz) == 3 && sz(3) == 3
        I = jitterColorHSV(I,...
            contrast=0.0,...
            Hue=0.1,...
            Saturation=0.2,...
            Brightness=0.2);
    end

    % Randomly flip image.
    tform = randomAffine2d(XReflection=true,Scale=[1 1.1]);
    rout = affineOutputView(sz,tform,BoundsStyle="centerOutput");
    I = imwarp(I,tform,OutputView=rout);

    % Apply same transform to boxes.
    [bboxes,indices] = bboxwarp(bboxes,tform,rout,OverlapThreshold=0.25);
    labels = labels(indices);

    % Return original data only when all boxes are removed by warping.
    if isempty(indices)
        data(ii,:) = A(ii,:);
    else
        data(ii,:) = {I,bboxes,labels};
    end
end
end

function data = preprocessData(data,targetSize)
% Resize the images and scale the pixels to between 0 and 1. Also scale the
% corresponding bounding boxes.

for ii = 1:size(data,1)
    I = data{ii,1};
    imgSize = size(I);

    bboxes = data{ii,2};

    I = im2single(imresize(I,targetSize(1:2)));
    scale = targetSize(1:2)./imgSize(1:2);
    bboxes = bboxresize(bboxes,scale);

    data(ii,1:2) = {I,bboxes};
end
end
Helper function for downloading the pretrained YOLO v4 object detector.
function detector = downloadPretrainedYOLOv4Detector()
% Download a pretrained yolov4 detector.
if ~exist("yolov4TinyVehicleExample_24a.mat", "file")
    if ~exist("yolov4TinyVehicleExample_24a.zip", "file")
        disp("Downloading pretrained detector...");
        pretrainedURL = "https://ssd.mathworks.com/supportfiles/vision/data/yolov4TinyVehicleExample_24a.zip";
        websave("yolov4TinyVehicleExample_24a.zip", pretrainedURL);
    end
    unzip("yolov4TinyVehicleExample_24a.zip");
end
pretrained = load("yolov4TinyVehicleExample_24a.mat");
detector = pretrained.detector;
end
References
[1] Alexey Bochkovskiy, Chien-Yao Wang, and Hong-Yuan Mark Liao. “YOLOv4: Optimal Speed and Accuracy of Object Detection.” 2020, arXiv:2004.10934. https://arxiv.org/abs/2004.10934.
See Also
Apps
Functions
yolov4ObjectDetector|trainYOLOv4ObjectDetector|yoloxObjectDetector(Visual Inspection Toolbox) |detect|evaluateObjectDetection|trainingOptions(Deep Learning Toolbox) |transform
Topics
- Object Detection in Large Satellite Imagery Using Deep Learning
- Detect Small Objects Using Tiled Training of YOLOX Network (Visual Inspection Toolbox)
- Detect Defects on Printed Circuit Boards Using YOLOX Network (Visual Inspection Toolbox)
- Multiclass Object Detection Using YOLO v2 Deep Learning
- Getting Started with YOLO v4
- Choose an Object Detector
- Get Started with Object Detection Using Deep Learning
- Anchor Boxes for Object Detection
- Deep Learning in MATLAB (Deep Learning Toolbox)
- Pretrained Deep Neural Networks (Deep Learning Toolbox)

