使用 RoadRunner 高清地图以编程方式构建简单的道路
RoadRunner 高清地图是一种道路数据模型,用于在 RoadRunner 场景中表示高清 (HD) 地图数据。该模型定义了一个简单的结构来使用车道、车道边界、车道标记和交叉口来表示道路布局。此示例演示如何使用 RoadRunner 高清地图 MATLAB® 对象和函数构建简单的道路。然后可以将道路导入 RoadRunner 中。构建道路并将其导入 RoadRunner 场景的步骤如下:
在 MATLAB 中构建高清地图
通过在 MATLAB 中绘制地图来验证车道和车道边界的表示
将地图写入 RoadRunner 高清地图 (.rrd) 文件
将文件导入 RoadRunner 并预览 RoadRunner 高清地图数据
从导入的文件构建 RoadRunner 场景(需要 RoadRunner Scene Builder)。
创建一条笔直的无标记道路
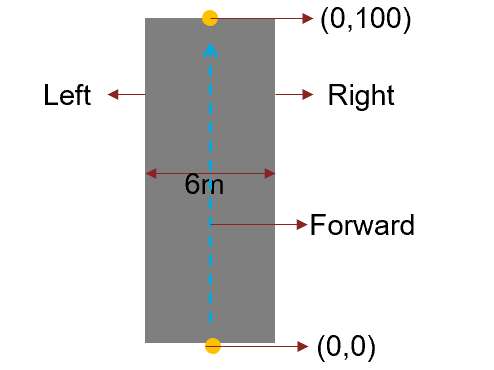
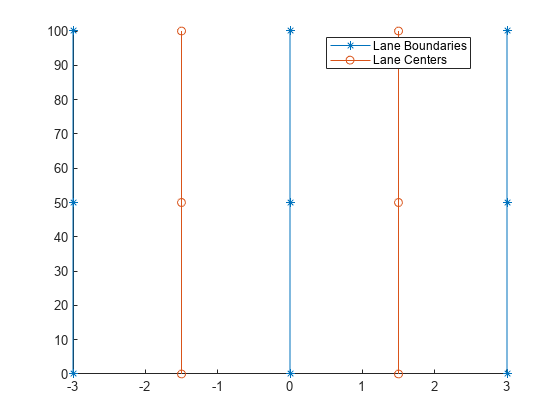
固定宽度的道路是使用一系列与道路中心位置相对应的 xy 坐标来定义的。该图显示了您将在本部分中创建的一条笔直的、无标记的道路。您还将在 MATLAB 中绘制道路,然后将其保存到二进制文件中。
通过调用 roadrunnerHDMap 对象创建一个空的 RoadRunner 高清地图。
rrMap = roadrunnerHDMap;
将直路的中心定义为一个二维数组,其中包含三组指定道路中心的 xy 坐标。另外,定义道路的宽度。
roadCenters = [0 0;0 50;0 100];
roadWidth = 6;
使用 roadrunner.hdmap.LaneBoundary 对象创建道路的左右边界。指定车道边界信息,包括车道 ID 和定义车道几何形状的坐标。
rrMap.LaneBoundaries(1) = roadrunner.hdmap.LaneBoundary(ID="Left",Geometry=roadCenters-[roadWidth/2 0]);
rrMap.LaneBoundaries(2) = roadrunner.hdmap.LaneBoundary(ID="Right",Geometry=roadCenters+[roadWidth/2 0]);
使用 roadrunner.hdmap.Lane 对象创建道路车道。指定车道 ID、坐标车道的几何形状、行驶方向和车道类型的车道信息。
rLane = roadrunner.hdmap.Lane(ID="Lane",Geometry=roadCenters,TravelDirection="Forward",LaneType="Driving");
将车道边界与车道连接起来。定义每个车道的左、右车道边界,并指定车道和车道边界之间的对齐方式。
leftBoundary(rLane,"Left",Alignment="Forward");
rightBoundary(rLane,"Right",Alignment="Forward");
rrMap.Lanes = rLane;
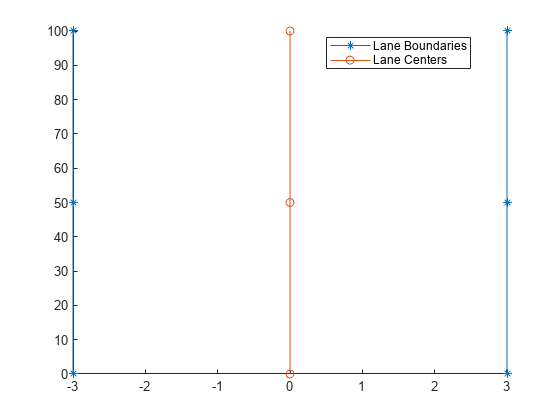
绘制车道中心和车道边界,以在将车道和车道边界导入 RoadRunner 之前预览它们。
plot(rrMap);
使用 write 函数将上一步绘制的高清地图写入文件。
write(rrMap,"straightRoad.rrhd");将高清地图文件导入并构建到 RoadRunner
有关将扩展名为 .rrhd 的 RoadRunner 高清地图文件导入 RoadRunner、预览地图和构建场景的详细说明,请参阅 使用 RoadRunner 高清地图导入自定义数据。
使用 MATLAB® 命令行中的 roadrunner 对象打开 RoadRunner 应用程序。在首次创建 roadrunner 对象之前,您必须以交互方式安装 RoadRunner 并激活您的 RoadRunner 许可证。有关详细信息,请参阅安装并激活 RoadRunner。
rrApp = roadrunner(ProjectFolder="C:\RR\MyProject", InstallationFolder="C:\Program Files\RoadRunner R2024a");
或者,您可以使用 roadrunnerSetup (Automated Driving Toolbox) 函数以交互方式启动 RoadRunner 应用程序。此函数打开一个对话框,用于指定打开 RoadRunner 时要使用的工程文件夹和安装文件夹。
从当前打开的场景中指定的文件导入并构建 RoadRunner 高清地图数据。在构建场景之前,您必须以交互方式激活 RoadRunner SceneBuilder 许可证。
file = fullfile(pwd,"straightRoad.rrhd");
importScene(rrApp,file,"RoadRunner HD Map");
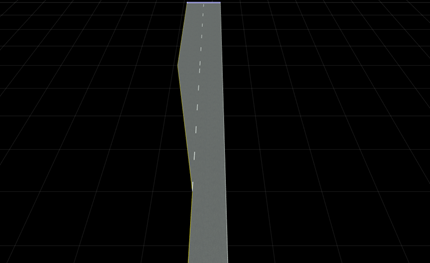
该图显示了使用 RoadRunner Scene Builder 构建的场景。

在直线道路上添加标记
在本部分中,您将向上一部分中创建的直路的左右车道边界添加纯白色车道标记。要指定车道标记,您需要 RoadRunner 中的素材。在此示例中,您使用属于 RoadRunner 素材类型 一部分的素材。这些素材是使用 RoadRunner 工程文件夹的相对路径在地图中指定的。
使用 roadrunner.hdmap.RelativeAssetPath 函数定义实心白色车道标记素材的路径。
solidWhiteAsset = roadrunner.hdmap.RelativeAssetPath(AssetPath="Assets/Markings/SolidSingleWhite.rrlms");使用 roadrunner.hdmap.LaneMarking 对象在笔直道路上创建实心白色车道标记。指定车道标记 ID 的车道标记信息以及素材的路径。
rrMap.LaneMarkings = roadrunner.hdmap.LaneMarking(ID="SolidWhite",AssetPath=solidWhiteAsset);使用 roadrunner.hdmap.MarkingReference 对象为实心白色标记创建应用到车道边界的参考。
markingRefSW = roadrunner.hdmap.MarkingReference(MarkingID=roadrunner.hdmap.Reference(ID="SolidWhite"));使用参数属性应用此车道标记以跨越左右车道边界的整个长度。
markingSpan = [0 1];
markingAttribSW = roadrunner.hdmap.ParametricAttribution(MarkingReference=markingRefSW,Span=markingSpan);
rrMap.LaneBoundaries(1).ParametricAttributes = markingAttribSW;
rrMap.LaneBoundaries(2).ParametricAttributes = markingAttribSW;
将修改后的高精地图写入文件。
write(rrMap,"straightRoadWithMarkings.rrhd");从当前打开的场景中指定的文件导入并构建 RoadRunner 高清地图数据。
file = fullfile(pwd,"straightRoadWithMarkings.rrhd");
importScene(rrApp,file,"RoadRunner HD Map");
该图显示了使用 RoadRunner Scene Builder 构建的场景。

创建双向道路
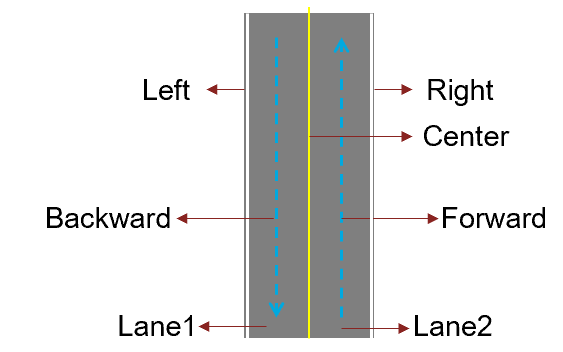
双向路有两条行驶方向相反的车道。一条实心黄色车道标记将车道分开。该图显示了您将在本部分中创建的一条双向直线道路。您使用前面部分中使用的相同道路中心和道路宽度。
通过调用 roadrunnerHDMap 对象创建一个空的 RoadRunner 高清地图。
rrMap = roadrunnerHDMap;
指定车道和车道边界。在此示例中,随着地图中对象数量的增加,值的预初始化可以提高性能。
rrMap.Lanes(2,1) = roadrunner.hdmap.Lane();
rrMap.LaneBoundaries(3,1) = roadrunner.hdmap.LaneBoundary();
分配 Lane 属性值。使用 deal 函数来匹配输入和输出列表。
[rrMap.Lanes.ID] = deal("Lane1","Lane2");
[rrMap.Lanes.Geometry] = deal(roadCenters-[roadWidth/4 0],roadCenters+[roadWidth/4 0]);
[rrMap.Lanes.TravelDirection] = deal("Backward","Forward");
[rrMap.Lanes.LaneType] = deal("Driving");
分配 LaneBoundaries 属性值。在此示例中,中央车道由 Lane1 和 Lane2 共享。
[rrMap.LaneBoundaries.ID] = deal("Left","Center","Right");
[rrMap.LaneBoundaries.Geometry] = deal(roadCenters-[roadWidth/2 0],...
  roadCenters,roadCenters+[roadWidth/2 0]);
将车道边界与车道连接起来。定义每个车道的左、右车道边界,并指定车道和车道边界之间的对齐方式。
leftBoundary(rrMap.Lanes(1),"Left",Alignment="Forward");
rightBoundary(rrMap.Lanes(1),"Center",Alignment="Forward");
leftBoundary(rrMap.Lanes(2),"Center",Alignment="Forward");
rightBoundary(rrMap.Lanes(2),"Right",Alignment="Forward");
除了之前添加的实心白色标记之外,还添加黄色实心标记。使用 roadrunner.hdmap.RelativeAssetPath 函数定义实心黄色车道标记素材的路径。
solidYellowAsset = roadrunner.hdmap.RelativeAssetPath(AssetPath="Assets/Markings/SolidSingleYellow.rrlms");使用 roadrunner.hdmap.LaneMarking 对象在笔直道路上创建实心黄色车道标记。指定车道标记 ID 的车道标记信息以及素材的路径。
rrMap.LaneMarkings(2,1) = roadrunner.hdmap.LaneMarking();
[rrMap.LaneMarkings.ID] = deal("SolidWhite","SolidYellow");
[rrMap.LaneMarkings.AssetPath] = deal(solidWhiteAsset,solidYellowAsset);
将白色标记分配给车道边缘的车道边界,将黄色标记分配给中央车道边界。这些标记跨越边界的整个长度。
markingRefSY = roadrunner.hdmap.MarkingReference(MarkingID=roadrunner.hdmap.Reference(ID="SolidYellow"));
markingAttribSY = roadrunner.hdmap.ParametricAttribution(MarkingReference=markingRefSY,Span=markingSpan);
[rrMap.LaneBoundaries.ParametricAttributes] = deal(markingAttribSW,markingAttribSY,markingAttribSW);
绘制车道中心和车道边界。
plot(rrMap)
将高清地图写入文件。
write(rrMap,"twoWayRoad.rrhd");从当前打开的场景中指定的文件导入并构建 RoadRunner 高清地图数据。
file = fullfile(pwd,"twoWayRoad.rrhd");
importScene(rrApp,file,"RoadRunner HD Map");
该图显示了使用 RoadRunner Scene Builder 构建的场景。

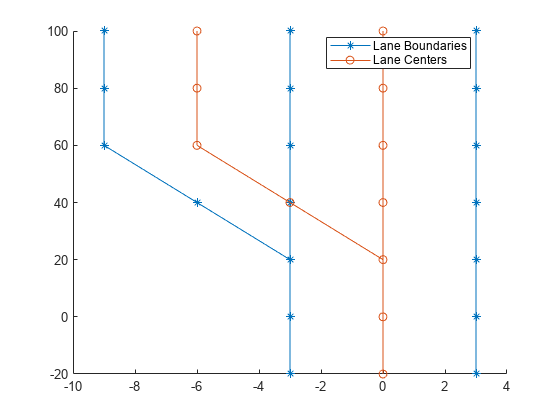
向单向道路添加一条车道
在本部分中,您将向单向道路添加一条车道。白色虚线标记用于分隔具有相同行驶方向的两条车道。要向单向道路添加车道,您需要从车道的左边缘将一条车道一分为二。这需要在 RoadRunner 高清地图中车道分割处创建额外的车道和车道边界。下图显示了您将添加到单向道路的车道:

通过调用 roadrunnerHDMap 对象创建一个空的 RoadRunner 高清地图。
rrMap = roadrunnerHDMap;
指定车道和车道边界。
rrMap.Lanes(5,1) = roadrunner.hdmap.Lane();
rrMap.LaneBoundaries(8,1) = roadrunner.hdmap.LaneBoundary();
指定车道组和车道标记。
rrMap.LaneGroups(3,1) = roadrunner.hdmap.LaneGroup();
rrMap.LaneMarkings(3,1) = roadrunner.hdmap.LaneMarking();
分配 Lane 属性值。将 Lane1 拆分为 Lane4 和 Lane5 并使用 Lane2 和 Lane3 用于过渡。
[rrMap.Lanes.ID] = deal("Lane1","Lane2","Lane3","Lane4","Lane5");
[rrMap.Lanes.Geometry] = deal([0 -20;0 0;0 20;],[0 20;0 40;0 60;],[0 20;-3 40;-6 60],[-6 60;-6 80;-6 100],[0 60;0 80;0 100]);
[rrMap.Lanes.TravelDirection] = deal("Forward");
[rrMap.Lanes.LaneType] = deal("Driving");
分配 LaneBoundaries 属性值。Lane3 与 Lane2 共享其右边界,用 Left2 表示。
[rrMap.LaneBoundaries.ID] = deal("Left1","Right1","Left2","Right2","Left3","Left4","Center4","Right4");
[rrMap.LaneBoundaries.Geometry] = deal([-3 -20;-3 0;-3 20],[3 -20;3 0;3 20],[-3 20;-3 40;-3 60;],...
        [3 20;3 40;3 60],[-3 20;-6 40;-9 60],[-9 60;-9 80;-9 100],[-3 60;-3 80;-3 100],[3 60;3 80;3 100]);
将车道边界与车道连接起来。定义每个车道的左、右车道边界,并指定车道和车道边界之间的对齐方式。
leftBoundary(rrMap.Lanes(1),"Left1",Alignment="Forward");
rightBoundary(rrMap.Lanes(1),"Right1",Alignment="Forward");
leftBoundary(rrMap.Lanes(2),"Left2",Alignment="Forward");
rightBoundary(rrMap.Lanes(2),"Right2",Alignment="Forward");
leftBoundary(rrMap.Lanes(3),"Left3",Alignment="Forward");
rightBoundary(rrMap.Lanes(3),"Left2",Alignment="Forward");
leftBoundary(rrMap.Lanes(4),"Left4",Alignment="Forward");
rightBoundary(rrMap.Lanes(4),"Center4",Alignment="Forward");
leftBoundary(rrMap.Lanes(5),"Center4",Alignment="Forward");
rightBoundary(rrMap.Lanes(5),"Right4",Alignment="Forward");
通过定义有关其前驱和后继关系的信息来指定车道之间的对齐方式。
rrMap.Lanes(3).Successors = roadrunner.hdmap.AlignedReference(Reference=roadrunner.hdmap.Reference(ID="Lane4"),Alignment="Forward");
rrMap.Lanes(3).Predecessors = roadrunner.hdmap.AlignedReference(Reference=roadrunner.hdmap.Reference(ID="Lane1"),Alignment="Forward");
rrMap.Lanes(2).Successors = roadrunner.hdmap.AlignedReference(Reference=roadrunner.hdmap.Reference(ID="Lane5"),Alignment="Forward");
rrMap.Lanes(2).Predecessors = roadrunner.hdmap.AlignedReference(Reference=roadrunner.hdmap.Reference(ID="Lane1"),Alignment="Forward");
rrMap.Lanes(1).Successors = roadrunner.hdmap.AlignedReference(Reference=roadrunner.hdmap.Reference(ID="Lane2"),Alignment="Forward");
rrMap.Lanes(1).Successors(2,1) = roadrunner.hdmap.AlignedReference(Reference=roadrunner.hdmap.Reference(ID="Lane3"),Alignment="Forward");
rrMap.Lanes(4).Predecessors = roadrunner.hdmap.AlignedReference(Reference=roadrunner.hdmap.Reference(ID="Lane3"),Alignment="Forward");
rrMap.Lanes(5).Predecessors = roadrunner.hdmap.AlignedReference(Reference=roadrunner.hdmap.Reference(ID="Lane2"),Alignment="Forward");
除了之前添加的实心白色和黄色标记之外,还添加虚线白色标记。使用 roadrunner.hdmap.RelativeAssetPath 函数定义白色虚线车道标记素材的路径。
dashedWhiteAsset = roadrunner.hdmap.RelativeAssetPath(AssetPath="Assets/Markings/DashedSingleWhite.rrlms");使用 roadrunner.hdmap.LaneMarking 对象在道路上创建白色虚线车道标记。
rrMap.LaneMarkings(3,1) = roadrunner.hdmap.LaneMarking();
[rrMap.LaneMarkings.ID] = deal("SolidWhite","SolidYellow","DashedWhite");
[rrMap.LaneMarkings.AssetPath] = deal(solidWhiteAsset,solidYellowAsset,dashedWhiteAsset);
使用参数属性分配车道标记。
markingRefDW = roadrunner.hdmap.MarkingReference(MarkingID=roadrunner.hdmap.Reference(ID="DashedWhite"));
markingAttribDW = roadrunner.hdmap.ParametricAttribution(MarkingReference=markingRefDW,Span=markingSpan);
[rrMap.LaneBoundaries.ParametricAttributes] = deal(markingAttribSY,markingAttribSW,markingAttribDW,markingAttribSW,...
    markingAttribSY,markingAttribSY,markingAttribDW,markingAttribSW);
绘制车道中心和车道边界。
plot(rrMap)
将高清地图写入文件。
write(rrMap,"laneAdd.rrhd");使用导入和构建选项时,用户必须将高清地图文件复制到当前工程的素材文件夹中。
copyfile("laneAdd.rrhd", "C:\RR\MyProject\Assets");
创建加载地图的 RoadRunner 高清地图导入选项。
importOptions = roadrunnerHDMapImportOptions(ImportStep="Load"); 将 RoadRunner 高清地图数据从指定文件加载到当前打开的场景中。
file = fullfile("C:\RR\MyProject\Assets","laneAdd.rrhd");
importScene(rrApp,file,"RoadRunner HD Map",importOptions);
创建用于构建地图的 RoadRunner HD 地图构建选项。
buildOptions = roadrunnerHDMapBuildOptions(DetectAsphaltSurfaces=true);
将指定文件中的 RoadRunner 高清地图数据构建到当前打开的场景中。
buildScene(rrApp,"RoadRunner HD Map",buildOptions);该图显示了使用 RoadRunner Scene Builder 构建的场景。