本页面提供的是上一版软件的文档。当前版本中已删除对应的英文页面。
基于预训练的 Keras 层组合网络
此示例说明如何从预训练的 Keras 网络中导入层、用自定义层替换不支持的层,以及将各层组合成可以进行预测的网络。
导入 Keras 网络
从 Keras 网络模型中导入层。'digitsDAGnetwithnoise.h5' 中的网络可对数字图像进行分类。
filename = 'digitsDAGnetwithnoise.h5';
lgraph = importKerasLayers(filename,'ImportWeights',true);
Warning: 'importKerasLayers' is not recommended and will be removed in a future release. To import TensorFlow-Keras models, save using the SavedModel format and use importNetworkFromTensorFlow function.
Warning: Unable to import some Keras layers, because they are not supported by the Deep Learning Toolbox. They have been replaced by placeholder layers. To find these layers, call the function findPlaceholderLayers on the returned object.
Keras 网络包含一些 Deep Learning Toolbox 不支持的层。importKerasLayers 函数会显示警告,并用占位符层替换不支持的层。
使用 plot 绘制层图。
figure
plot(lgraph)
title("Imported Network")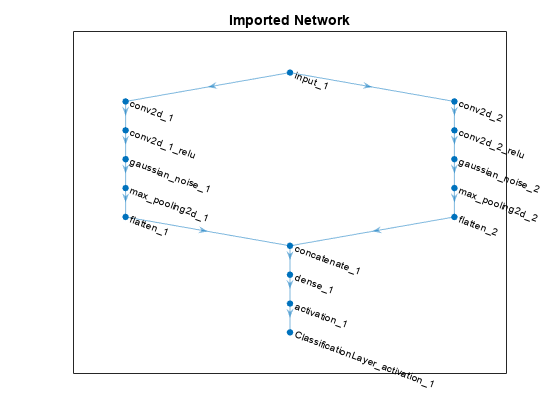
替换占位层
要替换占位层,请首先标识要替换的层的名称。使用 findPlaceholderLayers 查找占位层。
placeholderLayers = findPlaceholderLayers(lgraph)
placeholderLayers =
  2x1 PlaceholderLayer array with layers:

     1   'gaussian_noise_1'   GaussianNoise   Placeholder for 'GaussianNoise' Keras layer
     2   'gaussian_noise_2'   GaussianNoise   Placeholder for 'GaussianNoise' Keras layer
显示这些层的 Keras 配置。
placeholderLayers.KerasConfiguration
ans = struct with fields:
        trainable: 1
             name: 'gaussian_noise_1'
           stddev: 1.5000
    inbound_nodes: {{1x1 cell}}
ans = struct with fields:
        trainable: 1
             name: 'gaussian_noise_2'
           stddev: 0.7000
    inbound_nodes: {{1x1 cell}}
使用 gaussianNoiseLayer 辅助函数创建两个高斯噪声层,它们的配置与导入的 Keras 层相同。
gnLayer1 = gaussianNoiseLayer(1.5,'new_gaussian_noise_1');
gnLayer2 = gaussianNoiseLayer(0.7,'new_gaussian_noise_2');
使用 replaceLayer 将占位层替换为自定义层。
lgraph = replaceLayer(lgraph,'gaussian_noise_1',gnLayer1);
lgraph = replaceLayer(lgraph,'gaussian_noise_2',gnLayer2);
使用 plot 绘制更新后的层图。
figure
plot(lgraph)
title("Network with Replaced Layers")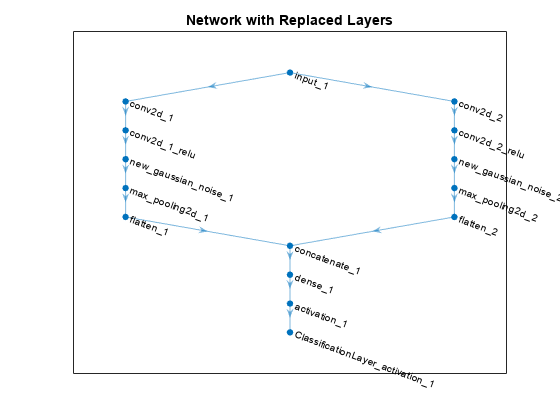
指定类名称
如果导入的分类层不包含类,则必须在进行预测之前指定这些类。如果不指定类,软件会自动将类设置为 1、2、...、N,其中 N 是类的数量。
通过查看层图的 Layers 属性,查找分类层的索引。
lgraph.Layers
ans =
  15x1 Layer array with layers:

     1   'input_1'                            Image Input             28x28x1 images
     2   'conv2d_1'                           2-D Convolution         20 7x7x1 convolutions with stride [1  1] and padding 'same'
     3   'conv2d_1_relu'                      ReLU                    ReLU
     4   'conv2d_2'                           2-D Convolution         20 3x3x1 convolutions with stride [1  1] and padding 'same'
     5   'conv2d_2_relu'                      ReLU                    ReLU
     6   'new_gaussian_noise_1'               Gaussian Noise          Gaussian noise with standard deviation 1.5
     7   'new_gaussian_noise_2'               Gaussian Noise          Gaussian noise with standard deviation 0.7
     8   'max_pooling2d_1'                    2-D Max Pooling         2x2 max pooling with stride [2  2] and padding 'same'
     9   'max_pooling2d_2'                    2-D Max Pooling         2x2 max pooling with stride [2  2] and padding 'same'
    10   'flatten_1'                          Keras Flatten           Flatten activations into 1-D assuming C-style (row-major) order
    11   'flatten_2'                          Keras Flatten           Flatten activations into 1-D assuming C-style (row-major) order
    12   'concatenate_1'                      Depth concatenation     Depth concatenation of 2 inputs
    13   'dense_1'                            Fully Connected         10 fully connected layer
    14   'activation_1'                       Softmax                 softmax
    15   'ClassificationLayer_activation_1'   Classification Output   crossentropyex
分类层的名称为 'ClassificationLayer_activation_1'。查看分类层并检查 Classes 属性。
cLayer = lgraph.Layers(end)
cLayer =
  ClassificationOutputLayer with properties:

            Name: 'ClassificationLayer_activation_1'
         Classes: 'auto'
    ClassWeights: 'none'
      OutputSize: 'auto'

   Hyperparameters
    LossFunction: 'crossentropyex'
由于层的 Classes 属性为 'auto',因此您必须手动指定类。将类设置为 0、1、...、9,然后将导入的分类层替换为新层。
cLayer.Classes = string(0:9)
cLayer =
  ClassificationOutputLayer with properties:

            Name: 'ClassificationLayer_activation_1'
         Classes: [0    1    2    3    4    5    6    7    8    9]
    ClassWeights: 'none'
      OutputSize: 10

   Hyperparameters
    LossFunction: 'crossentropyex'
lgraph = replaceLayer(lgraph,'ClassificationLayer_activation_1',cLayer);组合网络
使用 assembleNetwork 组合层图。此函数将返回一个可以用于预测的 DAGNetwork 对象。
net = assembleNetwork(lgraph)
net =
  DAGNetwork with properties:

         Layers: [15x1 nnet.cnn.layer.Layer]
    Connections: [15x2 table]
     InputNames: {'input_1'}
    OutputNames: {'ClassificationLayer_activation_1'}
另请参阅
importKerasNetwork | assembleNetwork | replaceLayer | importKerasLayers | trainNetwork | layerGraph | DAGNetwork | findPlaceholderLayers
相关主题
You can also select a web site from the following list:
Americas
- América Latina (Español)
- Canada (English)
- United States (English)
Europe
- Belgium (English)
- Denmark (English)
- Deutschland (Deutsch)
- España (Español)
- Finland (English)
- France (Français)
- Ireland (English)
- Italia (Italiano)
- Luxembourg (English)
- Netherlands (English)
- Norway (English)
- Österreich (Deutsch)
- Portugal (English)
- Sweden (English)
- Switzerland
- United Kingdom (English)