Extract 3D Vehicle Information from Recorded Monocular Camera Data for Scenario Generation
This example shows how to extract vehicle position, orientation, and dimension information to generate a RoadRunner scenario from camera data. You use a semi-automated workflow that uses a pretrained 3D object detector and a custom app to visually inspect the detections and filter noisy or unwanted detections.
In this example, you:
Detect vehicles using a pretrained vehicle detector.
Use a custom app to filter noisy and unwanted detections.
Generate a vehicle tracklist from filtered detections using a joint probabilistic data association (JPDA) tracker.
Load Sensor Data
This example requires the Scenario Builder for Automated Driving Toolbox™ support package. Check if the support package is installed. If it is not installed, install it using the Get and Manage Add-Ons.
checkIfScenarioBuilderIsInstalled
Download a ZIP file containing a subset of sensor data from the PandaSet data set, and then unzip the file. This data set contains camera images and camera sensor parameters collected using a forward-facing camera mounted on an ego vehicle. The data also contains timestamp information for each frame.
dataFolder = tempdir;
dataFilename = "PandasetCut_in_FrontCamera.zip";
url = "https://ssd.mathworks.com/supportfiles/driving/data/" + dataFilename;
filePath = fullfile(dataFolder,dataFilename);
if ~isfile(filePath)
    websave(filePath,url)
end
unzip(filePath,dataFolder)
dataset = fullfile(dataFolder,"PandasetCut_in_FrontCamera");
load(fullfile(dataset,"sequenceData.mat"),"imagesArr","intrinsics","timestamps");
The workspace loads this information from the MAT file.
imagesArr— Cell array of images for each camera frameintrinsics— Camera intrinsic parameterstimestamps— Times of capture, in seconds, for the camera data.
Store the sequence data in a structure.
sequenceData = struct;
sequenceData.images = imagesArr; % Cell array of camera frames.
sequenceData.numFrames = numel(imagesArr);% Number of camera frames.
[mrows,ncols] = size(imagesArr{1},[1,2]);
sequenceData.imagesHeight = mrows;
sequenceData.imagesWidth = ncols;
Store intrinsic camera parameters in a cameraIntrinsics object. If you do not know the camera parameters, you can estimate them using a camera calibration process. For more information, see Calibrate a Monocular Camera. You can also use the estimateMonoCameraFromScene function to estimate approximate camera parameters directly from a camera image.
fx = intrinsics.fx;
fy = intrinsics.fy;
cx = intrinsics.cx;
cy = intrinsics.cy;
intrinsics = cameraIntrinsics([fx fy],[cx cy],[mrows ncols]);
To use the 3D object detector, you must get the camera projection matrix using the cameraProjection function. The function requires camera intrinsics and transformation from world coordinates to camera coordinates as inputs. Because detections are in the camera-coordinate system, specify an identity transformation.
tform = rigidtform3d;
sequenceData.camProjection = cameraProjection(intrinsics,tform);

% Store the timestamps
sequenceData.timeStamps = timestamps;
Visualize the camera data using vision.DeployableVideoPlayer object.
videoPlayer = vision.DeployableVideoPlayer;
for i=1:sequenceData.numFrames
   frame = sequenceData.images{i};
   videoPlayer(frame);
   pause(0.2)
end
release(videoPlayer)
Detect Vehicles
To accurately extract position, orientation, and dimension information of vehicles from the recorded data, this example uses a pretrained 3D object detector [1], helperCameraVehicleDetector. This object detector is attached to the example as a supporting file.
Download the ZIP file containing the pretrained model, and then unzip it. The size of the downloaded model is 176 MB.
modelFilename = "MonoCamera3DObjectDetector.zip";
modelUrl = "https://ssd.mathworks.com/supportfiles/driving/data/" + modelFilename;
filePath = fullfile(dataFolder,modelFilename);
if ~isfile(filePath)
    websave(filePath,modelUrl)
end
modelFolder = fullfile(dataFolder,"MonoCamera3DObjectDetector");
unzip(filePath,dataFolder)
Create a 3D object detector using the HelperCameraVehicleDetector object.
detector = HelperCameraVehicleDetector(modelFolder);
Use the detect function of HelperCameraVehicleDetector to get the detections. The function takes the image and camera projection matrix as input.
camProjMat = sequenceData.camProjection;
I = sequenceData.images{1};

[boxes3D,boxes2D,score,labels] = detect(detector,I,camProjMat);
The function returns this information:
3D Boxes — 3D bounding boxes of vehicles in the Coordinate Systems in Automated Driving Toolbox
2D Boxes — 2D bounding boxes of vehicles in the pixel coordinate system
Score — Likelihood that an object is a vehicle, returned in the range
[0,1]Labels — Detected class of object
Visualize the detections using the HelperDraw3DBoxOnImage function.
img = helperDraw3DBoxOnImage(I,camProjMat,boxes3D,"yellow",[]);
imshow(img)
Get detections for all camera frames and store detections in a cell array.
detectionsArr = cell(sequenceData.numFrames,1);
hw = waitbar(0,"Running 3D Object Detector on frames");
N = sequenceData.numFrames;
for frameIdx = 1:N
    I = sequenceData.images{frameIdx};
    [boxes3D,boxes2D,score,labels] = detect(detector,I,camProjMat);
    if mod(frameIdx,5) == 0
        boxes3D = boxes3D(1,:);
        boxes2D = boxes2D(2,:);
        score = score(1);
        labels = labels(1);
    end
    detectionsArr{frameIdx,1} = {boxes3D,boxes2D,score,labels};
    waitbar(frameIdx/N,hw); % Update the waitbar.
end
close(hw)
Visualize the detections using the helperPlotDetections function.
helperPlotDetections(sequenceData,detectionsArr);
In this sequence you can observe the following:
The lead vehicle cuts-in from the right of the ego vehicle.
The lead vehicle occludes several other vehicles across multiple frames of the sequence.
Some parked vehicles are not completely visible.
Some vehicles are very far from the ego vehicle.

If a vehicle is partially visible or occluded by other vehicles in a camera frame, the 3D object detector can return incorrect values for the dimension and orientation of 3D bounding box of that vehicle. This image shows examples of incorrect bounding boxes for partially visible vehicles. Notice that the detected bounding boxes do not show accurate orientation or dimension.
Here are example of erronous bounding boxes for partially visible vehicles. The images clearly show that the calculated bounding boxes are incorrect.
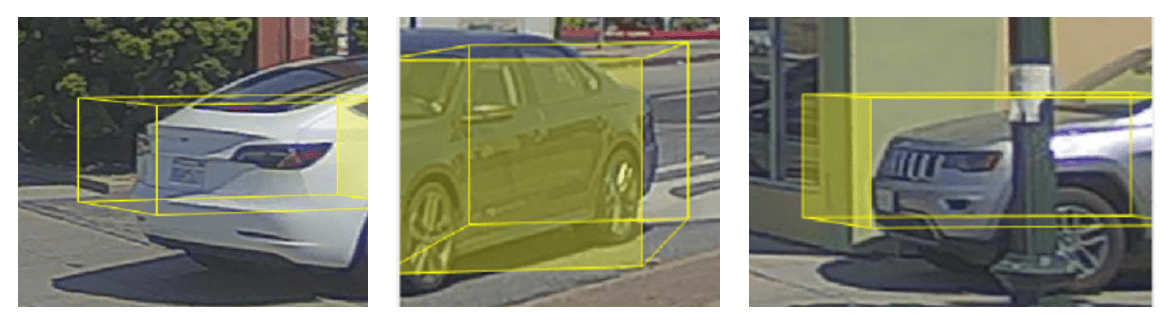
This image shows incorrectly detected bounding boxes for occluded vehicles.

Filter Detections Using Custom App
You must remove the inaccurate object detections before you create the track list for non-ego actors. This example provides a custom app to remove inaccurate object detections. The app enables you to:
Visualize the object detections as 2D and 3D bounding boxes overlaid on the image frames.
Read extracted object information, such as detection ID, class label, detection score, visibility score, and 2D and 3D bounding box information.
Specify different parameters to remove inaccurate detections. The app provides 2D bounding box parameters, 3D bounding box parameters, and semantic parameters.
For more information on app parameters, see Explore App Parameters.
To launch the app, use the helperFilteringApp function. Specify the sequence of camera images, sequenceData, and the vehicle detections, detectionsArr, as inputs to the function.
app = helperFilteringApp(sequenceData,detectionsArr);

To use the app, follow these steps:
Select the desired camera frame. Click Previous or Next to move to the desired camera frame.
Click Enable Selection.
Click an object overlaid with a bounding box. For example, a parked vehicle.
Read object parameters in the Object Information panel.
Apply desired values for parameters of 2D Bounding Box Filters, Semantic Filters, and 3D Bounding Box Filters.
Click Apply Filters. Visualize that the app removes some of the detections depending on specified values of the filter parameters. If required, update the values of these parameters and click Apply Filters again. When you are satisfied with the results, go to the next step.
Click Save Detections. The app saves the updated detections to a MAT file,
filteredBoxes3D.mat, in the current working directory.
The app enables you to perform these actions:
Remove vehicles with occlusion — In the Semantic Filters panel, set the visibility threshold value to
0.85. Doing so removes the occluded vehicles with less than 85% of visible area.Remove parked vehicles — Click a parked vehicle. In the Object Information panel, inspect the y-axis position parameter of the object to estimate the lateral limits of the road boundary because vehicles are parked outside the road boundaries. In the 3D Bounding Box Filters panel, specify appropriate lower and upper limits for the y-limit (meters) parameter. For this example, set y-limit (meters) to
[-4 6].Remove incoming vehicles — A vehicle moving along the ego direction must have a yaw angle close to 0 degrees. In the 3D Bounding Box Filters panel, set the yaw limits (deg) parameter to
[-15 15]. The app removes incoming vehicles moving in the opposite travel direction.Remove far vehicles — In general, detections of objects at far distances are inaccurate. To remove these far-distance objects from detections, in the 3D Bounding Box Filters panel, specify the values for x-limit (meters) parameter. For this example, set the x-limit (meters) parameter to
[0 60]. Doing so removes vehicles that are more than 60 meters away along the longitudinal direction from the ego vehicle.
waitfor(app);
Close the app before moving forward.
Generate Tracks from Filtered Detections
Load the filtered 3D detections.
load filteredBoxes3D.mat;
N = numel(filteredBoxes3D);
You must assign detections to distinct tracks to determine the entry and exit times of vehicles.
For this example, to track vehicle detections, use the trackerJPDA function and set the filter initialization function to helperInitFilter, which is attached to this example as a supporting file. This function returns an extended Kalman filter with constant velocity and constant turn motion models to track 3D bounding box detections.
Define a JPDA tracker using a trackerJPDA (Sensor Fusion and Tracking Toolbox) System object™.
tracker = trackerJPDA(TrackLogic="Integrated", ...
        FilterInitializationFcn=@helperInitFilter, ...
        AssignmentThreshold=[100 1000], ...
        MaxNumTracks=100, ...
        DetectionProbability=0.5, ...
        MaxNumEvents=50, ...
        ClutterDensity=1e-5, ...
        NewTargetDensity=1e-5, ...
        ConfirmationThreshold=0.8, ...
        DeletionThreshold=0.01);
Specify the measurement noise. The measurement noise describes the uncertainty in the measurements. Each diagonal element of the noise matrix corresponds to noise in the x-axis, y-axis, z-axis, yaw, length, width, and height values.
measurementNoise = blkdiag(0.25,0.25,0.25,5,0.25,0.25,0.25);
Get vehicle tracks using the helperCreateTracks function, which processes vehicle detections for each frame and assigns tracks if a detection meets the assignment criteria. The function returns vehicle tracks as an actorTracklist object.
tracklist = helperCreateTracks(tracker,filteredBoxes3D,sequenceData,measurementNoise,"visualization",true);You can use the actorprops function to extract actor properties from the vehicle track lists for generating a driving scenario. For more information on how to generate scenarios for RoadRunner Scenario from vehicle track lists, see the Generate RoadRunner Scenario from Recorded Sensor Data example.
Explore App Parameters
This section describes the app parameters.
Object Information
The Object Information panel lists these information for an object that is obtained from object detection results:
Id — Unique identifier for each bounding box in a frame.
Class — Classification labels for object detection.
2D Width — Width of 2D bounding box. Units are in pixels.
2D Height — Height of 2D bounding box. Units are in pixels.
Score — Confidence score of object detection. Values are in the range [0, 1].
Visibility — Object visibility fraction of 3D bounding box. Values are in the range [0, 1].
x — x-coordinate of 3D bounding box centroid. Units are in meters.
y — y-coordinate of 3D bounding box centroid. Units are in meters.
z — z-coordinate of 3D bounding box centroid. Units are in meters.
Length — Length of 3D bounding box. Units are in meters.
Width — Width of 3D bounding box. Units are in meters.
Height — Height of 3D bounding box. Units are in meters.
Yaw — Orientation of 3D bounding box along the z-axis. Units are in degrees.
Note:
The
x,y,z,Length,Width,Height, andYawrepresent their values in the Coordinate Systems in Automated Driving ToolboxThe visibility value for a car is calculated from its detected 3D bounding box and it is independent of how the car appears in the image. For example, if a car is partially visible in an image, its visibility value can still be 1 if its detected 3D bounding box is fully visible.
2D Bounding Box Filters
Specify these parameters in the 2D Bounding Box Filters panel to remove desired object detections:
Height limits (pixels) — Minimum and maximum height limits in pixels specified in the range
[min_height, max_height]. Set this range to remove bounding boxes that have heights outside the range.Width limits (pixels) — Minimum and maximum width limits in pixels specified in the range
[min_width, max_width]. Set this range to remove bounding boxes that have widths outside the range.
Semantic Filters
Score Threshold — Detection score threshold, specified as a scalar in the range [0, 1]. Use this parameter to remove detections with scores less than the specified threshold.
Visibility Threshold — Detection visibility threshold, specified as a scalar in the range [0, 1]. Use this parameter to remove detections with visibility values less than the specified threshold.
3D Bounding Box Filters
x-limits (meters) — Minimum and maximum x-axis limits specified in the range
[x_min, x_max]. Use this value to remove far-distance vehicles by specifying a maximum value for x. Units are in meters.y-limits (meters) — Minimum and maximum y-axis limits specified in the range
[y_min, y_max]. Use this value to remove vehicles at a certain lateral distance from the ego vehicle, for example, parked vehicles. Units are in meters.z-limits (meters) — Minimum and maximum z-axis limits specified in the range
[z_min, z_max]. Use this value to remove inaccurate bounding boxes detected above the ground plane. Units are in meters.length limits (dx, m) — Minimum and maximum length limits specified in the range
[length_min, length_max]. Use this value to remove inaccurate bounding boxes with smaller or larger lengths as compared to the length of an object in the image. Units are in meters.height limits (dy, m) — Minimum and maximum height limits specified in the range
[height_min, height_max]. Use this value to remove inaccurate bounding boxes that are outside the specified range. Units are in meters.width limits (dz, m) — Minimum and maximum width limits specified in the range
[width_min, width_max]. Use this value to remove inaccurate bounding boxes that are outside the specified range. Units are in meters.yaw limits (deg) — Minimum and maximum yaw limits specified in the range
[yaw_min, yaw_max]. Use this value to remove inaccurate bounding boxes that are outside the specified range. Units are in degrees.
Helper Functions
The helperPlotDetections function plots the detected 3D bounding boxes on the sequence and displays them in a video player.
function helperPlotDetections(sequenceData, detectionsArr)

    videoPlayer = vision.DeployableVideoPlayer;

    N = sequenceData.numFrames;
    camProjMat = sequenceData.camProjection;

    for frameIdx=1:N

        img = sequenceData.images{frameIdx};
        detections = detectionsArr{frameIdx};
        if ~isempty(detections)
            boxes3D = detections{1};
            img = helperDraw3DBoxOnImage(img,camProjMat,boxes3D,"yellow",[]);
        end
        videoPlayer(img)
        pause(0.05)
    end

    release(videoPlayer)
end
References
[1] Mousavian, Arsalan, Dragomir Anguelov, John Flynn, and Jana Kosecka. “3D Bounding Box Estimation Using Deep Learning and Geometry.” In 2017 IEEE Conference on Computer Vision and Pattern Recognition (CVPR), 5632–40. Honolulu, HI: IEEE, 2017. https://doi.org/10.1109/CVPR.2017.597.
[2] Hesai and Scale. PandaSet. Accessed September 18, 2025. https://pandaset.org/. The PandaSet data set is provided under the CC-BY-4.0 license.