使用深度学习进行图像处理算子逼近
此示例说明如何使用多尺度上下文聚合网络 (CAN) 逼近图像滤波运算。
算子逼近寻找处理图像的替代方法,使得结果类似于常规图像处理运算或流程的输出。算子逼近的目标通常是减少处理图像所需的时间。
目前已提出若干经典方法和深度学习方法来执行算子逼近。有些经典方法可提升单个算法的效率,但不能推广到其他运算。另一种常用方法是通过对图像的低分辨率副本应用算子来逼近大范围的运算,但高频成分的损失会限制逼近的准确度。
深度学习解决方案能够逼近更广泛、更复杂的运算。例如,Q. Chen [1] 提出的多尺度上下文聚合网络 (CAN) 可以逼近多尺度色调映射、照片样式转换、非局部去雾和铅笔绘图。多尺度 CAN 基于全分辨率图像进行训练,以提高处理高频细节的准确度。网络经过训练后,可以绕过常规处理运算,直接对图像进行处理。
此示例探讨如何训练多尺度 CAN 以逼近双边图像滤波运算,从而在保持边缘锐度的同时降低图像噪声。该示例展示了完整的训练和推断工作流,其中包括创建训练数据存储、选择训练选项、训练网络以及使用网络处理测试图像的过程。

算子逼近网络
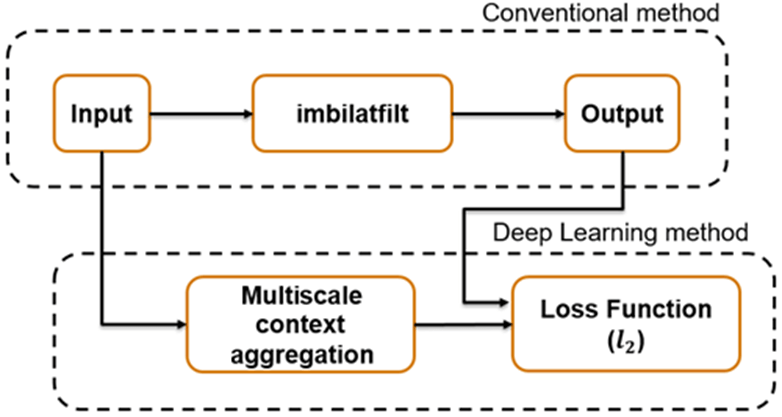
多尺度 CAN 经过训练,可最小化图像处理运算的常规输出与使用多尺度上下文聚合处理输入图像后的网络响应之间的 损失。多尺度上下文聚合从整个图像中寻找关于每个像素的信息,而不是将搜索范围限制在像素周围的小邻域。

为了帮助网络学习全局图像属性,多尺度 CAN 架构有很大的感受野。第一层和最后一层具有相同的大小,因为算子不应该改变图像的大小。连续的中间层通过呈指数增加的缩放因子实现扩张(因此 CAN 具有“多尺度”性质)。扩张使网络能够在不同空间频率下寻找空间分离的特征,而不会降低图像的分辨率。在每个卷积层后,网络使用自适应归一化来平衡批量归一化和恒等映射对逼近算子的影响。
下载训练数据
下载包含 20,000 个静态自然图像的 IAPR TC-12 Benchmark [2]。该数据集包括人、动物、城市等的照片。数据文件的大小约为 1.8 GB。如果您不想下载训练网络所需的训练数据集,可以通过在命令行中键入 load("trainedBilateralFilterNet_v2.mat"); 来加载预训练的 CAN。然后,直接转至本示例中的使用多尺度 CAN 执行双边滤波逼近部分。
使用辅助函数 downloadIAPRTC12Data 下载数据。此函数作为支持文件包含在本示例中。指定 dataDir 作为数据的存放位置。
dataDir = tempdir;
downloadIAPRTC12Data(dataDir);
tempdir;
downloadIAPRTC12Data(dataDir);Downloading IAPR TC-12 dataset... This will take several minutes to download and unzip... Done.
此示例使用 IAPRTC-12 Benchmark 数据的小型子集来训练网络。
trainImagesDir = fullfile(dataDir,"iaprtc12","images","39");
exts = [".jpg",".bmp",".png"];
pristineImages = imageDatastore(trainImagesDir,FileExtensions=exts);
列出训练图像数。
numel(pristineImages.Files)
ans = 916
准备训练数据
要创建训练数据集,请读入原始图像并输出已经过双边滤波的图像。滤波后的图像存储在磁盘上由 preprocessDataDir 指定的目录中。
preprocessDataDir = fullfile(trainImagesDir,"preprocessedDataset");使用辅助函数 bilateralFilterDataset 对训练数据进行预处理。此函数作为支持文件包含在本示例中。该辅助函数对 inputImages 中的每个原始图像执行以下操作:
计算双边滤波的平滑度。对滤波后的图像进行平滑处理可降低图像噪声。
使用
imbilatfilt执行双边滤波。使用
imwrite将滤波后的图像保存到磁盘。
bilateralFilterDataset(pristineImages,preprocessDataDir);
为训练定义随机补片提取数据存储
使用随机补片提取数据存储将训练数据馈送到网络。该数据存储从包含网络输入和预期网络响应的两个图像数据存储中提取随机的对应补片。
在此示例中,网络输入是 pristineImages 中的原始图像。预期网络响应是经过双边滤波处理后的图像。基于双边滤波图像文件集合创建一个名为 bilatFilteredImages 的图像数据存储。
bilatFilteredImages = imageDatastore(preprocessDataDir,FileExtensions=exts);
基于这两个图像数据存储创建一个 randomPatchExtractionDatastore。指定 256×256 像素的补片大小。指定 PatchesPerImage 名称-值参量以在训练期间从每对图像中提取一个随机定位的补片。指定小批量大小为一。
miniBatchSize = 1;
patchSize = [256 256];
dsTrain = randomPatchExtractionDatastore(pristineImages,bilatFilteredImages, ...
    patchSize,PatchesPerImage=1);
dsTrain.MiniBatchSize = miniBatchSize;
randomPatchExtractionDatastore 在一轮训练的每次迭代中向网络提供小批量数据。对数据存储执行读取操作以探查数据。
inputBatch = read(dsTrain);
disp(inputBatch)
       InputImage          ResponseImage
    _________________    _________________

    {256×256×3 uint8}    {256×256×3 uint8}
设置多尺度 CAN 层
此示例使用 Deep Learning Toolbox™ 中的层定义多尺度 CAN,这些层包括:
imageInputLayer(Deep Learning Toolbox) - 图像输入层convolution2dLayer(Deep Learning Toolbox) - 卷积神经网络的二维卷积层batchNormalizationLayer(Deep Learning Toolbox) - 批量归一化层leakyReluLayer(Deep Learning Toolbox) - 泄漏修正线性单元层
添加两个自定义尺度层来实现一个自适应批量归一化层。这些层作为支持文件包含在本示例中。
adaptiveNormalizationMu- 调整批量归一化分支强度的尺度层adaptiveNormalizationLambda- 调整恒等分支强度的尺度层
第一个层,即 imageInputLayer,对图像补片进行操作。补片大小基于网络感受野,它是一个空间图像区域,影响网络中最顶层的响应。理想情况下,网络感受野与图像大小相同,这样它就可以看到图像中的所有高级特征。对于双边滤波器,逼近图像补片大小固定为 256×256。
networkDepth = 10;
numberOfFilters = 32;
firstLayer = imageInputLayer([256 256 3],Name="InputLayer",Normalization="none");
图像输入层后跟一个二维卷积层,其中包含 32 个大小为 3×3 的滤波器。对每个卷积层的输入填零,使特征图与每次卷积后的输入大小保持相同。将权重初始化为单位矩阵。
Wgts = zeros(3,3,3,numberOfFilters);
for ii = 1:3
    Wgts(2,2,ii,ii) = 1;
end
convolutionLayer = convolution2dLayer(3,numberOfFilters,Padding=1, ...
    Weights=Wgts,Name="Conv1");
每个卷积层后跟一个批量归一化层,以及一个用于调整批量归一化分支强度的自适应归一化尺度层。稍后,此示例还将相应创建用于调整恒等分支强度的自适应归一化尺度层。现在,在 adaptiveNormalizationMu 层之后指定一个加法层。最后,为负输入指定标量乘数为 0.2 的泄漏 ReLU 层。
batchNorm = batchNormalizationLayer(Name="BN1");
adaptiveMu = adaptiveNormalizationMu(numberOfFilters,"Mu1");
addLayer = additionLayer(2,Name="add1");
leakyrelLayer = leakyReluLayer(0.2,Name="Leaky1");
按照相同的模式指定网络的中间层。连续卷积层具有一个随网络深度呈指数级缩放的扩张因子。
midLayers = [convolutionLayer batchNorm adaptiveMu addLayer leakyrelLayer];

Wgts = zeros(3,3,numberOfFilters,numberOfFilters);
for ii = 1:numberOfFilters
    Wgts(2,2,ii,ii) = 1;
end

for layerNumber = 2:networkDepth-2
    dilationFactor = 2^(layerNumber-1);
    padding = dilationFactor;
    conv2dLayer = convolution2dLayer(3,numberOfFilters, ...
        Padding=padding,DilationFactor=dilationFactor, ...
        Weights=Wgts,Name="Conv"+num2str(layerNumber));
    batchNorm = batchNormalizationLayer(Name="BN"+num2str(layerNumber));
    adaptiveMu = adaptiveNormalizationMu(numberOfFilters,"Mu"+num2str(layerNumber));
    addLayer = additionLayer(2,Name="add"+num2str(layerNumber));
    leakyrelLayer = leakyReluLayer(0.2,Name="Leaky"+num2str(layerNumber));
    midLayers = [midLayers conv2dLayer batchNorm adaptiveMu addLayer leakyrelLayer];
end
不要对倒数第二个卷积层应用扩张因子。
conv2dLayer = convolution2dLayer(3,numberOfFilters, ...
    Padding=1,Weights=Wgts,Name="Conv9");

batchNorm = batchNormalizationLayer(Name="AN9");
adaptiveMu = adaptiveNormalizationMu(numberOfFilters,"Mu9");
addLayer = additionLayer(2,Name="add9");
leakyrelLayer = leakyReluLayer(0.2,Name="Leaky9");
midLayers = [midLayers conv2dLayer batchNorm adaptiveMu addLayer leakyrelLayer];
最后一个卷积层有一个大小为 1×1×32×3 的滤波器,用于重新构造图像。
Wgts = sqrt(2/(9*numberOfFilters))*randn(1,1,numberOfFilters,3);
finalLayer = convolution2dLayer(1,3,NumChannels=numberOfFilters, ...
    Weights=Wgts,Name="Conv10");
串联所有层。
layers = [firstLayer midLayers finalLayer];
创建一个空的 dlnetwork 对象并将各层添加到该对象中。
opNet = dlnetwork;
opNet = addLayers(opNet,layers);
创建跳跃连接,用作自适应归一化方程恒等分支。将跳跃连接与加法层相连。
skipConv1 = adaptiveNormalizationLambda(numberOfFilters,"Lambda1");
skipConv2 = adaptiveNormalizationLambda(numberOfFilters,"Lambda2");
skipConv3 = adaptiveNormalizationLambda(numberOfFilters,"Lambda3");
skipConv4 = adaptiveNormalizationLambda(numberOfFilters,"Lambda4");
skipConv5 = adaptiveNormalizationLambda(numberOfFilters,"Lambda5");
skipConv6 = adaptiveNormalizationLambda(numberOfFilters,"Lambda6");
skipConv7 = adaptiveNormalizationLambda(numberOfFilters,"Lambda7");
skipConv8 = adaptiveNormalizationLambda(numberOfFilters,"Lambda8");
skipConv9 = adaptiveNormalizationLambda(numberOfFilters,"Lambda9");

opNet = addLayers(opNet,skipConv1);
opNet = connectLayers(opNet,"Conv1","Lambda1");
opNet = connectLayers(opNet,"Lambda1","add1/in2");

opNet = addLayers(opNet,skipConv2);
opNet = connectLayers(opNet,"Conv2","Lambda2");
opNet = connectLayers(opNet,"Lambda2","add2/in2");

opNet = addLayers(opNet,skipConv3);
opNet = connectLayers(opNet,"Conv3","Lambda3");
opNet = connectLayers(opNet,"Lambda3","add3/in2");

opNet = addLayers(opNet,skipConv4);
opNet = connectLayers(opNet,"Conv4","Lambda4");
opNet = connectLayers(opNet,"Lambda4","add4/in2");

opNet = addLayers(opNet,skipConv5);
opNet = connectLayers(opNet,"Conv5","Lambda5");
opNet = connectLayers(opNet,"Lambda5","add5/in2");

opNet = addLayers(opNet,skipConv6);
opNet = connectLayers(opNet,"Conv6","Lambda6");
opNet = connectLayers(opNet,"Lambda6","add6/in2");

opNet = addLayers(opNet,skipConv7);
opNet = connectLayers(opNet,"Conv7","Lambda7");
opNet = connectLayers(opNet,"Lambda7","add7/in2");

opNet = addLayers(opNet,skipConv8);
opNet = connectLayers(opNet,"Conv8","Lambda8");
opNet = connectLayers(opNet,"Lambda8","add8/in2");

opNet = addLayers(opNet,skipConv9);
opNet = connectLayers(opNet,"Conv9","Lambda9");
opNet = connectLayers(opNet,"Lambda9","add9/in2");
使用样本输入图像初始化 dlnetwork 目标。
opNet = initialize(opNet,dlarray(single(inputBatch.InputImage{1}),"SSCB"));使用 深度网络设计器 (Deep Learning Toolbox) 可视化网络。
deepNetworkDesigner(opNet)
指定训练选项
使用 Adam 优化器训练网络。使用 trainingOptions (Deep Learning Toolbox) 函数指定超参数设置。对 "Momentum" 使用默认值 0.9,对 "L2Regularization" 使用 0.0001(权重衰减)。指定 0.0001 的恒定学习率。进行 181 轮训练。
maxEpochs = 181;
initLearningRate = 0.0001;
miniBatchSize = 1;

options = trainingOptions("adam", ...
    InitialLearnRate=initLearningRate, ...
    MaxEpochs=maxEpochs, ...
    MiniBatchSize=miniBatchSize, ...
    Plots="training-progress", ...
    Verbose=false);
训练网络
默认情况下,该示例加载一个逼近双边滤波器的预训练多尺度 CAN。该预训练网络可让您无需等待训练完成即可执行双边滤波逼近。
要训练网络,请将以下代码中的 doTraining 变量设置为 true。使用 trainnet (Deep Learning Toolbox) 函数训练神经网络。对于回归,请使用均方误差损失。默认情况下,trainnet 函数使用 GPU(如果有)。在 GPU 上进行训练需要 Parallel Computing Toolbox™ 许可证和受支持的 GPU 设备。有关受支持设备的信息,请参阅GPU 计算要求 (Parallel Computing Toolbox)。否则,trainnet 函数使用 CPU。要指定执行环境,请使用 ExecutionEnvironment 训练选项。在 NVIDIA® Titan X GPU 上训练大约需要 15 个小时。
doTraining =false; if doTraining net = trainnet(dsTrain,opNet,"mean-squared-error",options); modelDateTime = string(datetime("now",Format="yyyy-MM-dd-HH-mm-ss")); save("trainedBilateralFilterNet_v2-"+modelDateTime+".mat","net"); else load("trainedBilateralFilterNet_v2.mat"); end
使用多尺度 CAN 执行双边滤波逼近
要使用逼近双边滤波器的经过训练的多尺度 CAN 网络处理图像,请按照此示例的后续步骤进行操作。该示例的后续部分显示如何:
基于参考图像创建一个示例含噪输入图像。
使用
imbilatfilt函数对该含噪图像执行常规双边滤波。使用 CAN 对该含噪图像执行双边滤波逼近。
以可视化方式比较算子逼近和常规双边滤波的去噪图像。
量化这些图像与原始参考图像的相似性,以此评估去噪图像的质量。
创建示例含噪图像
创建一个示例含噪图像,它将用于比较算子逼近和常规双边滤波的结果。
测试数据集 testImages 包含 Image Processing Toolbox™ 中提供的 20 个未畸变图像。将图像加载到 imageDatastore 中,并以蒙太奇方式显示图像。
fileNames = ["sherlock.jpg","peacock.jpg","fabric.png","greens.jpg", ...
    "hands1.jpg","kobi.png","lighthouse.png","office_4.jpg", ...
    "onion.png","pears.png","yellowlily.jpg","indiancorn.jpg", ...
    "flamingos.jpg","sevilla.jpg","llama.jpg","parkavenue.jpg", ...
    "strawberries.jpg","trailer.jpg","wagon.jpg","football.jpg"];
filePath = fullfile(matlabroot,"toolbox","images","imdata")+filesep;
filePathNames = strcat(filePath,fileNames);
testImages = imageDatastore(filePathNames);
以蒙太奇方式显示测试图像。
montage(testImages)

选择其中一个图像作为双边滤波的参考图像。将图像的数据类型转换为 uint8。
testImage = "fabric.png";
Ireference = imread(testImage);
Ireference = im2uint8(Ireference);
"fabric.png";
Ireference = imread(testImage);
Ireference = im2uint8(Ireference);您也可以自选其他图像作为参考图像。请注意,测试图像的大小必须至少为 256×256。如果测试图像小于 256×256,则使用 imresize 函数增加图像大小。网络还要求测试图像为 RGB 形式。如果测试图像为灰度图,则使用 cat 函数沿第三个维度串联原始图像的三个副本,以将图像转换为 RGB 图像。
显示参考图像。
imshow(Ireference)
title("Pristine Reference Image")
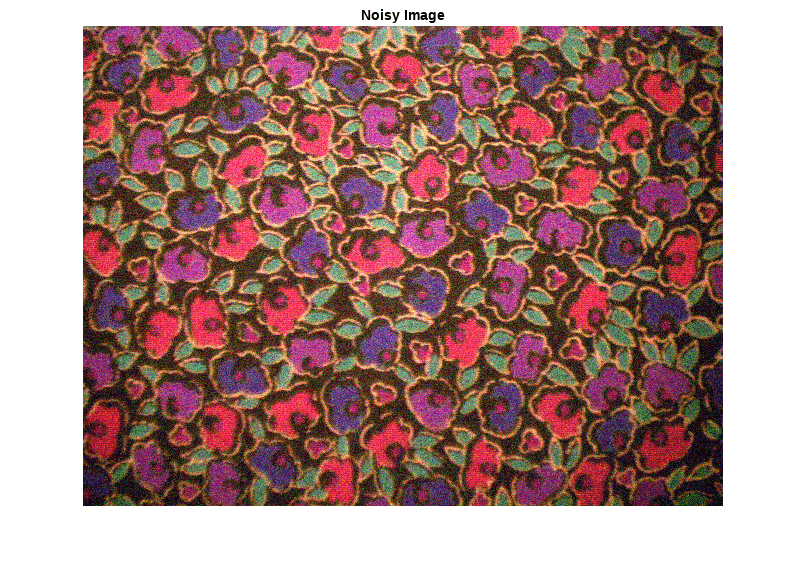
使用 imnoise 函数将方差为 0.00001 的零均值高斯白噪声添加到参考图像中。
Inoisy = imnoise(Ireference,"gaussian",0.00001);
imshow(Inoisy)
title("Noisy Image")

使用双边滤波对图像进行滤波
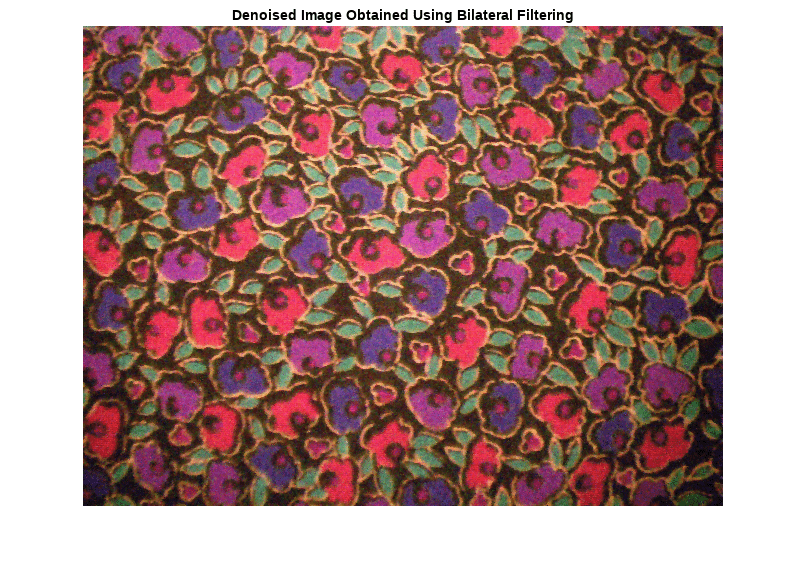
常规双边滤波是在保持边缘锐度的同时降低图像噪声的标准方法。使用 imbilatfilt 函数对含噪图像应用双边滤波器。指定与像素值方差相等的平滑度。
degreeOfSmoothing = var(double(Inoisy(:)));
Ibilat = imbilatfilt(Inoisy,degreeOfSmoothing);
imshow(Ibilat)
title("Denoised Image Obtained Using Bilateral Filtering")
使用经过训练的网络处理图像
通过经过训练的网络传递归一化的输入图像,并观察输出。网络的输出是所需的去噪图像,以 dlarray 目标形式返回。使用 extractdata 函数从 dlarray 目标中提取图像数据。
InoisyDL = dlarray(single(Inoisy),"SSCB");
IapproxDL = predict(net,InoisyDL);
Iapprox = extractdata(IapproxDL);
Image Processing Toolbox 要求浮点图像的像素值在 [0, 1] 范围内。使用 rescale 函数将像素值缩放到此范围,然后将图像转换为 uint8。
Iapprox = rescale(Iapprox);
Iapprox = im2uint8(Iapprox);
imshow(Iapprox)
title("Denoised Image Obtained Using Multiscale CAN")
可视化比较
为了在视觉上更好地理解去噪后的图像,请检查每个图像中的一个小区域。使用向量 roi 指定感兴趣的区域 (ROI),格式为 [x y 宽度 高度]。其中的元素定义了 ROI 左上角的 x 和 y 坐标,以及它的宽度和高度。
roi = [300 30 50 50];
将图像裁剪到该 ROI,并以蒙太奇形式显示结果。与常规双边滤波相比,CAN 去除了更多噪声。这两种方法都保留了边缘锐度。
montage({imcrop(Ireference,roi),imcrop(Inoisy,roi), ...
    imcrop(Ibilat,roi),imcrop(Iapprox,roi)}, ...
    Size=[1 4]);
title("Reference Image | Noisy Image | Bilateral-Filtered Image | CAN Prediction");
定量比较
使用图像质量度量来定量比较含噪输入图像、双边滤波图像和算子逼近图像。参考图像是在添加噪声之前的原始参考图像 Ireference。
对照参考图像测量每个图像的峰值信噪比 (PSNR)。PSNR 值越大,通常表示图像质量越好。有关该度量的详细信息,请参阅 psnr。
noisyPSNR = psnr(Inoisy,Ireference);
bilatPSNR = psnr(Ibilat,Ireference);
approxPSNR = psnr(Iapprox,Ireference);
PSNR_Score = [noisyPSNR bilatPSNR approxPSNR]';
测量每个图像的结构相似性指数 (SSIM)。SSIM 对照参考图像评估图像的以下三个特征的视觉效果:亮度、对比度和结构。SSIM 值越接近 1,测试图像与参考图像越一致。有关该度量的详细信息,请参阅 ssim。
noisySSIM = ssim(Inoisy,Ireference);
bilatSSIM = ssim(Ibilat,Ireference);
approxSSIM = ssim(Iapprox,Ireference);
SSIM_Score = [noisySSIM bilatSSIM approxSSIM]';
使用自然图像质量评估方法 (NIQE) 测量图像感知质量。NIQE 分数越小,表示感知质量越好。有关该度量的详细信息,请参阅 niqe。
noisyNIQE = niqe(Inoisy);
bilatNIQE = niqe(Ibilat);
approxNIQE = niqe(Iapprox);
NIQE_Score = [noisyNIQE bilatNIQE approxNIQE]';
在表中显示度量。
table(PSNR_Score,SSIM_Score,NIQE_Score, ...
    RowNames=["Noisy Image","Bilateral Filtering","Operator Approximation"])
ans=3×3 table
                              PSNR_Score    SSIM_Score    NIQE_Score
                              __________    __________    __________

    Noisy Image                 20.276       0.76228        11.574
    Bilateral Filtering         25.753       0.91534         6.924
    Operator Approximation      26.173       0.92976        5.8165
参考资料
[1] Chen, Q. J. Xu, and V. Koltun."Fast Image Processing with Fully-Convolutional Networks."In Proceedings of the 2017 IEEE Conference on Computer Vision.Venice, Italy, Oct. 2017, pp. 2516-2525.
[2] Grubinger, M., P. Clough, H. Müller, and T. Deselaers."The IAPR TC-12 Benchmark:A New Evaluation Resource for Visual Information Systems."Proceedings of the OntoImage 2006 Language Resources For Content-Based Image Retrieval.Genoa, Italy.Vol. 5, May 2006, p. 10.
另请参阅
randomPatchExtractionDatastore | dlnetwork (Deep Learning Toolbox) | trainingOptions (Deep Learning Toolbox) | trainnet (Deep Learning Toolbox) | predict (Deep Learning Toolbox) | imbilatfilt
主题
- 预处理图像以进行深度学习 (Deep Learning Toolbox)
- Datastores for Deep Learning (Deep Learning Toolbox)
- 深度学习层列表 (Deep Learning Toolbox)