Generate Articulating 3D Assets from Camera Images for RoadRunner Scenario Simulation
R2026bThis example shows how to generate custom 3D assets representing vehicle and static objects from camera images and import them into RoadRunner for scenario simulation.
Virtual scenarios generated from recorded sensor data mimic real-world driving conditions and provide an advanced platform to verify and validate automated driving functionalities. The RoadRunner Asset Library contains a robust collection of assets for testing, planning, and controlling algorithms. However, assets created from real-world camera sensor data can be more realistic and helpful for verifying perception algorithms. You can use artificial intelligence (AI) models trained on such camera sensor data to recreate assets, mimicking the color, texture, and dimensions of real-world objects. Recent advances in generative AI technology make it possible to generate custom 3D assets from camera images or text descriptions of real-world objects. This example generates 3D assets from single-view camera images, multi-view camera images, and text inputs by using the trellis pretrained model.
In this example, you:
Generate a 3D asset of a vehicle from a camera image, segment its wheels, create RoadRunner-compliant joints, and import it into a RoadRunner Scenario by associating the generated asset with a trajectory.
Generate 3D assets of static objects such as traffic cones, post boxes, barriers, trees, and traffic lamps from single-view camera images and text descriptions.
Convert the generated static assets into RoadRunner assets.
Import the converted RoadRunner static assets into a generated RoadRunner scene that contains roads.
Simulate the scenario in RoadRunner.
Generate Static 3D Assets
This example uses a subset of single-view images of vehicle and static objects from the Objaverse data set, attached to the example as supporting files. Unzip the files into the current working directory.
imgFolder = "ObjaverseImages";
if ~exist(imgFolder,"dir")
    unzip("Objaverse-Buildings-SideWalkObjects-Images.zip",imgFolder)
    unzip("Objaverse-RoadObstacles-Vehicle-Images.zip",imgFolder)
end
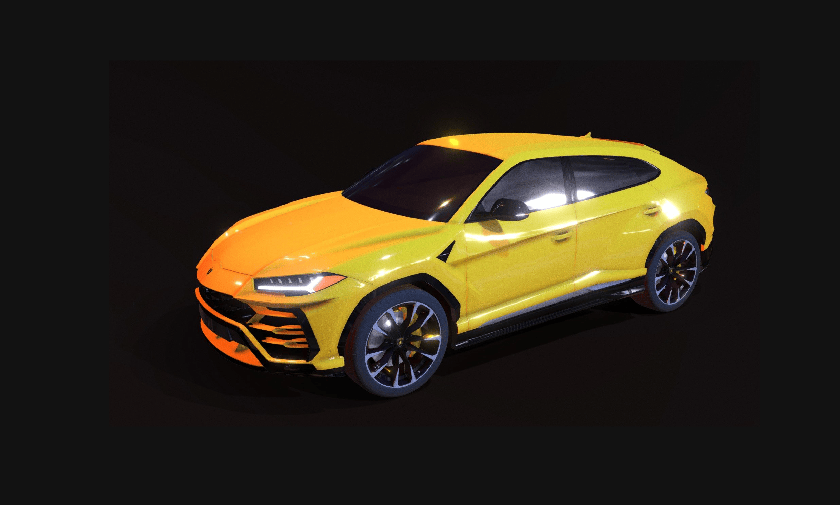
Read the vehicle image from the data set into the workspace and display the image.
Note: If you use a custom image for asset generation, the input image must be a high-resolution RGB image that contains a single object.
img = imread(fullfile(imgFolder,"vehicles","32964087f5d24c3e90482724ddfc2fef.jpeg"));
imshow(img)
Initialize the trellis model to generate 3D assets from single-view camera images.
Note: The trellis model requires a CUDA enabled GPU with at least 16 GB of memory.
trellisObj = trellis;
Generate a 3D asset from the single-view camera image by using the generateFromImage object function of the trellis object. The function returns a Mesh object vehicleMesh.
vehicleMesh = generateFromImage(trellisObj,img,Seed=42)
vehicleMesh =
  Mesh with properties:

         Vertices: [8937×3 double]
            Faces: [11684×3 double]
      FaceNormals: [11684×3 double]
    VertexNormals: [8937×3 double]
           UpAxis: "Z"

           Bounds: [2×3 double]
         Centroid: [5.2595e-04 0.0086 -0.0250]
          Extents: [0.4493 0.9985 0.3250]
             Area: 1.5290
           Volume: 0.0733
     IsWatertight: 0

       FaceColors: []
     VertexColors: []
               UV: [8937×2 double]
         Material: [1×1 asset3d.Material]
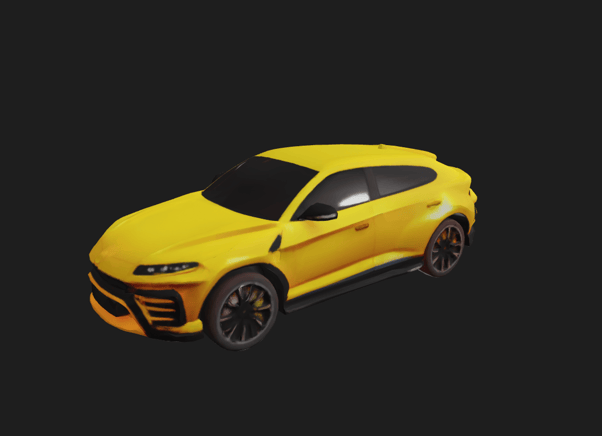
Display the vehicle mesh.
show(vehicleMesh)
Generate a traffic cone 3D asset from a text description by using the generateFromText object function.
trafficConeMesh = generateFromText(trellisObj,"A traffic cone",Seed=42)trafficConeMesh =
Mesh with properties:
Vertices: [24103×3 double]
Faces: [43996×3 double]
FaceNormals: [43996×3 double]
VertexNormals: [24103×3 double]
UpAxis: "Z"
Bounds: [2×3 double]
Centroid: [-1.8526e-04 2.7129e-04 -0.2691]
Extents: [0.9962 0.9966 1.0009]
Area: 5.3094
Volume: 0.0455
IsWatertight: 0
FaceColors: []
VertexColors: []
UV: [24103×2 double]
Material: [1×1 asset3d.Material]
Display the traffic cone mesh.
show(trafficConeMesh)

Prepare Assets for RoadRunner Scene
To open RoadRunner using MATLAB®, specify the path to your RoadRunner project. This code shows the path for a sample project folder location in Windows®.
rrProjectPath = "C:\RR\MyProject";Create a new directory, GenAIAssets, inside the Assets folder of the RoadRunner project.
genAssetFolderInRRProj = fullfile("Assets","GenAIAssets");
assetDir = fullfile(rrProjectPath,genAssetFolderInRRProj);
if ~exist(assetDir,"dir")
    mkdir(assetDir)
end
Scale and Save Asset
Scale and translate assets before saving them as GLB files.
To scale an asset, use the scale or resize object functions of the Mesh object. To translate position of the asset, use the translate object function.
resize(trafficConeMesh,[NaN NaN 0.6],Uniform=true)
translate(trafficConeMesh,[0 0 -trafficConeMesh.Bounds(1,3)])
Write the generated 3D asset to the TrafficCone.glb file in the GenAIAssets directory by using the asset3d.write function.
assetFileName = "TrafficCone.glb";
assetFileWPath = fullfile(assetDir,assetFileName);
asset3d.write(trafficConeMesh,assetFileWPath)
Generate All Static Scene Assets
This example uses 30 assets generated from images.
This section runs the trellis model on all 30 images, scales the assets according to their true metric dimensions, and saves them to the RoadRunner assets path.
imgFiles = [ ...
    dir(fullfile(imgFolder,"buildings","*.jpeg")); ...
    dir(fullfile(imgFolder,"road obstacles","*.jpeg")); ...
    dir(fullfile(imgFolder,"sidewalk objects","*.jpeg")) ...
    ];

mkdir(fullfile(assetDir,"buildings"))
mkdir(fullfile(assetDir,"road obstacles"))
mkdir(fullfile(assetDir,"sidewalk objects"))

h = waitbar(0,"Generating Assets...");
numImages = length(imgFiles);
for i = 1:numImages
    waitbar(i/numImages,h,sprintf("Generating Asset for Image %d of %d",i,numImages))
    img = imread(fullfile(imgFiles(i).folder,imgFiles(i).name));
    asset = generateFromImage(trellisObj,img,ShowProgressBar=false,Seed=42);
    helperProcessAndSaveAsset(asset,imgFiles(i).name,assetDir);
end
delete(h)
Import Static Assets into RoadRunner
Specify the path to your local RoadRunner installation folder. This code shows the path for the default installation location on Windows. For information about creating a project in RoadRunner, see RoadRunner Project and Scene System (RoadRunner).
Open RoadRunner by using the specified path to the project.
rrAppPath = "C:\Program Files\RoadRunner\" + matlabRelease.Release + "\roadrunner\bin\win64";
rrApp = roadrunner(rrProjectPath,InstallationFolder=rrAppPath);
Copy the SceneOnly.rrscene scene file into the Scenes folder of the RoadRunner project. This scene has been created from recorded camera and GPS data by using the process in the Generate RoadRunner Scene Using Processed Camera Data and GPS Data example. The scene contains roads with two-lanes on either side with sidewalk and buildings.
Open the RoadRunner scene from MATLAB by using the openScene function.
copyfile("SceneOnly.rrscene",fullfile(rrProjectPath,"Scenes"))
openScene(rrApp,"SceneOnly.rrscene")
Import Assets Programmatically
Import the traffic cone asset into RoadRunner programmatically.
To import static assets into RoadRunner, populate the staticObjectCuboids and params structures. The staticObjectCuboids structure stores the position, dimension, and orientation of the asset. The params structure stores the path to the asset. For more information, see roadrunnerStaticObjectInfo.
cuboidXYZ = [-2.269 -70 0.3]; % [x y z]
cuboidLWH = trafficConeMesh.Extents; % [length width height]
cuboidRPY = [0 0 0]; % [roll pitch yaw]
cuboidRoadBarrier = [cuboidXYZ cuboidLWH cuboidRPY];
staticObjectCuboids.cones = cuboidRoadBarrier;
params.cones.AssetPath = fullfile(genAssetFolderInRRProj,"TrafficCone.glb");
Generate a custom static object in the RoadRunner HD Map format for each cuboid and its associated generated asset by using the roadrunnerStaticObjectInfo function.
rrStatObjInfo = roadrunnerStaticObjectInfo(staticObjectCuboids,Params=params)
rrStatObjInfo = struct with fields:
    staticObjectTypes: [1×1 roadrunner.hdmap.StaticObjectType]
        staticObjects: [1×1 roadrunner.hdmap.StaticObject]
Create an empty RoadRunner HD Map.
rrMap = roadrunnerHDMap;
Add the generated static object information to the RoadRunner HD Map object.
rrMap.StaticObjectTypes = rrStatObjInfo.staticObjectTypes;
rrMap.StaticObjects = rrStatObjInfo.staticObjects;
Write the RoadRunner HD Map to a binary file in the Assets folder of the RoadRunner project.
rrMapFileName = "RoadRunnerAssetsScene.rrhd";
rrMapFile = fullfile(rrProjectPath,"Assets",rrMapFileName);
write(rrMap,rrMapFile)
To import multiple custom static assets into one scene, specify not to clear the existing scene data for each asset import.
Import the scene into RoadRunner by using the importScene function.
buildOpts = roadrunnerHDMapBuildOptions(ClearSceneOfExistingData=false);
importOpts = roadrunnerHDMapImportOptions(BuildOptions=buildOpts);
importScene(rrApp,rrMapFile,"RoadRunner HD Map",importOpts)
Import Assets Using RoadRunner
You can verify the previously generated 30 assets visible in the RoadRunner Library Browser under the GenAIAssets folder. Drag the assets from the Library Browser onto the RoadRunner scene canvas.
These assets have already been placed in the scene and saved as Scene-30-Assets.rrhd. Import the scene with assets into RoadRunner.
importScene(rrApp,fullfile(pwd,"Scene-30-Assets.rrhd"),"RoadRunner HD Map",importOpts)
Prepare Vehicle Asset for RoadRunner
The generated vehicle asset might not have the correct scale, orientation, or position for use in RoadRunner. To ensure proper asset representation in RoadRunner, perform these steps:
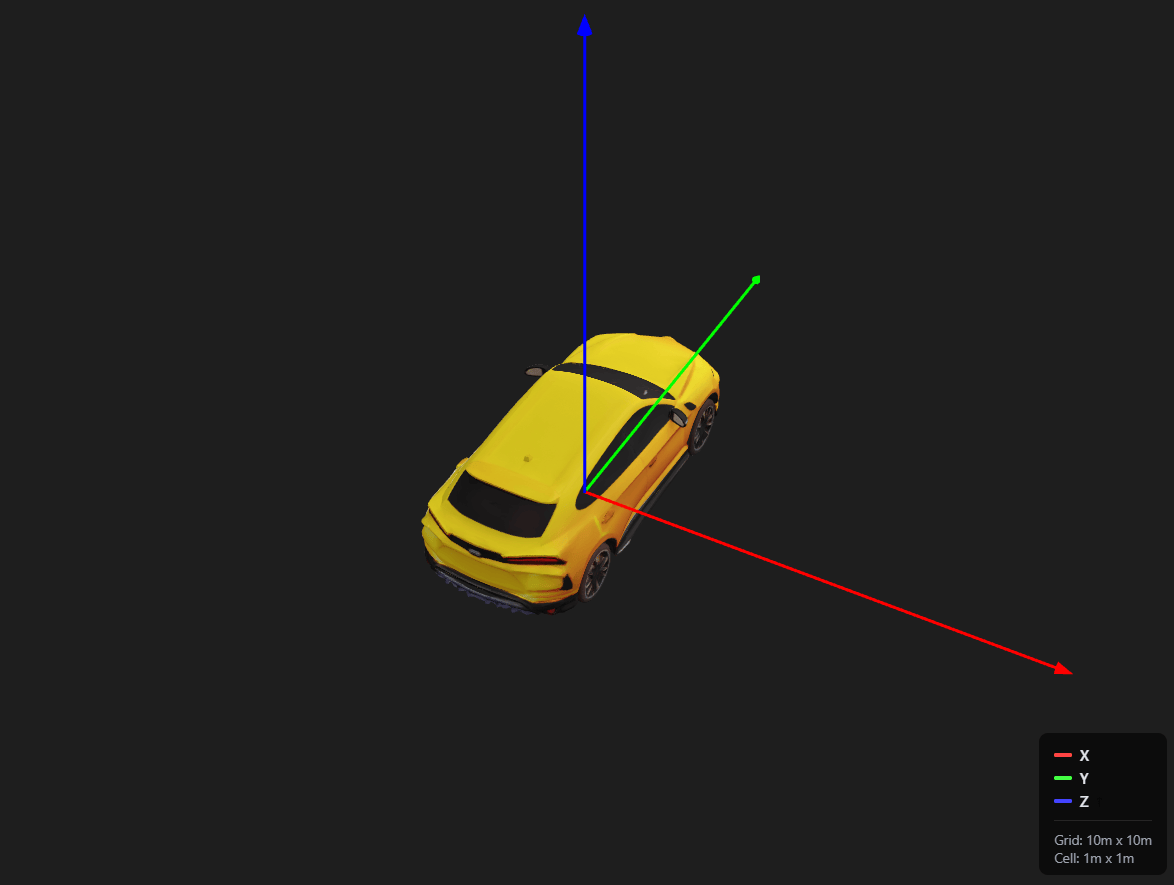
Rotate the vehicle asset by using the
rotatefunction. The forward direction of the generated vehicle asset is along the negative Y-axis, but forward must be along the positive Y-axis for use in RoadRunner. This example rotates the vehicle asset by 180 degrees along the Y-axis.Scale the vehicle asset by using the
resizefunction. This example scales the vehicle asset to a length of 4 meters.Translate the vehicle asset by using the
translatefunction. This example translates the vehicle asset so that the bottom of the mesh is at the ground plane.
assetVehicle = load("vehicleMesh.mat").vehicleMesh;
rotate(assetVehicle,deg2rad([0 0 180]))
resize(assetVehicle,[NaN 4 NaN],Uniform=true)
translate(assetVehicle,[0 0 -assetVehicle.Bounds(1,3)])
Display the vehicle asset.
show(assetVehicle,Axes=true)
Segment Vehicle Wheels and Save Asset for RoadRunner
Segment the wheels from the vehicle mesh by using the asset3d.segmentMeshSDF function. Since this method uses random initial values for segmentation, a seed is set for reproducibility.
Note: This section of the example can also be done interactively using the Asset Generator app. Refer Transform, Segment, and Export 3D Assets Using Asset Generator for more information.
[labels,nSeg] = asset3d.segmentMeshSDF(assetVehicle,NumComponents=5,BoundarySmoothness=19,SmoothingIterations=5,Seed=249467215);
Display the segmented asset by using the asset3d.showSegments function to identify which segments correspond to wheels.
showSegments(asset3d,assetVehicle,labels)
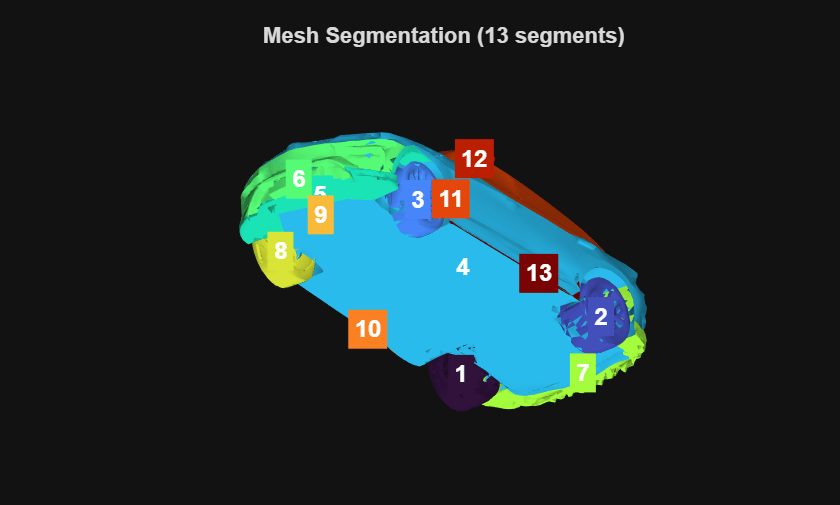
From the segmented view, segments 8, 3, 1, and 2 correspond to the wheels of the vehicle. RoadRunner expects wheels named as "wheel01" (Front Left), "wheel02" (Front Right), "wheel03" (Back Left), and "wheel04" (Back Right). Map the segment IDs to the correct wheel names.
wheelIDs = [8 3 1 2];
wheelNames = ["wheel01" "wheel02" "wheel03" "wheel04"];
Create a vehicle scene from the segmented wheels by using the Scene object. Each body and wheels submesh must have its origin at the geometric center. Move the origin of each submesh to its geometric center and perform node transformation by using the helperAddVehiclePart helper function.
vehicleScene = asset3d.Scene(BaseFrame="Vehicle");
for i = 1:numel(wheelIDs)
    helperAddVehiclePart(vehicleScene,assetVehicle.submesh(find(labels == wheelIDs(i))),wheelNames(i));
end
helperAddVehiclePart(vehicleScene,assetVehicle.submesh(find(~ismember(labels,wheelIDs))),"body");
Inspect the vehicle by using the show function with the Explode argument set to true to visualize the segments in an exploded view.
show(vehicleScene,Explode=true,ExplodeVector=[0 0 -2])
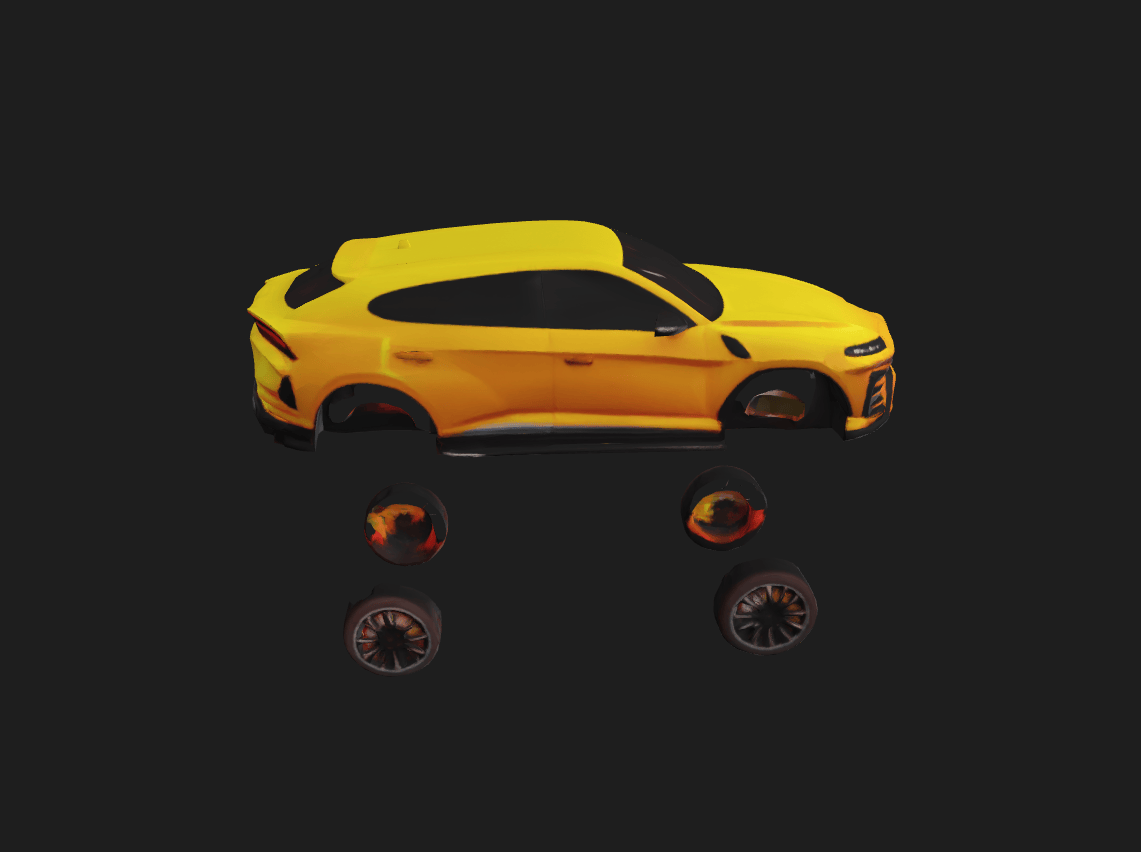
Save the vehicle scene as vehicle.glb in the GenAIAssets directory by using the asset3d.write function.
assetFileVehicle = fullfile(assetDir,"vehicle.glb");
asset3d.write(vehicleScene,assetFileVehicle,UpAxis="Y")
Import Trajectory and Simulate RoadRunner Scenario
To simulate the scenario in RoadRunner, the vehicle asset must be associated with a trajectory.
Load the vehicle trajectory data into the workspace and create a trajectory object from the loaded data by using the recordedSensorData function.
load("VehicleTraj.mat");
vehicleTraj = recordedSensorData("trajectory",egoTrajectory.timestamps,egoTrajectory.position)
vehicleTraj =
  Trajectory with properties:

               Name: ''

         NumSamples: 401
           Duration: 20
         SampleRate: 20.0500
         SampleTime: 0.0500
         Timestamps: [401×1 double]

           Position: [401×3 double]
        Orientation: [401×3 double]
           Velocity: [401×3 double]
             Course: [401×1 double]
        GroundSpeed: [401×1 double]
       Acceleration: [401×3 double]
    AngularVelocity: [401×3 double]

        LocalOrigin: [0 0 0]
         TimeOrigin: 0

         Attributes: []
Associate the vehicle asset with the trajectory and export it to RoadRunner by using the exportToRoadRunner function of the Trajectory object.
exportToRoadRunner(vehicleTraj,rrApp,AssetPath=assetFileVehicle)
ans =
  roadrunner with properties:

    InstallationFolder: "C:/Program Files/RoadRunner R2026a/bin/win64"
               Version: "R2026a Update 3 (1.12.3.d765fc513d3)"
             NoDisplay: 0
             NoDesktop: 0
Create a scenario simulation object for the current RoadRunner scenario by using the createSimulation function.
rrSim = createSimulation(rrApp);
Define the simulation parameters of RoadRunner Scenario. Specify the maximum simulation time as 20 seconds and step size as 0.05. To plot the simulation results, enable data logging.
endTime = 20;
set(rrSim,MaxSimulationTime=endTime)
set(rrSim,StepSize=0.05)
set(rrSim,Logging="on")
Run the simulation and wait for the simulation to complete.
set(rrSim,SimulationCommand="Start")
while strcmp(get(rrSim,"SimulationStatus"),"Running")
    pause(1)
end
To view the scenario from the ego vehicle view or chase view, in the RoadRunner Simulation pane, in the Camera section, set Camera View to Follow or Front. The Actor attribute is set to vehicle by default, which is the ego vehicle for this scenario.
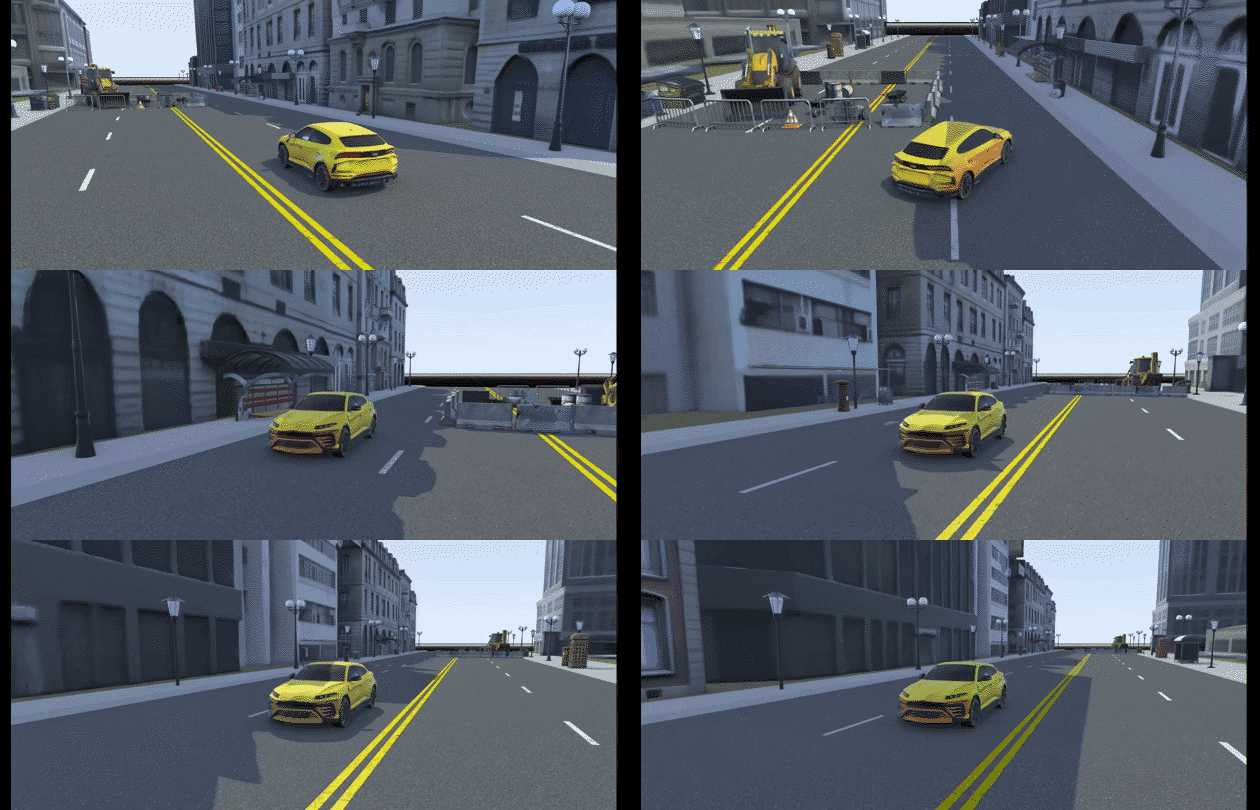
This figure shows a scenario created in RoadRunner that contains the imported 3D vehicle asset and multiple static assets such as traffic cones, post boxes, barriers, trees, and traffic lamps.