rigidBodyTree
Create tree-structured robot
Description
The rigidBodyTree is a representation of the connectivity
of rigid bodies with joints. Use this class to build robot manipulator models in
MATLAB®. If you have a robot model specified using the Unified Robot Description
Format (URDF), use importrobot to import your robot
model.
A rigid body tree model is made up of rigid bodies as rigidBody objects. Each rigid body has a rigidBodyJoint object associated with it that defines how it can move
relative to its parent body. Use setFixedTransform to define the fixed transformation between the frame of
a joint and the frame of one of the adjacent bodies. You can add, replace, or remove
rigid bodies from the model using the methods of the RigidBodyTree
class.
Robot dynamics calculations are also possible. Specify the Mass,
CenterOfMass, and Inertia properties for each
rigidBody in the robot model. You can
calculate forward and inverse dynamics with or without external forces and compute
dynamics quantities given robot joint motions and joint inputs. To use the
dynamics-related functions, set the DataFormat property to
"row" or "column".
For a given rigid body tree model, you can also use the robot model to calculate joint
angles for desired end-effector positions using the robotics inverse kinematics
algorithms. Specify your rigid body tree model when using inverseKinematics or generalizedInverseKinematics.
The show method supports visualization of
body meshes. Meshes are specified as .stl files and can be added to
individual rigid bodies using addVisual. Also, by default, the importrobot function loads all the accessible .stl
files specified in your URDF robot model.
Creation
Description
robot = rigidBodyTreeaddBody.
robot = rigidBodyTree("MaxNumBodies",N,"DataFormat",dataFormat)DataFormat
property as a name-value pair.
Properties
This property is read-only.
Number of bodies in the robot model (not including the base), returned as an integer.
This property is read-only.
List of rigid bodies in the robot model, returned as a cell array of
handles. Use this list to access specific RigidBody
objects in the model. You can also call getBody to get a body by
its name.
This property is read-only.
Names of rigid bodies, returned as a cell array of character vectors.
This property is read-only.
Name of frames on rigid body tree, specified as a cell array. The cell contains the base frame name of the rigid body tree by default.
Name of robot base, returned as a string scalar or character vector.
Gravitational acceleration experienced by robot, specified as an
[x y z] vector in meters per second squared. Each
element corresponds to the acceleration of the base robot frame in that
direction.
Input/output data format for kinematics and dynamics functions, specified
as "struct", "row", or
"column". To use dynamics functions, you must use
either "row" or "column".
Object Functions
centerOfMass | Center of mass position and Jacobian |
externalForce | Compose external force matrix relative to base |
forwardDynamics | Joint accelerations given joint torques and states |
geometricJacobian | Geometric Jacobian for robot configuration |
gravityTorque | Joint torques that compensate gravity |
inverseDynamics | Required joint torques for given motion |
massMatrix | Joint-space mass matrix |
velocityProduct | Joint torques that cancel velocity-induced forces |
getTransform | Get transform between body frames |
homeConfiguration | Get home configuration of robot |
randomConfiguration | Generate random configuration of robot |
checkCollision | Check if robot is in collision |
addBody | Add body to robot |
addSubtree | Add subtree to robot |
getBody | Get robot body handle by name |
removeBody | Remove body from robot |
replaceBody | Replace body on robot |
replaceJoint | Replace joint on body |
subtree | Create subtree from robot model |
copy | Copy robot model |
show | Show robot model in figure |
showdetails | Show details of robot model |
writeAsFunction | Create rigidBodyTree code generating function |
Examples
Add a rigid body and corresponding joint to a rigid body tree. Each rigidBody object contains a rigidBodyJoint object and must be added to the rigidBodyTree using addBody.
Create a rigid body tree.
rbtree = rigidBodyTree;
Create a rigid body with a unique name.
body1 = rigidBody('b1');Create a revolute joint. By default, the rigidBody object comes with a fixed joint. Replace the joint by assigning a new rigidBodyJoint object to the body1.Joint property.
jnt1 = rigidBodyJoint('jnt1','revolute');
body1.Joint = jnt1;
Add the rigid body to the tree. Specify the body name that you are attaching the rigid body to. Because this is the first body, use the base name of the tree.
basename = rbtree.BaseName;
addBody(rbtree,body1,basename)
Use showdetails on the tree to confirm the rigid body and joint were added properly.
showdetails(rbtree)
--------------------
Robot: (1 bodies)

 Idx    Body Name   Joint Name   Joint Type    Parent Name(Idx)   Children Name(s)
 ---    ---------   ----------   ----------    ----------------   ----------------
   1           b1         jnt1     revolute             base(0)
--------------------
Use the Denavit-Hartenberg (DH) parameters of the Puma560® robot to build a robot. Each rigid body is added one at a time, with the child-to-parent transform specified by the joint object.
The DH parameters define the geometry of the robot with relation to how each rigid body is attached to its parent. For convenience, setup the parameters for the Puma560 robot in a matrix [1]. The Puma robot is a serial chain manipulator. The DH parameters are relative to the previous row in the matrix, corresponding to the previous joint attachment.
dhparams = [0   	pi/2	0   	0;
            0.4318	0       0       0
            0.0203	-pi/2	0.15005	0;
            0   	pi/2	0.4318	0;
            0       -pi/2	0   	0;
            0       0       0       0];
Create a rigid body tree object to build the robot.
robot = rigidBodyTree;
Create the first rigid body and add it to the robot. To add a rigid body:
Create a
rigidBodyobject and give it a unique name.Create a
rigidBodyJointobject and give it a unique name.Use
setFixedTransformto specify the body-to-body transformation using DH parameters. The last element of the DH parameters,theta, is ignored because the angle is dependent on the joint position.Call
addBodyto attach the first body joint to the base frame of the robot.
body1 = rigidBody('body1');
jnt1 = rigidBodyJoint('jnt1','revolute');

setFixedTransform(jnt1,dhparams(1,:),'dh');
body1.Joint = jnt1;

addBody(robot,body1,'base')
Create and add other rigid bodies to the robot. Specify the previous body name when calling addBody to attach it. Each fixed transform is relative to the previous joint coordinate frame.
body2 = rigidBody('body2');
jnt2 = rigidBodyJoint('jnt2','revolute');
body3 = rigidBody('body3');
jnt3 = rigidBodyJoint('jnt3','revolute');
body4 = rigidBody('body4');
jnt4 = rigidBodyJoint('jnt4','revolute');
body5 = rigidBody('body5');
jnt5 = rigidBodyJoint('jnt5','revolute');
body6 = rigidBody('body6');
jnt6 = rigidBodyJoint('jnt6','revolute');

setFixedTransform(jnt2,dhparams(2,:),'dh');
setFixedTransform(jnt3,dhparams(3,:),'dh');
setFixedTransform(jnt4,dhparams(4,:),'dh');
setFixedTransform(jnt5,dhparams(5,:),'dh');
setFixedTransform(jnt6,dhparams(6,:),'dh');

body2.Joint = jnt2;
body3.Joint = jnt3;
body4.Joint = jnt4;
body5.Joint = jnt5;
body6.Joint = jnt6;

addBody(robot,body2,'body1')
addBody(robot,body3,'body2')
addBody(robot,body4,'body3')
addBody(robot,body5,'body4')
addBody(robot,body6,'body5')
Verify that your robot was built properly by using the showdetails or show function. showdetails lists all the bodies in the MATLAB® command window. show displays the robot with a given configuration (home by default). Calls to axis modify the axis limits and hide the axis labels.
showdetails(robot)
--------------------
Robot: (6 bodies)

 Idx    Body Name   Joint Name   Joint Type    Parent Name(Idx)   Children Name(s)
 ---    ---------   ----------   ----------    ----------------   ----------------
   1        body1         jnt1     revolute             base(0)   body2(2)
   2        body2         jnt2     revolute            body1(1)   body3(3)
   3        body3         jnt3     revolute            body2(2)   body4(4)
   4        body4         jnt4     revolute            body3(3)   body5(5)
   5        body5         jnt5     revolute            body4(4)   body6(6)
   6        body6         jnt6     revolute            body5(5)
--------------------
show(robot);
axis([-0.5,0.5,-0.5,0.5,-0.5,0.5])
axis off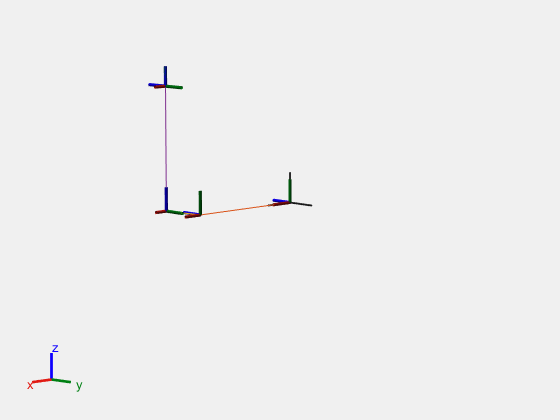
References
[1] Corke, P. I., and B. Armstrong-Helouvry. “A Search for Consensus among Model Parameters Reported for the PUMA 560 Robot.” Proceedings of the 1994 IEEE International Conference on Robotics and Automation, IEEE Computer. Soc. Press, 1994, pp. 1608–13. DOI.org (Crossref), doi:10.1109/ROBOT.1994.351360.
Make changes to an existing rigidBodyTree object. You can get replace joints, bodies and subtrees in the rigid body tree.
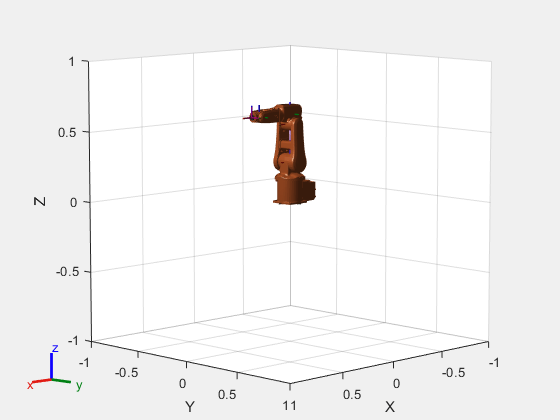
Load an ABB IRB-120T manipulator from the Robotics System Toolbox™ loadrobot. It is specified as a rigidBodyTree object.
manipulator = loadrobot("abbIrb120T");View the robot with show and read the details of the robot using showdetails.
show(manipulator);
showdetails(manipulator)
--------------------
Robot: (8 bodies)

 Idx     Body Name            Joint Name            Joint Type     Parent Name(Idx)   Children Name(s)
 ---     ---------            ----------            ----------     ----------------   ----------------
   1          base        base_link-base                 fixed         base_link(0)
   2        link_1               joint_1              revolute         base_link(0)   link_2(3)
   3        link_2               joint_2              revolute            link_1(2)   link_3(4)
   4        link_3               joint_3              revolute            link_2(3)   link_4(5)
   5        link_4               joint_4              revolute            link_3(4)   link_5(6)
   6        link_5               joint_5              revolute            link_4(5)   link_6(7)
   7        link_6               joint_6              revolute            link_5(6)   tool0(8)
   8         tool0          joint6-tool0                 fixed            link_6(7)
--------------------
Get a specific body to inspect the properties. The only child of the link_3 body is the link_4 body. You can copy a specific body as well.
body3 = getBody(manipulator,"link_3");
childBody = body3.Children{1}
childBody =
rigidBody with properties:
Name: 'link_4'
Joint: [1×1 rigidBodyJoint]
Mass: 1.3280
CenterOfMass: [0.2247 1.5000e-04 4.1000e-04]
Inertia: [0.0028 0.0711 0.0723 1.3052e-05 -1.3878e-04 -6.6037e-05]
Parent: [1×1 rigidBody]
Children: {[1×1 rigidBody]}
Visuals: {'Mesh Filename link_4.stl'}
Collisions: {'Mesh Filename link_4.stl'}
FrameNames: {'link_4'}
ParentFrame: 'link_3'
body3Copy = copy(body3);
Replace the joint on the link_3 body. You must create a new Joint object and use replaceJoint to ensure the downstream body geometry is unaffected. Call setFixedTransform if necessary to define a transform between the bodies instead of with the default identity matrices.
newJoint = rigidBodyJoint("prismatic");
replaceJoint(manipulator,"link_3",newJoint);

showdetails(manipulator)
--------------------
Robot: (8 bodies)

 Idx     Body Name            Joint Name            Joint Type     Parent Name(Idx)   Children Name(s)
 ---     ---------            ----------            ----------     ----------------   ----------------
   1          base        base_link-base                 fixed         base_link(0)
   2        link_1               joint_1              revolute         base_link(0)   link_2(3)
   3        link_2               joint_2              revolute            link_1(2)   link_3(4)
   4        link_3             prismatic                 fixed            link_2(3)   link_4(5)
   5        link_4               joint_4              revolute            link_3(4)   link_5(6)
   6        link_5               joint_5              revolute            link_4(5)   link_6(7)
   7        link_6               joint_6              revolute            link_5(6)   tool0(8)
   8         tool0          joint6-tool0                 fixed            link_6(7)
--------------------
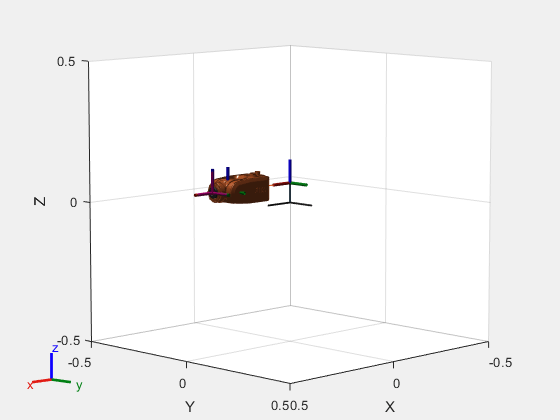
Remove an entire body and get the resulting subtree using removeBody. The removed body is included in the subtree.
subtree = removeBody(manipulator,"link_4")subtree =
rigidBodyTree with properties:
NumBodies: 4
Bodies: {[1×1 rigidBody] [1×1 rigidBody] [1×1 rigidBody] [1×1 rigidBody]}
Base: [1×1 rigidBody]
BodyNames: {'link_4' 'link_5' 'link_6' 'tool0'}
BaseName: 'link_3'
Gravity: [0 0 0]
DataFormat: 'struct'
FrameNames: {'link_3' 'link_4' 'link_5' 'link_6' 'tool0'}
show(subtree);
Remove the modified link_3 body. Add the original copied link_3 body to the link_2 body, followed by the returned subtree. The robot model remains the same. See a detailed comparison through showdetails.
removeBody(manipulator,"link_3");
addBody(manipulator,body3Copy,"link_2")
addSubtree(manipulator,"link_3",subtree)

showdetails(manipulator)
--------------------
Robot: (8 bodies)

 Idx     Body Name            Joint Name            Joint Type     Parent Name(Idx)   Children Name(s)
 ---     ---------            ----------            ----------     ----------------   ----------------
   1          base        base_link-base                 fixed         base_link(0)
   2        link_1               joint_1              revolute         base_link(0)   link_2(3)
   3        link_2               joint_2              revolute            link_1(2)   link_3(4)
   4        link_3               joint_3              revolute            link_2(3)   link_4(5)
   5        link_4               joint_4              revolute            link_3(4)   link_5(6)
   6        link_5               joint_5              revolute            link_4(5)   link_6(7)
   7        link_6               joint_6              revolute            link_5(6)   tool0(8)
   8         tool0          joint6-tool0                 fixed            link_6(7)
--------------------
To use dynamics functions to calculate joint torques and accelerations, specify the dynamics properties for the rigidBodyTree object and rigidBody.
Create a rigid body tree model. Create two rigid bodies to attach to it.
robot = rigidBodyTree('DataFormat','row');
body1 = rigidBody('body1');
body2 = rigidBody('body2');
Specify joints to attach to the bodies. Set the fixed transformation of body2 to body1. This transform is 1m in the x-direction.
joint1 = rigidBodyJoint('joint1','revolute');
joint2 = rigidBodyJoint('joint2');
setFixedTransform(joint2,trvec2tform([1 0 0]))
body1.Joint = joint1;
body2.Joint = joint2;
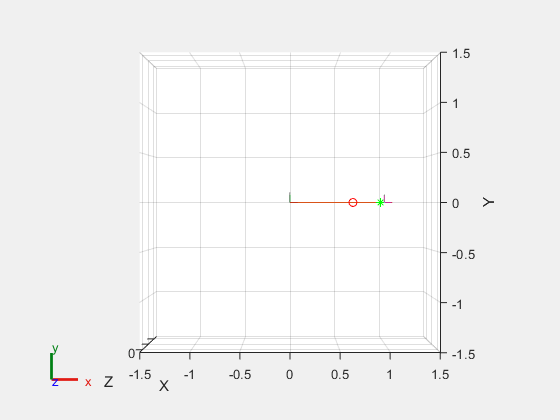
Specify dynamics properties for the two bodies. Add the bodies to the robot model. For this example, basic values for a rod (body1) with an attached spherical mass (body2) are given.
body1.Mass = 2;
body1.CenterOfMass = [0.5 0 0];
body1.Inertia = [0.001 0.67 0.67 0 0 0];

body2.Mass = 1;
body2.CenterOfMass = [0 0 0];
body2.Inertia = 0.0001*[4 4 4 0 0 0];

addBody(robot,body1,'base');
addBody(robot,body2,'body1');
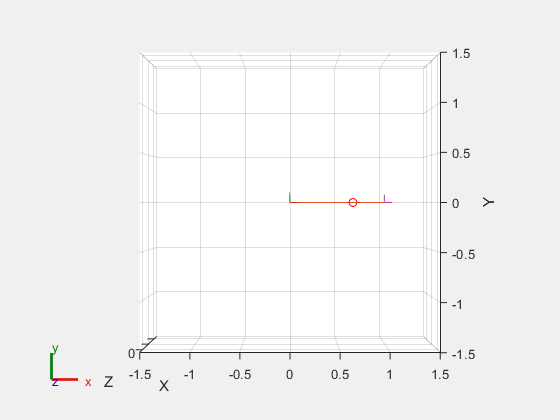
Compute the center of mass position of the whole robot. Plot the position on the robot. Move the view to the xy plane.
comPos = centerOfMass(robot);

show(robot);
hold on
plot(comPos(1),comPos(2),'or')
view(2)
Change the mass of the second body. Notice the change in center of mass.
body2.Mass = 20;
replaceBody(robot,'body2',body2)

comPos2 = centerOfMass(robot);
plot(comPos2(1),comPos2(2),'*g')
hold off
Calculate the resultant joint accelerations for a given robot configuration with applied external forces and forces due to gravity. A wrench is applied to a specific body with the gravity being specified for the whole robot.
Load a KUKA iiwa 14 robot model from the Robotics System Toolbox™ loadrobot. The robot is specified as a rigidBodyTree object.
Set the data format to "row". For all dynamics calculations, the data format must be either "row" or "column".
Set the gravity. By default, gravity is assumed to be zero.
kukaIIWA14 = loadrobot("kukaIiwa14",DataFormat="row",Gravity=[0 0 -9.81]);
Get the home configuration for the kukaIIWA14 robot.
q = homeConfiguration(kukaIIWA14);
Specify the wrench vector that represents the external forces experienced by the robot. Use the externalForce function to generate the external force matrix. Specify the robot model, the end effector that experiences the wrench, the wrench vector, and the current robot configuration. wrench is given relative to the "iiwa_link_ee_kuka" body frame, which requires you to specify the robot configuration, q.
wrench = [0 0 0.5 0 0 0.3];
fext = externalForce(kukaIIWA14,"iiwa_link_ee_kuka",wrench,q);
Compute the resultant joint accelerations due to gravity, with the external force applied to the end-effector "iiwa_link_ee_kuka" when kukaIIWA14 is at its home configuration. The joint velocities and joint torques are assumed to be zero (input as an empty vector []).
qddot = forwardDynamics(kukaIIWA14,q,[],[],fext)
qddot = 1×7

   -0.0023   -0.0112    0.0036   -0.0212    0.0067   -0.0075  499.9920
Use the inverseDynamics function to calculate the required joint torques to statically hold a specific robot configuration. You can also specify the joint velocities, joint accelerations, and external forces using other syntaxes.
Load an Omron eCobra-600 from the Robotics System Toolbox™ loadrobot, specified as a rigidBodyTree object. Set the gravity property and ensure the data format is set to "row". For all dynamics calculations, the data format must be either "row" or "column".
robot = loadrobot("omronEcobra600", DataFormat="row", Gravity=[0 0 -9.81]);
Generate a random configuration for robot.
q = randomConfiguration(robot);
Compute the required joint torques for robot to statically hold that configuration.
tau = inverseDynamics(robot,q)
tau = 1×4

    0.0000    0.0000  -19.6200         0
Use the externalForce function to generate force matrices to apply to a rigid body tree model. The force matrix is an m-by-6 vector that has a row for each joint on the robot to apply a six-element wrench. Use the externalForce function and specify the end effector to properly assign the wrench to the correct row of the matrix. You can add multiple force matrices together to apply multiple forces to one robot.
To calculate the joint torques that counter these external forces, use the inverseDynamics function.
Load a Universal Robots UR5e from the Robotics System Toolbox™ loadrobot, specified as a rigidBodyTree object. Update the gravity and set the data format to "row". For all dynamics calculations, the data format must be either "row" or "column"
manipulator = loadrobot("universalUR5e", DataFormat="row", Gravity=[0 0 -9.81]);
showdetails(manipulator)
--------------------
Robot: (10 bodies)

 Idx                Body Name                         Joint Name                         Joint Type                Parent Name(Idx)   Children Name(s)
 ---                ---------                         ----------                         ----------                ----------------   ----------------
   1                     base         base_link-base_fixed_joint                              fixed                    base_link(0)
   2        base_link_inertia        base_link-base_link_inertia                              fixed                    base_link(0)   shoulder_link(3)
   3            shoulder_link                 shoulder_pan_joint                           revolute            base_link_inertia(2)   upper_arm_link(4)
   4           upper_arm_link                shoulder_lift_joint                           revolute                shoulder_link(3)   forearm_link(5)
   5             forearm_link                        elbow_joint                           revolute               upper_arm_link(4)   wrist_1_link(6)
   6             wrist_1_link                      wrist_1_joint                           revolute                 forearm_link(5)   wrist_2_link(7)
   7             wrist_2_link                      wrist_2_joint                           revolute                 wrist_1_link(6)   wrist_3_link(8)
   8             wrist_3_link                      wrist_3_joint                           revolute                 wrist_2_link(7)   flange(9)
   9                   flange                     wrist_3-flange                              fixed                 wrist_3_link(8)   tool0(10)
  10                    tool0                       flange-tool0                              fixed                       flange(9)
--------------------
Get the home configuration for manipulator.
q = homeConfiguration(manipulator);
Set external force on shoulder_link. The input wrench vector is expressed in the base frame.
fext1 = externalForce(manipulator,"shoulder_link",[0 0 0.0 0.1 0 0]);Set external force on the end effector, tool0. The input wrench vector is expressed in the tool0 frame.
fext2 = externalForce(manipulator,"tool0",[0 0 0.0 0.1 0 0],q);Compute the joint torques required to balance the external forces. To combine the forces, add the force matrices together. Joint velocities and accelerations are assumed to be zero (input as []).
tau = inverseDynamics(manipulator,q,[],[],fext1+fext2)
tau = 1×6

   -0.0233  -52.4189  -14.4896   -0.0100    0.0100    0.0000
You can import robots that have .stl files associated with the Unified Robot Description format (URDF) file to describe the visual geometries of the robot. Each rigid body has an individual visual geometry specified. The importrobot function parses the URDF file to get the robot model and visual geometries. The function assumes that visual geometry and collision geometry of the robot are the same and assigns the visual geometries as collision geometries of corresponding bodies.
Use the show function to display the visual and collision geometries of the robot model in a figure. You can then interact with the model by clicking components to inspect them and right-clicking to toggle visibility.
Import a robot model as a URDF file. The .stl file locations must be properly specified in this URDF. To add other .stl files to individual rigid bodies, see addVisual.
robot = importrobot('iiwa14.urdf');Visualize the robot with the associated visual model. Click bodies or frames to inspect them. Right-click bodies to toggle visibility for each visual geometry.
show(robot,Visuals="on",Collisions="off");

Visualize the robot with the associated collision geometries. Click bodies or frames to inspect them. Right-click bodies to toggle visibility for each collision geometry.
show(robot,Visuals="off",Collisions="on");

More About
When working with robot dynamics, specify the information for individual bodies of your manipulator robot using these properties of the rigidBody objects:
Mass— Mass of the rigid body in kilograms.CenterOfMass— Center of mass position of the rigid body, specified as a vector of the form[x y z]. The vector describes the location of the center of mass of the rigid body, relative to the body frame, in meters. ThecenterOfMassobject function uses these rigid body property values when computing the center of mass of a robot.Inertia— Inertia of the rigid body, specified as a vector of the form[Ixx Iyy Izz Iyz Ixz Ixy]. The vector is relative to the body frame in kilogram square meters. The inertia tensor is a positive definite matrix of the form:
The first three elements of the
Inertiavector are the moment of inertia, which are the diagonal elements of the inertia tensor. The last three elements are the product of inertia, which are the off-diagonal elements of the inertia tensor.
For information related to the entire manipulator robot model, specify these rigidBodyTree object properties:
Gravity— Gravitational acceleration experienced by the robot, specified as an[x y z]vector in m/s2. By default, there is no gravitational acceleration.DataFormat— The input and output data format for the kinematics and dynamics functions, specified as"struct","row", or"column".
Manipulator rigid body dynamics are governed by this equation:
also written as:
where:
— is a joint-space mass matrix based on the current robot configuration. Calculate this matrix by using the
massMatrixobject function.— are the Coriolis terms, which are multiplied by to calculate the velocity product. Calculate the velocity product by using by the
velocityProductobject function.— is the gravity torques and forces required for all joints to maintain their positions in the specified gravity
Gravity. Calculate the gravity torque by using thegravityTorqueobject function.— is the geometric Jacobian for the specified joint configuration. Calculate the geometric Jacobian by using the
geometricJacobianobject function.— is a matrix of the external forces applied to the rigid body. Generate external forces by using the
externalForceobject function.— are the joint torques and forces applied directly as a vector to each joint.
— are the joint configuration, joint velocities, and joint accelerations, respectively, as individual vectors. For revolute joints, specify values in radians, rad/s, and rad/s2, respectively. For prismatic joints, specify in meters, m/s, and m/s2.
To compute the dynamics directly, use the forwardDynamics object function. The function calculates the joint accelerations for the specified combinations of the above inputs.
To achieve a certain set of motions, use the inverseDynamics object function. The function calculates the joint torques required to achieve the specified configuration, velocities, accelerations, and external forces.
References
[1] Craig, John J. Introduction to Robotics: Mechanics and Control. Reading, MA: Addison-Wesley, 1989.
[2] Siciliano, Bruno, Lorenzo Sciavicco, Luigi Villani, and Giuseppe Oriolo. Robotics: Modelling, Planning and Control. London: Springer, 2009.
Extended Capabilities
Usage notes and limitations:
When creating the rigidBodyTree object, use the syntax that specifies the
MaxNumBodies as an upper bound for adding bodies to the robot model.
You must also specify the DataFormat property as a name-value pair. For
example:
robot = rigidBodyTree("MaxNumBodies",15,"DataFormat","row")
To minimize data usage, limit the upper bound to a number close to the expected number of bodies in the model. All data formats are supported for code generation. To use the dynamics functions, the data format must be set to "row" or "column".
The show and showdetails functions do not support code generation.
Version History
Introduced in R2016bThe FrameNames property of the rigidBodyTree object allows you to
view the name of frames on the rigid body tree, specified as a cell array.
These rigidBodyTree object functions now
support static memory sizes for code generation by disabling dynamic memory
allocation.
For more information about disabling dynamic memory allocation, see Set Dynamic Memory Allocation Threshold (MATLAB Coder).
The rigidBodyTree object was renamed from
robotics.RigidBodyTree. Use rigidBodyTree
for all object creation.
See Also
importrobot | inverseKinematics | generalizedInverseKinematics | rigidBodyJoint | rigidBody
Topics
External Websites
MATLAB Command
You clicked a link that corresponds to this MATLAB command:
Run the command by entering it in the MATLAB Command Window. Web browsers do not support MATLAB commands.
选择网站
选择网站以获取翻译的可用内容,以及查看当地活动和优惠。根据您的位置,我们建议您选择:。
您也可以从以下列表中选择网站:
如何获得最佳网站性能
选择中国网站(中文或英文)以获得最佳网站性能。其他 MathWorks 国家/地区网站并未针对您所在位置的访问进行优化。
美洲
- América Latina (Español)
- Canada (English)
- United States (English)
欧洲
- Belgium (English)
- Denmark (English)
- Deutschland (Deutsch)
- España (Español)
- Finland (English)
- France (Français)
- Ireland (English)
- Italia (Italiano)
- Luxembourg (English)
- Netherlands (English)
- Norway (English)
- Österreich (Deutsch)
- Portugal (English)
- Sweden (English)
- Switzerland
- United Kingdom (English)